Since moving back to the family farm, I haven't been able to do a lot of crafting. I have, however, been finding all sorts of potential crafting materials!
Years ago, I had to drop what had been an annual Christmas tradition: hand making ornaments, for our tree and for gift giving.
This year, I've finally started this up again, collaborating with one of my daughters.
I've been pruning a lot of trees over the past two summers, plus cleaning up storm damage and taking out dead and dying trees. Some of this, I've been setting aside specifically to use as crafting material in the future.
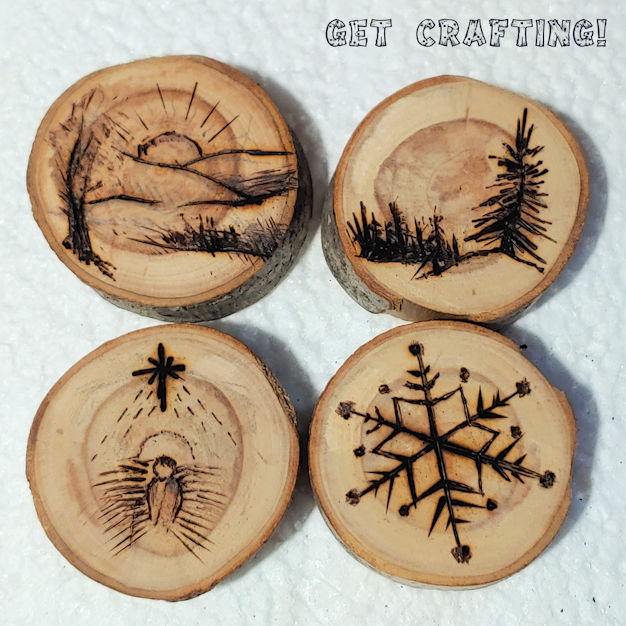
The wood slices I am using for these ornaments are from crab apple tree branches I pruned last year. I cut some fairly thick discs and, little by little, sanded some of them smooth. Since this is an experiment, for the most part, I started with only 4 slices.
I penciled in some sketches, in some places using the colours and shapes that were already in the wood in planning the designs.
I broke out my wood burning tools for the first time in ages.
Since I was out of practice, I started with the simplest design - the snowflake - and worked my way through. I used the same wedge shaped tip for all of this, though I really should have changed tips for things like shading. I wasn't too worried about the detail, though, because after the designs were burned in, I passed them on to my daughter to paint. She questioned me on what I had in mind, which was mostly just using white to highlight details, but mostly, I just left it to her.
This is the result!
I love her use of the gold!
Once the paint was dry, I screwed in tiny eyelets. At this point, we could just add wire hangers that we already have and call them done, or I might string on hanging cords and add other small decorative elements.
If it works out, I've got a whole bunch of apple wood slices just waiting to be sanded, to make more. :-)
As usual, real life has made blogging here rather sparse!
I have, however, actually managed to get some crafting done, in between moving my office/craft room to another room.
One of the things I recently finished, having put it aside to complete other projects, is something I intended to use as a chair seat cover.
Our cat has other ideas.
In moving back to the family farm, we are using some of the furniture that was already here, including the mish-mash of dining chairs. All of which have big granny squares my mother made, covering the seats and some of the backs, as well. Unfortunately, my mother did not have access to good yarn. She also used whatever scraps were at hand. So... they're a little hard on the eyes.
I was entertaining the thought of replacing them with different covers, all using the same yarn - blanket yarn was used in my tester - and done in a dense waffle weave stitch.
No, not waffle stitch. Waffle weave stitch. I found the stitch featured in a crochet magazine some time ago, and have since seen it with a different name. I've completely forgotten what that name was. I was, however, able to find a tutorial for a waffle weave baby blanket, so here it is.
The end result is a very thick, insulating fabric. I ended up using the stitch to make a scarf, headband and hat set for a friend. They are incredibly warm; perfect for the blistering cold temperatures we've had this winter!
As a note about working up a hat; the stitch can be done in the round, but the work must be turned after joining each round. Which makes working from the bottom up, much more practical. I normally work my hats top down.
It also helps to use a larger hook than you normally would for the yarn weight. I couldn't really do that for the blanket yarn I used for the test chair seat cover. I used a 10mm hook, because the next size up I have from that is 25mm, which I use mostly as a nostepinne when reballing yarn into centre pull cakes. If I'm going to do this stitch with this yarn again, I would need to pick up some larger hooks.
I don't think I'll be doing that. At least not to make chair seat covers. For the cost of yarn and amount of work involved, it would make more sense to just buy a set of chair pads. Especially since I would want to get some extra thick ones, to make it less painful for my husband to sit at the table.
I will definitely use this stitch for other things, though. The super thick fabric it makes would be perfect for things like hot pads, using cotton yarn. The insulating qualities makes it perfect for warm winter hats.