Pages

Showing posts with label Blast from the past. Show all posts

Thursday, September 8, 2011

Little pieces of history, part eight

This is the last piece in my series of fancywork that I inherited.

Hand made beauty

This piece is actually from Poland, and I have no idea as to its original source.  My mother explained to me that these were traditionally made to hang on walls.  You can see that this one spent some time on a wall somewhere, long enough to develop dots of rust from whatever was used to tack it up.

Hand made beauty

The central design is free style cross stitch with a bit of stem stitch for the arms and legs, and stem stitch and straight stitch for the facial details. Including the border, it measures about 29" x 21 3/4"

The border is a long strip of bobbin lace that has been back stitched to the hem.  You can see how it was folded to turn the corners in the above photo.  In one corner, there is a bit of repair to the back stitch - in a brown thread!

Aside from the dots of rust and a bit of wear, the embroidered cloth is in pretty good shape.  The lace, unfortunately, has quite a lot of damage. 

Personally, I find the design rather unattractive, and the skill it was worked in isn't very good.  The cross stitches are quite uneven, with some looking more like V's and Y's than X's.  At the back, you can see knots were tied at the start of the threads, while a lot of the ends don't seem to have been anchored at all.  I'm rather surprised they haven't come lose at the front, but I guess being a decorative wall hanging rather than something that saw use, like a table cloth, has saved it.

Though I don't particularly like it, I find it an interesting piece and imagine that whoever stitched it must still have been pretty proud to have it decorating their wall.


Tuesday, September 6, 2011

Little pieces of history, part six

Here we have another fantastic piece from my prolific and highly skilled great aunt.

Hand made beauty

This filet crochet runner is about 2 feet 10 inches long and about 15 inches wide.  The rose motif you see here is mirrored in the other half.


Hand made beauty

The simple edging matches the filet mesh very well.

I've looked over this piece thoroughly and there isn't a bit of damage of any kind on it.  It's in superb condition!  I know the piece must be quite old, but with the excellent condition and unfaded colour, it looks like it could have been finished last week!  I might want to give it a gentle cleaning and re-block it, just to straighten out the edges, but that's about it.

Monday, September 5, 2011

Little pieces of history, part five

I've got just a few pieces of fancywork to feature in this series.  This time, a ruffle edged doily.

Hand made beauty

This is another piece of thread crochet from my great aunt.  It had been starched and the ruffled edges are still quite stiffened.  It seems to have been packed away rather poorly over the years.  While the centre motif is in very good condition, with only a few stray wisps of thread coming loose where it appears a new thread had been started and the ends sewn in, the edging has quite a bit of damage.  Especially the white portion.  I would love to give this a thorough cleaning and get the starch out, but I don't know what would have been used.  Who knows how long ago it was starched in the first place?  About the only thing I can say for sure is that it was NOT stiffened with sugar.

Whatever it was, it gives the white threads an almost translucent quality.  I'm afraid that cleaning it might actually damage it even more.  There's no chance of repairing it, if it can be repaired at all, until the starch is removed.

I wonder if I should contact our local museum and see if there's someone there who can advise me.  They don't have a lot of stuff like this (their displays are mostly bead and leatherwork), but it wouldn't hurt to ask.  Or perhaps the Crochet Guild of America could give me some pointers.

Hmmm...

Thursday, August 25, 2011

Little pieces of history, part four

I've fallen behind on blogging about the wonderful pieces of fancywork I inherited.

I think this next piece is my favourite of them all. A gorgeous round tablecloth, just over 2 feet across, not counting the crocheted edging.

Hand made beauty

This is another piece from my great aunt. The fabric is thick and densely wove, and looks to be cotton. I got a little surprise when I examined it more closely for this post. A distictive numerical stamp on the back. I do believe this used to be some sort of sack! A flour or sugar sack, perhaps.


Hand made beauty

Here's a detail of the repeated floral motive. It is done in embroidery floss using satin stitch, stem stitch and French knots. The black marks that you see on the bottom are from what looks to be other numbers on the back, written in marker, that extend beyound the hem. The fabric was definitely repurprosed.

Hand made beauty

I just love this thread crochet border! There is some minor damage to a couple of lengths of chain that I have found, and a couple of dots of what looks to be rust, but aside from that, this piece is in suprisingly good condition. Very sturdy. I'm pretty sure I can fix the damage to the crochet myself, too, in such a way that it would not be noticable anymore. I just have to make sure I can match the thread, first.

The hem is something I find really remarkable about this piece. As you can see from the photo above, it has two rounds of machine stitch. Hemming something round is always a challange, so I'm impressed with how neat it is right from the start.

It's the back of the hem that has me fascinated! Looking at it, there's a bit more concern about the condition of the piece, and it will need gentle care.

The crochet edging was actually worked directly onto the fabric. It looks like a circle of single crochet was worked around the edge of the circle first, encasing about a quarter inch of fabric, but worked so that the top of the stitches faced *into* the work, instead of out. At least one more round of single crochet was worked after that, then there's a ring of double crochet worked around the edge, serving as the foundation for the rest of the edging, which is worked in rows.

The foundation portion of the edging is fastened down with basting stitches, the edge is folded under for the hem, then machine sewn, creating the hem and turning the crochet foundation to the outside of the piece at the same time. The very first round of single crochet is completely hidden in the back. This is the part that is showing some wear. You can see the loose ends of the weave through the crochet thread, and in a couple of places they've worked themselves out of the loops around them, leaving empty crochet stitches hanging around. Of the two rounds of machine stitch, the inside one used to just catch the edge of the hem, but as the ends worked themselves loose, very little of it is still attached. It's the outer ring of machine stitching that is holding the hem in place.

I can't tell if the edging was completed before or after the hem was turned and sewn. I would guess after, or the pulling on the fabric would have yanked the crochet foundation right out of the weave. Unless the fabric was cut *after* the crochet was worked. That's certainly possible. I would love to have seen it being worked.

It's a remarkable piece, and I just love it!

Monday, July 25, 2011

Little pieces of history, part three

Here's another piece of fancywork that was passed on to me. Unfortunately, I don't know a lot about the background of this piece.

(click on the images to be taken to my flickr page for larger images)

Hand made beauty

This tiny hankerchief has seen better days, I'm afraid. It's got a fair amount of damage and is quite fragile.

Hand made beauty

I added my gauge ruler so you can get an idea of how small it is. The border appears to be done in bobbin lace. The corners are worked into the lace pattern, not folded and turned, with a seam at one corner. Even with the damage, it's pretty remarkable work.

Hand made beauty

The embroidery is drawn thread work, with woven wheels done at the junctions.

With the fabric as thin and flimsy as it is, coupled with the damage, I have no way of judging how well done the original embroidery was.

I'm not sure how to handle this piece. I don't want it to get any more damaged. It might be worth searching out some specialists and find out.

Tuesday, July 12, 2011

Little pieces of history, part two

Here's another post featuring various items that my mother passed on to me during a recent trip out.

This next piece is a large, rectangular tablecloth. I don't know the exact dimensions, but it would easily cover a table large enough to seat six.

Hand made beauty

This piece was actually stitched by my cousin and godmother; the woman who inspired me to become a crafter with her gorgeous embroidered gifts I still treasure.

The piece is done with cotton embroidery floss on cotton or cotton blend cloth. The scalloped edge intrigues me. Usually, I see edges like this done in buttonhole stitch, with the design stitched inside the outer edge of the fabric, then the excess cut away, in the same matter as cutwork embroidery. The edging is not buttonhole stitch, however. It's looks like satin stitch worked around the edge. I can't see and won't be moving the threads around to look, but the outer curve of the scallops feel like they have been padded. That would certainly keep the edge stronger. What I can't tell is if the embroidered edge was stitched before or after the scalloped edge was cut. I will have to ask my cousin about it.


Hand made beauty

The middle of the cloth is framed with this stitched rectangle. The straight lines are done in a small, dense chain stitch. The two vertically placed motifs of this photo are at the centre of the rectangle's sides.

Unfortunately, from the flattened look of the embroidery, I think this has been ironed from the front instead of pressed from the back. Will have to fix that when I clean it.


Hand made beauty

Here's a detail of the motif. The stems are done in stem stitch with straight stitch leaves. For the flowers, the stamens are done in back stitch and French knots, with the petals and middles done in satin stitch.

I really love this piece! It's now the largest of my embroidered tablecloths, and I look forward to using it. :-)

Monday, July 11, 2011

Little pieces of history, part one

I have long had a passion for hand made items. Particularly items that are meant to be used. Aside from appreciating the time and skill required to make these items, I like how they can also connect us to the past. Even if I have no idea who made something or why, a piece of that person's hard work lives on.

While out in Manitoba a little while ago, my mother passed on a whole pile of items. Many of them belonged to her late aunt. Others had belonged to my mother's sister. When my aunt had to leave the farm and the property was sold, these items passed through several hands before making it to me, more than a year later! *L*

Over the next while, I'll be posting photos I took of the hand made pieces and telling a little about them. Most of them have seen a lot of years of use and some, sadly, have a fair amount of damage.

At this point, I have not done anything to them. They've been sitting in bags or boxes for a long time, and I've made no attempt yet to clean or press any of them. They are just as I've received them.

Here's the first. (If you want to see larger photos, just click on the image to be taken to my flickr page)

Hand made beauty

This small piece is worked on linen, which has such a lovely drape and softness. It measures about 16 inches square, including the border.

Hand made beauty

The embroidery appears to be done in cotton embroidery floss. The flower petals and leaves are done in Laisy Daisy stitch, with a bit of stem stitch among the leaves and satin stitch for the middles of the flowers. The black border is also done in stem stitch.

Hand made beauty

The crochet border is worked into an edge of single crochet. The edge of the linen has been folded over, and the fold is completely encased in the single crochet edge at the back. The border is a filet crochet finished with loops and picots.

This piece, according to my mother, was worked up by her late aunt, who was prolific and highly skilled. My mother had given me some small boxes of embroidery flosses, perle cotton, needles and tatting shuttles many years ago. Along with the finished pieces I brought back this trip, my mother also passed on a whole lot of crochet thread, some incredibly fine for use with a .75mm hook.

The last time I saw my great aunt, I was very young and barely remember her. I do, however, feel honored to have these items of hers. She was a remarkable woman.

Friday, May 21, 2010

Feature Friday: freestyle embroidery

This week I decided to combine my Feature Friday with a Blast from the Past.

 Free style embroidery uses the same stitches are non-freestyle embroidery - and there are a great many types of stitches!  The only difference is that it's not usually done from a pattern or transfer.  I prefer freestyle, as I like to make things up as I go along.

There's a bit of a story behind the piece featured below.

I've always been a doodler.  Few surfaces escaped my restless hands.  One of my first jobs after I moved out on my own was at a sports apparel company, prepping orders, doing quality control and packing them for shipping.  What my clothes looked like didn't matter a whole lot, since clients never saw me.  I wore the same kind of heavy duty jeans I used for throwing bales on the farm, and always had in my pockets a pen, box cutter and permanent marker.

During breaks, my restless fingers soon had me doodling on my own jeans with the permanent marker.  I usually drew a particular image, upside down, on the front of my thighs.  After a few washes, the doodles would fade, and I'd draw over the lines again with my marker.

The job entailed a fair amount of wear and tear on my clothes, so it wasn't long before I had holes in my knees.  Being the frugal sort (or perhaps miserly would be more appropriate a description), I chose to repair the holes in my knees.  I didn't like patches.  Instead, I drew a loose outline of a rose that covered the hole by a generous amount, then filled it in with satin stitch.  The result was a very durable patch that didn't look like a patch.

Fast forward a few years.  Now married and living in BC, my husband found himself a denim jacket that had a large blank panel on the back.  He let me draw on it using fabric markers.  I did drawings up the sleeves, across the yoke on the back and, of course, the large back panel.  Those still faded with washing, so I tried fabric paints in one section.  I didn't like how the fabric felt afterwards, so I didn't do any more.  I kept recolouring with fabric markers as the jacket faded, and the designs along with it.

By this time, my husband had given me the jacket.

Eventually I got tired of that and decided the only way to make the back design permanent was to embroider it.  Until then, my knee patches were the most ambitious pieces I'd attempted.  This was to be my first major embroidery piece.

It took me 6 months of stitching - spread over 9 months.

I loved that jacket so much, I wore it until it fell apart.  When it was no longer salvageable, I cut off the back panel, and have kept it ever since.

Here it is.

IMG_3458overview50%

This is an overview of the entire piece, which is done mostly in satin stitch, which remains my favourite stitch.


IMG_3477face50%

I played around with different blues to shade the face.  In this photo, you can actually see the sloppier stitches where I'd started, and hadn't quite gotten the hang of stitching, at the top of the neck, between the head and red mane.  The mane was done in long and short stitch, with a strand of metallic filament added to the embroidery floss for a bit of sparkle.  I'd added a silver strand to the white thread I did the teeth with.

IMG_3459metalthread50%

The chest plate was done in metallic embroidery thread in gold and silver, with embroidery floss for the red "rubies."  The metallic thread was an incredible pain to work with! It was constantly fraying at the ends and breaking at the needle.  After a while, I gave up on using the short threads recommended.  Instead, I used a very long thread, with the needle near the very end.  I'd do a few stitches, move the needle down and away from where the thread was already starting to break, trim the end of fraying bits, do a few more stitches, move the needle again, and so on.  There was a lot of wasted thread that way, but I was no longer starting new ones every ten or so stitches!

IMG_3462wing50%

The shading of the wings were done in long and short stitch, while the blood vessels were done in stem stitch.

IMG_3475back50%

When it was finished, I covered the entire inside of the panel with embroidery glue to protect the strands from catching on anything.

The very last thing I did was some time after the embroidery was finished.  If you look back at the photos above, you might notice a difference in colour in the denim surrounding the dragon, but not in the wing area.  That is from glow in the dark paint.  Once fully charged, the phosphorescent paint formed a bright outline of the overall dragon shape.

I got a lot of compliments and feedback while wearing this jacket, and one guy at a bus stop even offered to buy it.  I wasn't willing to part with it.

This is just one rather large example of freestyle embroidery.  Over the years I've done a few other small pieces.  When my girls were small, I made a couple of vests for them.  One, in royal blue, has seashells, an eel, and fish done in white stem stitch outlines.  Another, in dusty rose, has several butterflies.  That one was made extra special, as the embroidery threads, including some in silk, were from my late Great Aunt's stash, which my mother got after her aunt died and passed on to me, since my mother doesn't do embroidery herself.

Freestyle embroidery is a great way to embellish wearables - and can have the extra benefit of strengthening clothing in hard wearing areas. 

If you're not too keen on sketching your own designs, go ahead and find some iron on transfers.  There's no need to learn a lot of stitches and their variations, either.  Most of my own work has been done in only three stitches - long and short (great for shading or blending colours), stem (excellent for curved lines) and satin (for a solid sheen).   There's certainly no shortage of colours to choose from in basic cotton embroidery floss, though if you have access to a specialty shop, it's fun to try out different fibres, too.

Fabric or some clothing item to stitch, a variety of sharp pointed embroidery needles (which have larger holes than sewing needles), a pile of floss in different colours, scissors and maybe an embroidery hoop.  You don't need much to get started.  Practise some stitches on some scrap fabric, or even create your own little sampler of different stitches to see how they look.

Hhhhmmm... now I'm itching to stitch!

Saturday, January 10, 2009

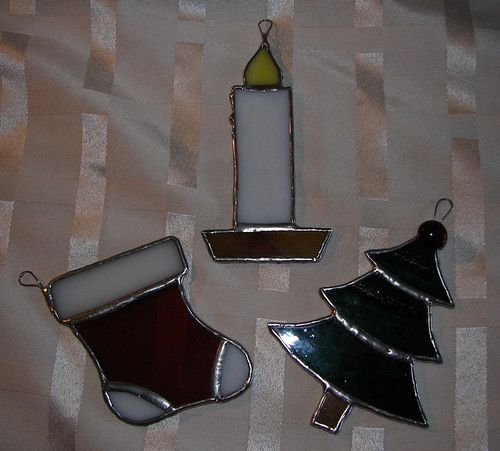
Blast from the past - I didn't make these

First off, I want to make it very clear. I did not make these. *L*

We'd been living in Richmond, BC, far longer than we expected. Finally, we were heading back home to Manitoba. As we were packing and getting ready, one of my husband's co-workers gave us these as a gift. She made them herself. I think she did a fabulous job! They're quite heavy - I have to bend the tree tips to keep them from sliding off when the weight pulls them down. I try to place them in front of lights to them off a bit more. :-)

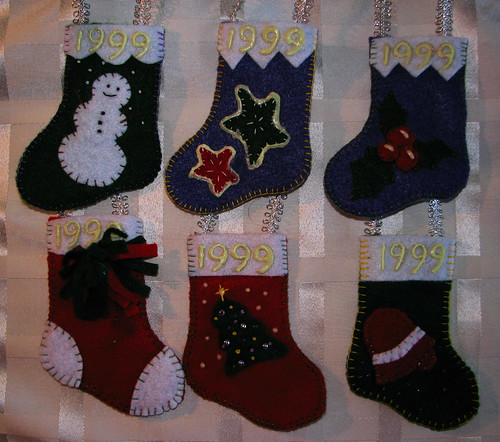
Blast from the Past - mini felt stockings

Christmas again - this time, 1999. Less than 2 months before, we'd moved back to BC, after being away for several years. We had two children now, and were renting a house in Richmond. This move was supposed to be temporary - my husband had signed on for a 6 month contract - so we didn't bring much with us. My husband had driven out a couple of weeks ahead of us, with the car loaded down with everything we could fit. The girls and I flew out later with a few suitcases. That was all we ever brought with us.

We ended up there for almost 2 years. His contract kept getting extended by 6 months, so we never did ship anything out after us.

Our first Christmas in Richmond found us with no tree and no decorations. We bought a small artificial tree (I know this is sacrilage for some, but we never use live trees) and placed it on the top of a large storage bin for extra height, with the bin covered by a white table cloth. That came in handy, as the empty bin was used to hide the gifts until Christmas Day.


These are the only decorations I've made that included the year on them. I figured the turn of the century was a good time to do it. ;-) I had very little in the way of supplies. A few pieces of felt and a cardboard template. Some embroidery thread, ric rac and glow in the dark pain in a tube.

These have a plain back to them, and can be used to hold small items, if we want. I've never bothered, though.

That year, our tiny tree had these and some fancied up clam shells from a little basket of shells my daughter's had. When the tree came down, the shells were de-fancified and went back to the girls. Throw in a cheap dollar store garland and string of lights, and we had a pretty decent little tree that year. *L*

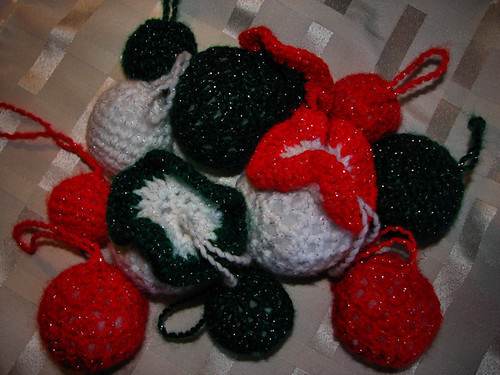
Blast from the Past - the ones that started it all

Christmas, 1993. My husband was still in the military, and we were living in a PMQ (military quarters) in Victoria, BC.

It was also my elder daughter's first Christmas.

One of the things I didn't want to do during her first Christmas was to worry about the tree. I wanted her to be able to enjoy the tree. She was pretty mobile already - in fact, she took her first independant steps on New Year's Day, at 9 1/2 month's of age. I wanted her to be free to be around the tree, and even handle the decorations, if that's what she wanted.

That led me on a search for child proof Christmas decorations. I had a few that were ok - some birds, apples and strawberries - but they would've meant a very empty tree. After searching many different stores, I found nothing. Decorations were either pretty, but not safe, or safe and butt ugly.

So I decided to make them. I'd just taught myself how to crochet not long before. (Story here.) It was time to extend my novice skills. I bought some sparkly yarn at Walmart, found some instructions, and made these.

(more and larger photos available here)

The first bunch were simple spirals - three double crochet into each stitch of a base chain, then finished with a row of single chain. For some, I left the ends from the sc row as tassles. The two on the bottom were from a much thicker yarn without the sparkley strand I decided to try as well.


More challenging where these balls. I hadn't done increases or decreases before, and I didn't have a pattern, either. I just winged it.

The large and small balls are made exactly the same way. I just used dc instead of sc for the larger ones. They're kind of lumpy and shapeless after all these years, but they still look kinda nice on the tree.

That first Christmas, our tree was decorated entirely with these, the birds and fruit I already had, and some lights. My daughter was free to explore the tree to her heart's content - and it didn't take long for her curiousity to be satisfied. She mostly left the tree alone after that.

I think the whole plan worked out rather well. :-)

Wednesday, December 3, 2008

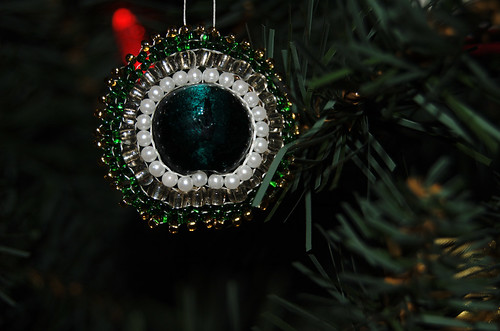
Blast from the Past: Beaded medallion

I made these beaded medallions as my Christmas decorations a few years back. The large glass beads I used for the centers were either in this green or a golden brown, in several different shapes.

To make these, I started by making a thread base around the bead. I threaded the bead and tied the thread around quite tightly, then moved the knot into the middle of the bead (the loose end was woven into the beads later on). Next, I added more loops in a sort of figure 8 around and through the bead so that there were three wraps of thread on each side. Still using the same thread, I added the first row of beads in brick stitch onto the base threads, continued with brick stitch for two more rows, then ended with a picot edge. Using the same thread I was beading with, I anchored the beads by going back into them a few times, then made the loop, and finally anchored the end of the thread back into the bead work.

I was really happy with how they turned out. They look really nice in the tree. They're fairly small - about 2 inches across - and would do well on a mini-tree, too.

Sunday, November 16, 2008

Blast from the past - shisha embroidery

I've been trying to push on finishing my daughter's coat. I'd hoped to have it at least assembled by this weekend, but it didn't work out that way. I'm still working on that last sleeve. So for now, I'm posting some older samples of crafts I've tried.

For quite a few years, I'd been looking for a reason to try shisha embroidery. Last year, I decided to make shisha mirror embroidery the focal point of that year's Christmas decorations.

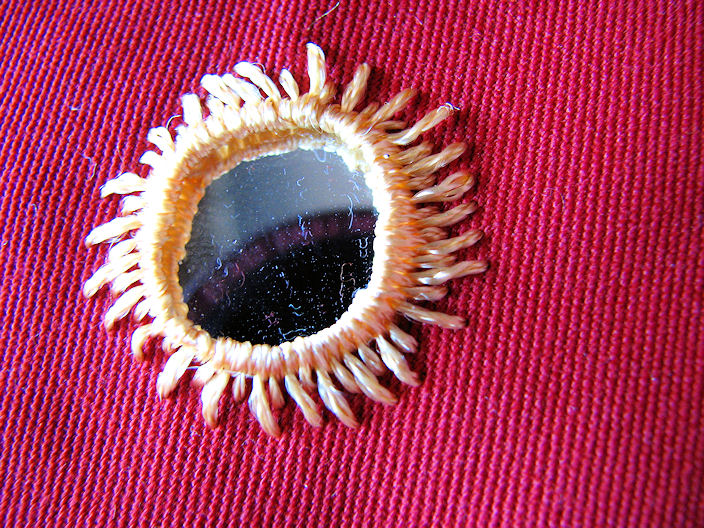
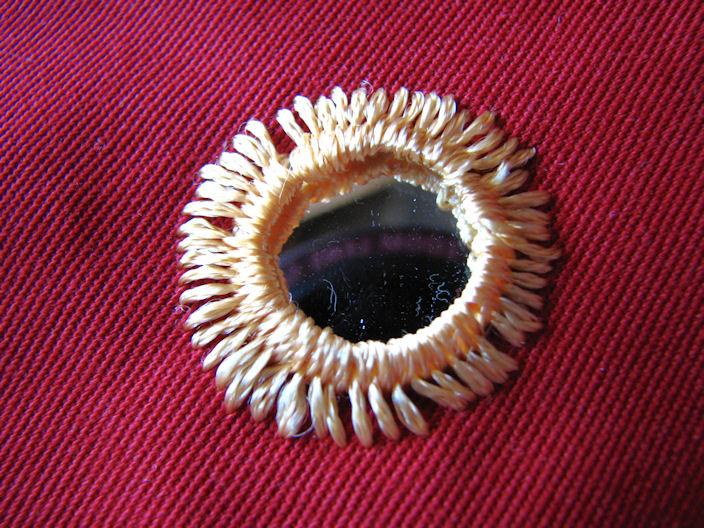
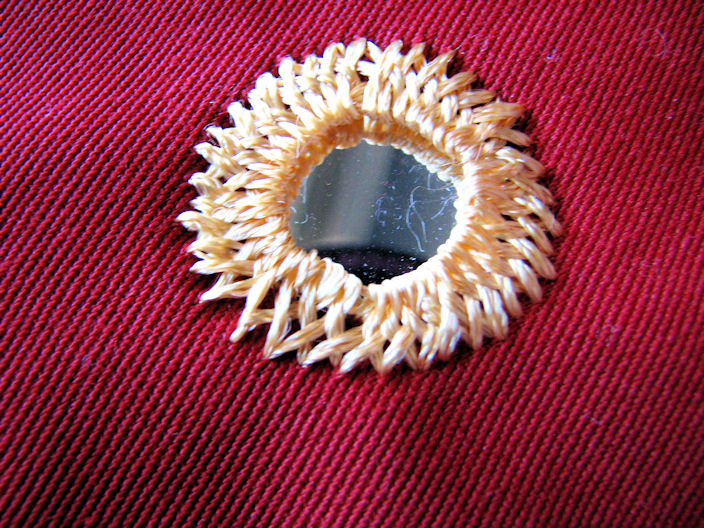
In this series of photos, the same stitch is used, but I changed the placement of the foundation threads, as well as the length of the surrounding stitches.


The mirrors are first held in place using foundation threads - pairs of them at 90 degree angles, forming a square opening around the middle. While working the ring of stitches, there's a tendency for the foundation threads to pull outwards. With this one, it pulled out way too far. As I worked the rest of the embroidery and embellishments, the mirror ended up falling right out. Fixing it wasn't too much trouble, though.


In this one, I over compensated and ended up making the opening much smaller than it should have been. I didn't mind, though, as I liked the effect of the threads that resulted.


This one was a little more open than I wanted, but it held fine. I also altered the stitch by bringing the needle up right next to the mirror at the start, then finishing the stitch by bringing the needle to be back farther out.


Changing the start and finish points of the stitches really changed the look of the pattern.


You can see the finished decorations here.

We don't have all of them anymore, as several were given away to friends.