Pages

Showing posts with label crochet - tea cozy. Show all posts

Friday, January 30, 2009

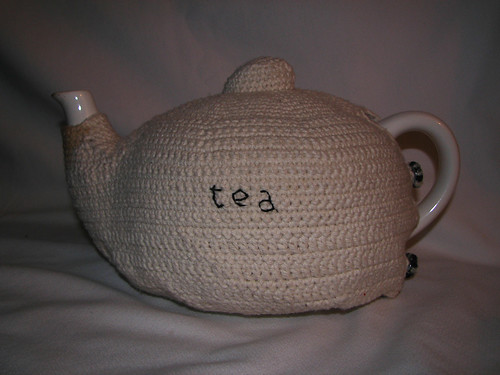
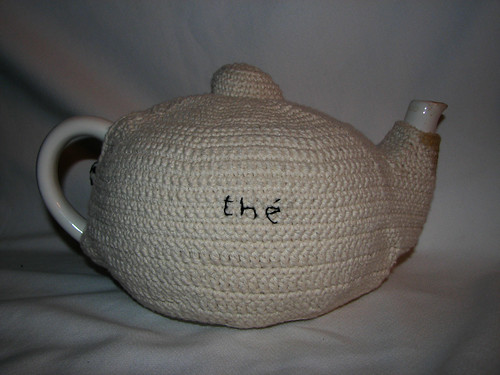
The finished tea cozy.

I actually finished it a while ago, but didn't get around to taking photos until today.

(full photos available here)


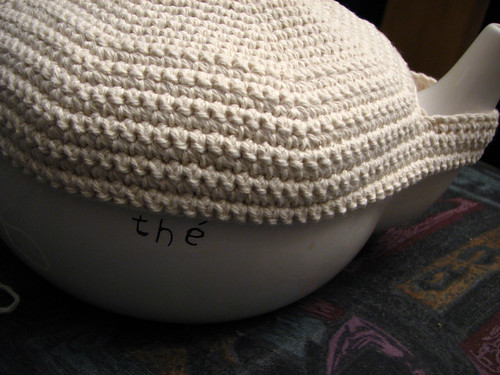
I embroidered the letters in ordinary DMC embroidery thread, trying to match the scrawly font on the pot itself.


I also matched the sides, so the English embroidery is almost exactly on top of the English writing on that side, etc.

After the embroidery was done, I tossed it in with the laundry. Although the rest of the load was dry, the cozy was still quite damp. Even though we almost immediately put it on the pot and sort-of massaged it to form to the pot's shape, you can still see that it creased a bit in the wash.

You can also see by the stain that the spout portion is doing its job quite well. :-D

Sunday, January 25, 2009

Work in progress: tea cozy, finishing touches

larger photos available here

My arm was feeling really good today, so I finished off the crochet portion of my tea cozy.

I didn't have much to do from where I left off yesterday. Basically, just one row of dc, decreasing at every marker, plus and extra in the middle under the spout. When I got to the end of the row, I used a marker to keep in in place, then switched to working on the spout opening (the fun part of making centre-pull balls of yarn - I have access to both ends of the yarn).


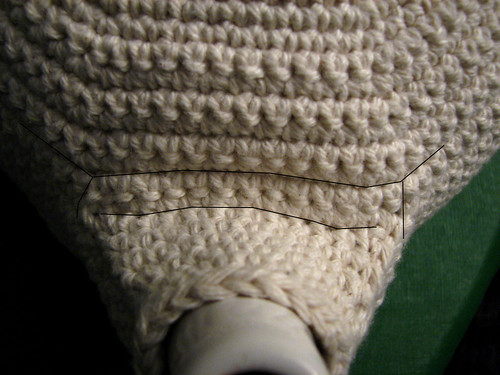
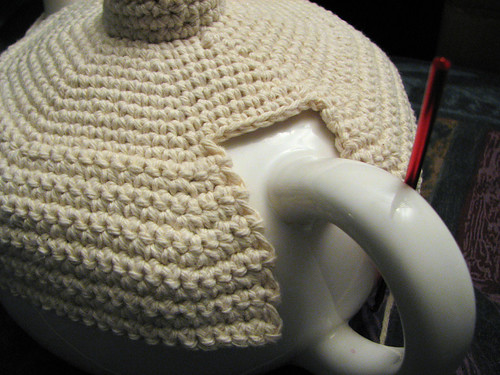
For the spout section, I wanted to bring the body section forward a couple or rows before I started working around the whole edge. In this photo, I've marked where the last round before the split is marked, and where the chain around the spout area is. The short line shows where I switched to working in the round.

Because the last row of sc I worked before making the spout opening was worked on the right side (RS), I joined the yarn into the side of the spout opening, into the first chain, on the wrong side (WS). This way, the two filler rows I made would match the body of the cozy. I worked the first row across to the other end of the chain row, slip stitched into the last chain, then turned it and worked my way back again, making two rows that were bascially straight out from the main body. I turned it again and worked another row of sc into the front loops only, as at this point the stitches were running up the spout. Joining 2sctog at the corner, I kept on going around the spout opening, working into the other side of the foundation chain. When I reached the other side of the foundation chain, I did another 2sctog to turn the corner, then continued on. I worked in a spiral at this point, just going around until it was the height I wanted. Only the last row did not have 2sctog at the corners.


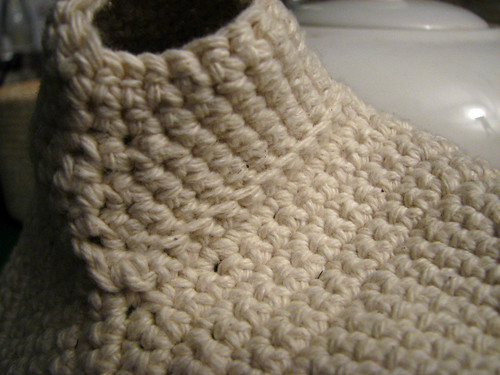
Here's a different view of the spout section. You can see where I've worked into the foundation chain, as well as the 2sctog stitches.


For this shot, I turned the spout area inside out. You can see the line where I'd done the stitches into the front loops only.

One of the reasons I wanted the spout area to go up so high is because, like most teapots, ours dribbles when we fill our cups. The cozy will not only keep the tea warm, but will make things less messy. With a cotton yarn, it'll be easy to clean, too.


One the spout section was finished, I went back to the base of the cozy.

Starting from where I left off at the end of a dc row, I kept on going around the corner rather than turning again. I did 2 sc into each dc and 1 sc into each sc along the sides of the rows, with 2sctog to turn the corners.

When I finished edging the handle opening, I kept on going in sc around the bottom of the cozy. I didn't do any more decreases, but I did make sure the stitches were tight so that it still pulled in a bit.


When I reached the end, I put it on the pot and marked where I wanted to have button loops, then did a second round of sc into the handle opening, placing loops at the markers, and finishing at the opposite corner.

In this photo, I've marked outside edges of the handle opening that I worked the edging sc stitches into.


I raided my elder daughter's button box and found these cow print buttons. I thought they were a hoot. After I finished off the tail end, I added the buttons into the cozy. Using the same yarn as the cozy, I used a tapestry needle to thread 2 lengths of yarn through the cozy, into the button, then back through the cozy. On the inside, I double knotted the ends, which left me with 4 tail ends at each button to finish off into the back of the cozy.

The only thing left to do now is a bit of embroidery. My pot has "tea" written on one side, and "thé" on the other. I plan to match the writing on the cozy. :-D

Meanwhile, we've already tried it out, and it does it's job quite well.
Friday, January 23, 2009

Work in progress: tea cozy


larger sized photos available here


This is a project I started that has been interrupted by my elbow problems. I'm working on a tea cozy sized and shaped to fit my 14 cup teapot. The yarn is Lily Sugar 'n Cream, 100% cotton, in coconut. I'd bought a 400g/14 oz ball and had started using it to make a tank top but ran out and couldn't find any more - it was a discontinued line, I discovered. Considering how short a time I've re-started crocheting, I've had that happen too often. *L* I frogged the pieces I'd done so far and am using it for other things. I find I really like how well it holds its shape when I use smaller than recommended hooks (the label recommends using H/8 - 5mm hooks) and sc stitches. It's great for can cozies, which is what gave me the idea to make a shaped tea cozy. The pot is big enough that, even with 3 or 4 people drinking tea, we're not constantly running out. That means we tend to take more time in drinking our tea, knowing we don't have to beat each other off for a second or third cup. Unfortunately, it also means the tea in the pot sits long enough to actually get cold.

So this is the tea cozy I'm NOT working on because I'm NOT supposed to be doing crochet until my arm heals. *ahem*


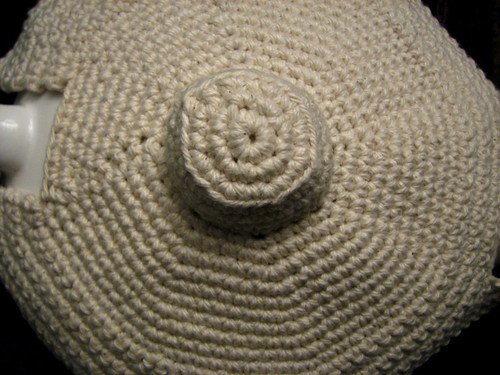
Using a size F/5 - 3.75mm hook, I started off with a "magic ring" and 8sc into the ring. The next rows were done with increases to make a flat disc until it was as wide as the knob of the pot's lid. To make a nice, crisp angle into the side of the knob area, I did the first row without increases into the back loop only. When I got the depth matching the height of the lid's knob, I continued increasing into a flat disc, with the first row being done into the front loop only for the direction change. Working in 8ths, the disc was a handy octagonal shape.


Here's the inside of the knob area, where you can see how working into the front loops only makes the directional change nice and crisp.

Once I got the disc the same size as my pot lid, I started alternating increased rows with rows that had no increases at all. This gave a gentle curve that matched the curve of the top of my pot.


When I got to a point a little above the handle, I stopped working in the round and, leaving one side of the octagon unworked for the handle space, began working the rows back and forth, still increasing every other row.


When I got to just above the spout height, I started a length of chain at a point where two sections of the octagon met, long enough to fit snugly around the spout, then re-joined at the other end of the same section of the octagon. When doing the next row back, I continued the sc into, rather than around, the chain, as I plan to do a finishing edge around the spout itself.

When I reached the top of the pot's widest point, I stopped the increased rows completely, except on either side of the handle (which you can see in the above photo) to keep the sides of the handle opening straight.


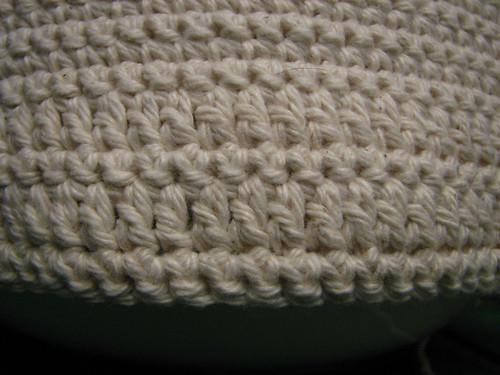
With my arm starting to bother me a lot, I found I could only do a few stitches at a time. Since I'd like to actually use this cozy some time soon, I decided to start alternating rows of dc and sc. This way, it would work up a bit faster, while adding a bit of textural change to the cozy. Here you can see where the pattern changes, with dc worked on the right side and sc on the wrong side.


After only one row of dc, the cozy had reached the farthest point of the spout. I marked the center of the spout section and, in the sc row, reduced by one stitch. The next dc row was reduced by one stitch in the same spot. I was now past the depth of the spout, so I marked stitches on either side of the spout in the dc row and, in the next sc row, did a decrease at each marker.


I was now past the widest area of the pot. I then placed markers to match the increases at the top of the pot, working out where they would be on either side of the spout, since that area is now wider than the other sections.

Then I stopped to give my arm a break.