Pages

Showing posts with label yarn. Show all posts

Monday, March 7, 2022

Reflective

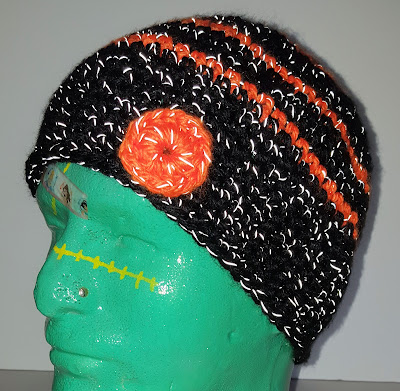
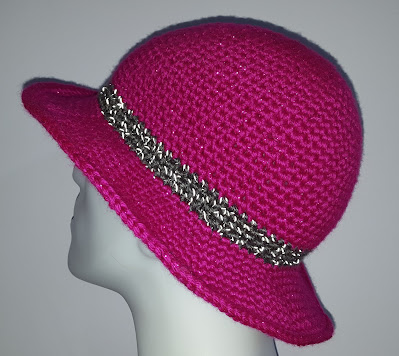
 One of the types of yarn I enjoyed using was the Red Heart reflective yarn.  Here is an example of my using it as a contrasting band in a hat.


I've also used it in entire hats, as well as to make high-visibility wrist bands.


Unfortunately, none of the local yarn stores carry it anymore, and while I can buy it online, I really prefer not to, if possible.

Instead, my darling husband found an alternative for me.


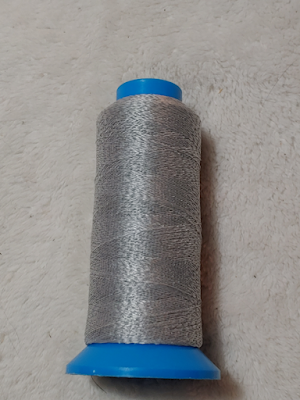
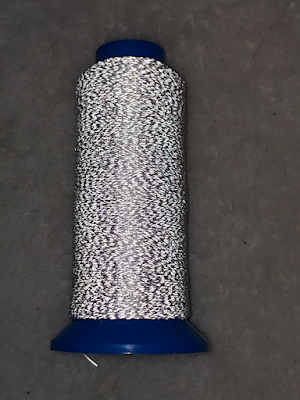
This is a nylon reflective sewing thread. This is something that can be used in sewing machines, if desired.

Here is how it looks with flash.  


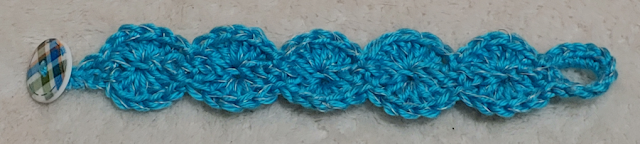
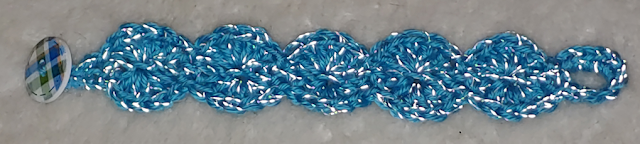
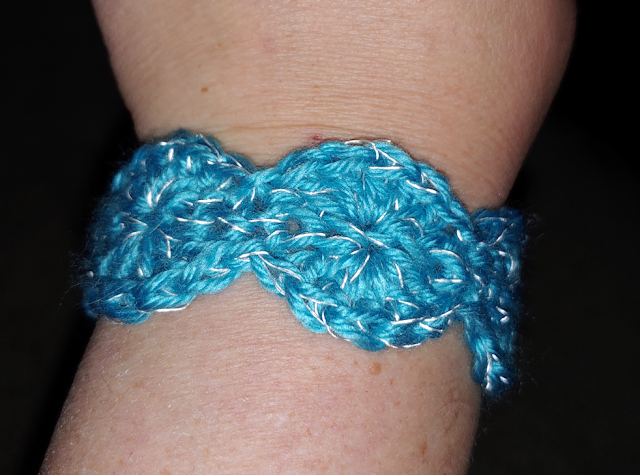
The beauty of this is that I can use it to make any yarn reflective.  I tested it out by making a simple bracelet.

First, in normal light.


Now with flash.


I think that worked our rather well!


I look forward to using it with other types of yarn, or even with crochet thread.  There's a lot on the cone, so this is something that will last for quite a few projects!

I'm quite pleased with it.


Thursday, December 18, 2014

New.


With conflicting schedules, my husband had to drop me off for my class over 2 hours early.
Darling that he is, he bought me some of the new yarns at Michael's to keep me busy while I wait.
These are the new Swizl yarns from Loops & Threads. Super bulky, 78 yds / 71 m, 100% acrylic.
This colourway is Royal Blue.  Can you tell?

Thursday, October 23, 2014

My new toy


A 25.00 mm hook,  and some yarn to try it with.
The edge of the hook feels a bit rough, though.  I think a bit of fine sandpaper, first, would be a good idea.
Sent by mobile.

Thursday, January 30, 2014

Check it out!


A simple hat made with the new Reflective yarn, first with no flash and regular incandescent lighting, then in a dark room and a flash.
This stuff is pretty dramatic! 
It was also decent to work with, though some care needs to be taken not to catch the reflective strand.  We shall see how it handles wear and washing.

Sent from Anna's phone

Reflective


Just picked up a couple of balls of Red Heart's new Reflective yarn.  Will be making a quick hat to start with.  Looking forward to testing it out.

Sent from Anna's phone

Sunday, June 2, 2013

Saying Thanks

Things have been really busy lately, so posting is going to be a bit sparse.  Hopefully, I'll be able to do more mobile posting over the summer.  We shall see.

With two new additions to our household, we're all getting used to having younger children again!  Both my daughters have been great about helping their new "sisters" settle in.  My younger daughter has been really above and beyond, so today I got her a gift to say thanks.

While I was helping my older daughter with her first festival of the season - in pouring rain, no less - I had the opportunity to tuck into a local yarn shop I haven't been to in ages.  I found this.


I took this sad, inadequate little photo with my phone while we were still out, and it's now tucked away, so I'll have to look up the brand, etc. later on.  I do remember that it's 75% superfine merino wool, 25% silk.  It's 100g and 1,400m.


Yes, it's almost a kilometer and a half long and weights only 100 grams!!  The photo does not do the colour justice at all.  It's incredibly soft and luxurious, too. 
 

My daughter is thrilled with her gift!


Tuesday, September 4, 2012

Upcoming events and news

I hope everyone had a great long weekend! 

I've got a few bits of info to pass on today.  Top of the list, my older daughter now has a much larger gallery display of her paintings available for sale at Transcend on Jasper Ave.  Her paintings will be there for the entire month of September.  With the weather cooling down, it's a great time to swing by for a cup of what I'm told is the best coffee in Edmonton (I don't drink coffee myself, so I can't say!).  Meanwhile, many thanks to Steeps in Old Glenora and their patrons for their support.  She had a total of 5 paintings there, and two of them sold, which is really awesome!

This Saturday, Sept 8, I will be doing an Open House at Micheals from 11-3.  This is a Meet The Instructors event being held at all the stores.  I will be at the Clareview location, as usual.  Classes are all 50% off on that day, so it's a good time to sign up for a succession of classes, sign up with a friend, or buy classes as a gift. 

On Sunday, Sept. 9, my daughter and I will be back at Art in the Plaza from 11-4pm.  Even with her display at Transcend, she will have plenty of paintings to show and sell at the Plaza.  I'll have my little table of crocheted items again; with the weather starting to get cool, it's a good time to start looking at the heavier, earwarming hats!

On Saturday, Sept 15, I will be hosting another Yarn Night at the Clareview Micheals from 1-3, with the option of going longer.  Registration is $5, and pre-registration is encouraged.  It's a good opportunity for folks who are having a bit of trouble with their projects, but not enough to take in an entire class.

On Sunday, Sept 16, I will be helping my daughter set up on Whyte Ave for an Art Walk type of event.  We're a little short on details right now - apparently, they're calling it a Garage Sale, and all the shops on Whyte will be taking part, with artists setting up tents in the parks.  I'll post more details when we have them. 

On Saturday, Sept. 22, I will be doing a crochet demo at the Clareview Micheals from 1-3. 

And finally, we'll be back at the Plaza for the 23rd and 30th.

Moving into October, the Carft Yarn Council has declared the second Friday in October to be the annual I Love Yarn Day.  This year, it will fall on Oct. 12.  It's a day to spread the warmth!  Blog it, tweet it, facebook it, and share your love of all things yarn!

Have a great week!

Saturday, August 25, 2012

Twisted Sisters

On location at the Twisted Sisters Fiber Mill, checking out the alpacas.

Update: Well, I'm home now, and I've got a whole bunch of photos and some short videos to process.  We had a fantastic time at Twisted Sisters!!  The alpacas were adorable, the tour of the mill fascinating, and it may well have been a good thing that they cannot do debit in their store! *L*  They do take cash and credit card, though.  So many beautiful things!  I was able to get one lovely hank of 50% alpace, 50% merino yarn, and I'm really looking forward to working with it. 

I definitely want to go back, and enthusiastically recommend them to any yarn lovers out there!  Many thanks to Barb of the Wandering Woolies for arranging this field trip. 

Once I've got the photos and video processed, I'll put them online for viewing.

Thursday, August 16, 2012

The Yarn Bowl - a lovely tool

The first weekend my daughter attended Art in the Plaza was on Canada Day.  Since it made no sense to drive there, help her set up and leave, I brought along my project bag and stayed with her for the day. This way, she can head out whenever she needs to, and I can stay and tend her display for her, too.

After one of these excursions, she came back with a surprise for me, purchased from one of the other artists - this lovely yarn bowl!


I don't know how I missed them in the display, as I've been wanting one ever since I saw one being used by a fellow yarn enthusiast.  These are a fantastic idea!  In the past, before I started reballing my yarn into centre pull balls, I would use just a plain cereal bowl to keep my yarn from rolling around on the floor.  A lovely bowl like this not only keeps the yarn clean and in one place, threading the yarn through the slot keeps it flowing smoothly and without tangles.  A grand idea!

The bowl was at a very reasonable price, and the woman who made it says she can make them in any colour someone desires.  I've been so happy with mine, and I'd highly recommend sending an email to  Deborrah Hughes-Gahr and ordering one! 


Wednesday, July 18, 2012

Yarny Love

Ah, finally - a blog post not done on my phone!

Summer is the busiest time of year for us, and for the next while I will be joining my daughter at Art on the Plaza, sharing her booth with my crochet.

My birthday was during the Art Walk (which was fabulous, even with all the rain on the last day!), so today my daughters took me out to get my birthday gift.  They were originally planning to pool their resources and get me a tajine, but they're prohibitively expensive and not many places carry them, or have them in stock, so they took me to River City Yarns, instead.  This is what they got me...

Philidar Recif


Eighteen balls of Phildar Recif multicolour in Savane, a self striping yarn made in Belgium (French language website)

The downtown River City Yarns is in the process of moving to a new, larger location in the West End, so the downtown store was almost completely empty when we got there.  There were quite a few kits and some other yarns, and sale tables.  The sale items were all at least 25% off, or 50% off if you bought at least 10.  It was so difficult to choose!  In the end, I decided to pick up all they had left in this colorway.  That way, there's enough yarn for me to make pretty much anything I decide on.  The girls had one restriction placed on their gift.  I have to use it to make something for myself!  Most of the things I make are either gifts, samples or sale.  Other than winter hats and the like, or things like can cozies or table mats, I have nothing for myself.

This yarn is 70% acrylic, 25% coton and 5% polyester, gentle wash and lay flat to dry.  Each ball is 50g, 112m.  I am thinking of using it to make either a top out of it, or a shrug or cardigan - something lighter for summer use.

While we were there, my younger daughter picked up a ball of yarn for herself.

Frill Seeker by Estelle


Frill Seeker by Estelle, Precious Metal, Q50901.  Another hand wash, lay flat to dry, it's 90% acrylic, 10% polyester, with about 60 meters in a 200g ball - enough to make two narrow scarves.  She's broken out the knitting needles already! 

Now to look for pattern ideas.

My kids sure know how to make their mom happy!


Wednesday, June 27, 2012

Yarn Bowl


Finally made it to a Wandering Woolies Meet Up.  One of the members brought her yarn bowl along.  What a fantastic idea!

Thursday, November 24, 2011

Quick and Easy Garland

Here's a garland I made up using the new Martha Stewart yarn, Glitter Eyelash.

When I first saw the new line of Martha Stewart yarns, I have to admit I had low expectations for the eyelash yarn.  That's because I have low expectation for eyelash yarn in general.  I find them a major pain to work with, and heaven help you if you make a mistake and need to undo it!

I was impressed with this yarn, however.  First off, there's a nice range of colours with marvelous sparkle to them.  Then I actually picked up a ball.  I had expected it to be scratchy from the glitter strands, but it was surprisingly soft.  I was impressed.

So when I decided to make a last minute decoration for the staff decorated tree at the Michaels I teach at, I picked up a couple of balls in Blue Topaz.  I decided to make a garland similar to one I have made before, using glow in the dark yarn. 

Once actually working with the yarn, I was again impressed.  It was smooth to work with and there was no tangling of any kind.  Very nice.  

For the garland pictured below, I used a 5.00mm hook and some white yarn I had on hand (Loops and Threads Impeccable) along with the Glitter Eyelash.

To start, make a chain to the desired length.  I never measured the final length for this, but I'm guessing it was about 13-15 feet long.

To make a gentle spiral, two stitches are worked into each chain in the foundation.

Start by making a loop by working a sc into the 6th chain from the hook, or whatever number of chains for the size of loop you want. Work 1 hdc in the next ch.

Place a stitch marker at the opposite end of the foundation chain, 7 ch from the end or the number of ch in your loop plus 2.

Work 2 dc into each ch to the marker.  Work 1 hdc into the ch the marker is in.  Create a loop by working a sc into the next ch and the last chain together.

Fasten off yarn.

Join with Glitter Eyelash into the hdc stitch at either end of the garland.  Work 1 sc into each stitch to the hdc at the opposite end.

Fasten off yarn.


Quick and easy garland

When I first started this, I had intended to make a denser glitter row by working 1 ch in between each sc.  It was looking great, but used far more yarn than I had.  Unfortunately, I had already worked about 1 3/4 balls of Glitter Eyelash before I realized there was no way I had enough to finish the entire garland.  I would have needed almost 4 balls to finish it that way (which, by the way, I recommend as a variation.  Just make sure you have lots of Glitter Eyelash).

I had to do the one thing I dreaded most with an eyelash yarn.  I would need to undo nearly two balls worth. 

Much to my surprise, it came undone as smoothly as any basic yarn!  There were no tangles at all, no catches, no twisting.  It was beautiful! 

Quick and easy garland

To store the garland, wrap it around a core of some kind.  I used the thick cardboard tube from a package of extra wide aluminum foil.  There's a couple of spots of sticky glue where the foil was attached to the tube, which I covered with tape.  Just hook the loop around one end of the tube, then wind the garland around it.  To fit this garland onto the tube, I had to jam it together pretty tightly.  The tube also makes it easier to place the garland on your tree.  Just hook a loop onto your tree, then unwind it as you go.

This garland took me about 3 hours to do, including the time it took to rip all the eyelash yarn and work it back up again.  This can easily be worked up in a single evening.

As for the Glitter Eyelash yarn from Martha Stewart, I definitely recommend it!  It's got great colours, lovely sparkle, a soft texture, is lovely to work with, and is even a delight to undo if you make a mistake.  Fantastic stuff!


Sunday, September 18, 2011

For display - part one

One of the staff at the Clareview Michaels had the idea of getting all the class instructors to make a display to promote our classes.  They will be framed and put up in the appropriate sections of the store.  The space we'll have to fill is 11x14, minus a 4 inch square which she will use to put in text about the classes.

My first thought had been to do a flat display featuring the stitches taught in the classes.  It occurred to me, however, that while these will be framed, they aren't going to have any glass.  Which meant I could go with something three dimensional.

I decided to go with a "still life" idea, using stitches and techniques that students will learn if they've taken all four classes.

I started off with a general idea of colours and textures, then spent some time in the yarn section.  This is what I came home with.

IMG_5184-50%crop

The skeins on the bottom are all Loops & Threads, Impeccable, Worsted.  For the Bernat Handicrafter Cotton, I ended up going with just two colours, but I will be using all of the Impeccable colours.

Next, it was time to do some sketching.

IMG_5186-50%

The pencil is a little hard to see here.  The big X was to find the centre, while the box just above the centre is where the information would be.  I figured a vase done in the Handicrafter Cotton would be good to show off how structural crochet can be, as well as show off some of the textured stitches covered in one of the classes.  From the vase would be some flowers and long leaves, using the light green for the leaves and stems, burnt orange for the flower centres and pale yellow for the petals.  On the other side, hanging down, will be a branch in brown with leaves in the darker green, though I am considering using the yellow and burnt orange as well to make fall foliage.

IMG_5188-50%

Next, I wanted to work out more details for the vase and flowers.  I changed the flower petal shapes from what's in my sketch, as that would have used techniques not covered in the classes.  Since all of this is going to be pinned onto a backing, I wanted to have the vase flat on one side, which meant I would actually be making half a vase, vertically.

IMG_5191-50%

I started with the vase base by making a semi-circle in single crochet, then finishing the flat side with single crochet to tidy it up.  The "right side" of the semi-circle would be facing down, where it will be visible.  The rest of the vase is worked from the "wrong side" of this piece.

IMG_5193-50%

To keep a sharp turn between the vase and the sides, I made a foundation of slip stitches on the wrong side of the semi-circle, worked under the single crochet loops.  This photo is of the right side of the base, and you can see where the yarn is wrapped around each single crochet.  For some reason, I never got a photo fo the wrong side, showing the slip stitches.  Oops.

IMG_5194-50%

The first round of the vase's sides was worked through the loops of the slip stitches, leaving a crisp edge of single crochet loops facing out from the base. 

IMG_5195-50%

Here's the inside view of that first round.

IMG_5197-50%

As I built up the sides in single crochet, I worked increases on the curved side, spacing them in different places in each round so that I would not have increases worked one above the other.  I still kept the increases closer to the flat back, where possible, so that they would be less visible.  I changed colours after about 2 inches, dropping the first colour without finishing off the yarn.  I did not do any increases in the new colour.

IMG_5201-50%

After the 1 round of single crochet in the new colour, I worked a round doing double crochet in the back, then popcorn stitches separated by two double crochet around the front.  I did one more round of single crochet before changing back to the first colour, again just dropping the second colour without finishing it.

IMG_5203-50%

I hadn't made much effort to count stitches when I was doing the increases, so it wasn't until I switched back to the first colour and did a single round of single crochet that I stopped to count.  I found I had 32 stitches, which is perfect for this shell pattern using 5 double crochet shells separated by a single crochet.  I did two rounds of shell stitch, then another round of single crochet, then changed colours again.

IMG_5206-50%

Then it was another group of 1 round in single crochet, 1 round with popcorn stitch and 1 last round of single crochet.  This time, when I changed colours, I did finish off the yarn in the second colour and hid the yarn end under the next round in the first colour.

IMG_5212-50%

Here's an inside view before continuing on.  None of this will be visible in the display.  The rest of the vase was done in single crochet only.

IMG_5222-50%crop

Using the first colour, the next few rounds had evenly spaced decreases added to the curved front of the vase to close it up until it was about the same size as the base.  One round was done without any increases or decreases, then I started adding increases again to create the flare.  Finally, one last round was done in the second colour.

The shape is a bit wonky from handling, but it seems to have worked out rather well! When it comes time to mount the vase, the flowers stems and leaves will be filling it, along with enough fibre fill to maintain its shape.  The smaller hook size (I used a 3.75mm hook) makes for a stronger structure, but it'll still need a bit of help to keep it from getting squished.

Next up, the flowers.
Wednesday, September 14, 2011

Wee One

My younger daughter loves to crochet cute things, so it was no surprise to see her pick up a copy of Super-super Cute Crochet, by Brigitte Read.  I have been visiting the author's blog for a while now, and enjoyed her work.

My older daughter loves cute crochet things, but not actually doing crochet.  Not her thing.  Instead, she gets her sister to make things for her.  Watching the two of them going squee after the designs in this book is hilarious.

The design they settled on was the Owls pattern.  Of course, being their mother's daughters, no pattern goes without modification!  The pattern recommended using DK/light worsted yarn and a 3.5mm hook.  Well, the hook stayed the same, but after going through a stash of novelty yarn, they settled on rainbow coloured fun fur type yarn.  No labels in sight (it may have come from the ReUse Centre, for all I can remember), so I can't say exactly what it is.

This is the result.

IMG_5172-50%

While being worked, the long strands tended to remain on the wrong side of the stitches, so when it was ready for stuffing, my daughter flipped it inside out for finishing.  Her sister added brads for the eyes (we need to get a supply of safety eyes!).  That beak?  That's actually a clump of the fun fur that got caught up while the opening was sewn shut.  Fortuitous.

IMG_5174-50%

The guardian of wee little owls approves of this.

Thursday, August 25, 2011

Monday, August 15, 2011

Experimenting with a new yarn.

Michaels has brought in a whole bunch new yarns that have caught my attention. This in particular.

DSC_9096-50%

This is Red Heart Boutique Doodle yarn. It's a 100% polyester yarn that's listed as 6/Super Bulky, with a recommended hook size of Q/16mm or needle size of 50US/25mm. It's the thickest, squishiest yarn I've ever seen! Very soft feel to it, too.

The sample at the display, however, was very disappointing. It's just a length of the yarn, braided. So I went looking at the free patterns available at Red Heart for this yarn.

More disappoint. I can't believe the folks at Red Heart couldn't come up with something more creative. I kept going back to the display, wondering what I would make with such a soft, squishy and bulky yarn.

Perhaps I'm showing my age, but the idea that kept popping into my mind was a butt pillow. *L* There have been a few times recently where I really would have liked having some sort of cushion I could use to sit on, such as during Taste of Edmonton, when what few seats were available were quite wet from the rain.

So I finally forked over the cash and got the two hanks pictured above.

After some thought, I decided to do the equivalent of double ended crochet. I dug up a piece of dowling to serve as a double ended hook. Here is my first attempt.

DSC_9148crop50%


I started off by hand chaining 7 stitches. I picked up the loops through the back bars of the chains, placing them on the dowling. The dowling serves only to hold the loops and nothing else. Tension was all maintained by hand.

DSC_9150crop50%

After turning the work and pushing the loops to the other end, the new colour was pulled through the loops...

DSC_9152crop50%

Then the new loops were drawn up the same way as Tunisian Simple Stitch.

The whole thing was turned and the loops pushed to the opposite end of the dowling to pick up the first colour again.

DSC_9153crop50%

Here the first colour has been drawn through the loops.

DSC_9154crop50%

Then the new loops were picked up again.

Working with the dowling was all right except that it wasn't as smooth as it should have been, making sliding the loops from one end to the other less than idea. Here is how it looked at the end.

DSC_9156crop50%

Here's one side, before I wove the loose ends in.

DSC_9157crop50%

I had more of the lighter coloured yarn left, so I hand chained it to make a carrying loop before tucking the end in.

DSC_9158crop50%

Here's how the other side looked.

I was no happy with this. As the work progressed and I got more used to handling the yarn and loops, my tension changed a fair bit. The last rows were quite a bit tighter and denser, and I found I preferred it. I also didn't like the dimensions very much. So I undid it and started over.

Here's the finished result.

IMG_5064crop50%

IMG_5065crop50%

For this, I worked with 10 stitches, but made everything a lot tighter, making the resulting butt cushion smaller than thicker. I ended up with two fairly long ends, so I hand chained them and tied them together to make a handle.

That's when I discovered a problem with the yarn. The yarn is made up of short lengths of fibres caught in a twisted core. Some of them came loose as I was tying the ends of the two colours together. The next thing I knew, tufts of colour was bursting loose in my hand. I ended up taking the small lengths of yarn that had tied the hanks together to tie around the ends to stop it, but those started coming apart, too. It seems stable now, but I'm now afraid the knot will simply disintergrate at any moment!

Aside from this, however, I consider the project a success. I still ended up with the last rows looking narrower than the first rows, but I don't think much can be done about that.

It is also a very comfortable butt pillow! *L*

Friday, April 29, 2011

Making a centre pull yarn ball - crochet hook method

Using a crochet hook as a nostepinne is very similar to using the pencils.  Start with the largest crochet hook you've got available.

Centre pull yarn ball - crochet hook method

For me, that's a 9.00mm hook.  Larger would be better.

First, make a slip knot at the hook, as if you were about to do some crochet.  Snug the slip knot tight at the throat of the hook, so it won't slide up as you work.

Centre pull yarn ball - crochet hook method

Pull the yarn up to the other end and start wrapping back towards the middle, just as was done for the pencil method.

Centre pull yarn ball - crochet hook method

The ball of yarn I'm using here is a fair bit bigger, so I made the core a bit longer than for the previous balls.  Again, wrap back and forth for a few layers, then continue the same as with the pencils.

Centre pull yarn ball - crochet hook method

As I wrapped, I made the height of the ball greater than the core by changing the angle of my wrap, allowing the yarn to go over the top and bottom every now and then.  In this photo, only about half of the ball has been wrapped.   Then I gave it to my younger daughter to finish so I could upload the photos and start these posts.

She loves making these!

There you have it.  Three methods of making a centre pull ball of yarn.

Have fun!