I have some incense sticks I really like, but they are ever so slightly too wide for the burners I have. I have to carefully scrape one end of the sticks to get them to fit, and even then, they easily break when I try to set them in the burners, or fall out. Not a good thing to happen with a lit incense stick!
So I picked up some cheap dollar store, oven bake, no name, modeling clay and made a new burner.
It's not the greatest, but not bad, considering I've never done anything like this before, and have no modeling tools.
Of course, as soon as it was cooled down from being baked, I had to test it out!
For the "bowl", I used the inside of a small dipping sauce bowl as a mold to get the shape I wanted. Then I rolled out a small amount of dark brown to create the decorative lip around to top edge. After that, I just made various shapes to decorate the middle out of the light and dark brown clay, while building it up to a depth that would hold an incense stick securely.
Last of all, I used an incense stick to create the hole in the middle. The hole goes all the way through so that, if the last, unburned nub of incense were difficult to get out, I could use something to push it out from below.
My makeshift tools were a straight sided water bottle to roll out the clay, a repurposed can to cut the circle, and a bamboo skewer to help position things, then gently tamp them into place, so the layers of clay would stick to each other.
I'm sure all those nooks and crannies will collect ashes, but that's okay. The main thing is, I finally have a burner to hold my favorite incense sticks!
For this year's Christmas ornaments, I went back to an old standby: crochet!
I saw some patterns on Pinterest that I liked, and used that as inspiration, but in the end, each one I made was different.
I had some unexpected challenges. Funding Christmas yarns was one. I wasn't able to get to a Michael's, the only craft store option, during my trips to the city. The best option I had was Walmart, and their Christmas craft supplies were almost non-existent. I couldn't even find the miniature decorations I used to be able to fund easily.
Then, after my first few, I started running out of stuffing, but when I tried to buy more, I couldn't find any!
I even had a hard time finding Styrofoam balls, which I used to see everywhere. I did finally find some at a dollar store, along with some miniature decorations.
So I made do with what I had, with white and sparkly red yarn as the main connecting theme.
This is all that I've made, and I think I'm done for this year. We aren't even putting up our usual tree, so we don't have space for them on the mini tree on the piano, in the cat free tool!
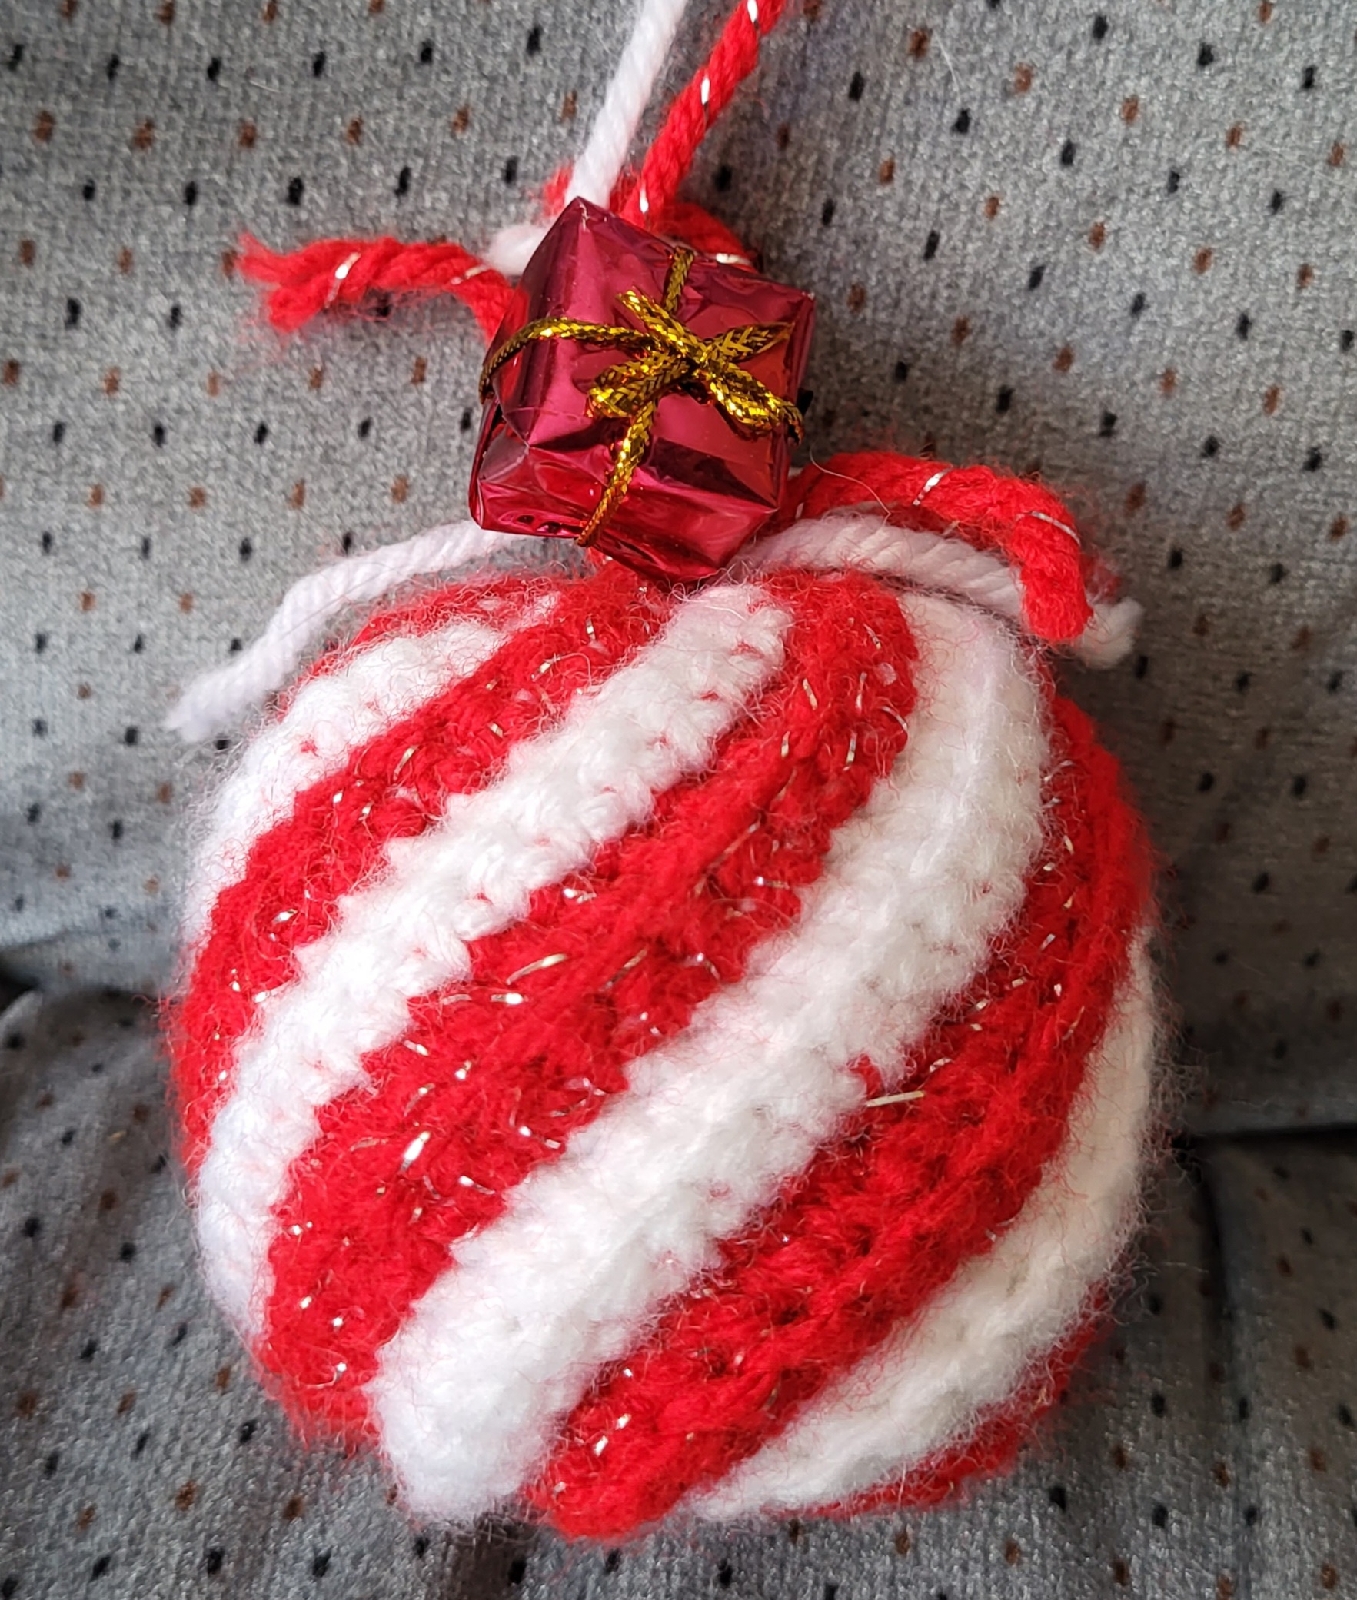
This is the first one I made. Just diagonal lines in back loop single crochet, sewn together. One end was closed up, the stuffing added, then the other end sewn closed. When I finally found some mini decorations, I added the little present on top.
The next one I tried was straight rows of back loop double crochet. Otherwise, it was assembled the same way.
I didn't like the sewing, so the next one was done in simple rounds.
I found some wooded beads and the little bow to dress it up a bit.
At this point, I was almost out of stuffing, and switched to the foam balls.
This variation is really just a tawashi dish cloth pattern I'd made in the past, except stuffed. The rows are done in the back loop, starting with sc, then hdc, then dc, then hdc again, and ending with sc. The end result was bigger than the balls, so it is quite loose around it. A miniature bauble got it's hanging cord removed, than added on with the excess yarn used to sew the sides together, and close off the end.
Again, I didn't want to sew things together, so I did this one in rounds. Once the foam ball was added, though, it was pretty awkward to stitch around it. Especially when doing decrease rounds.
Time for something different.
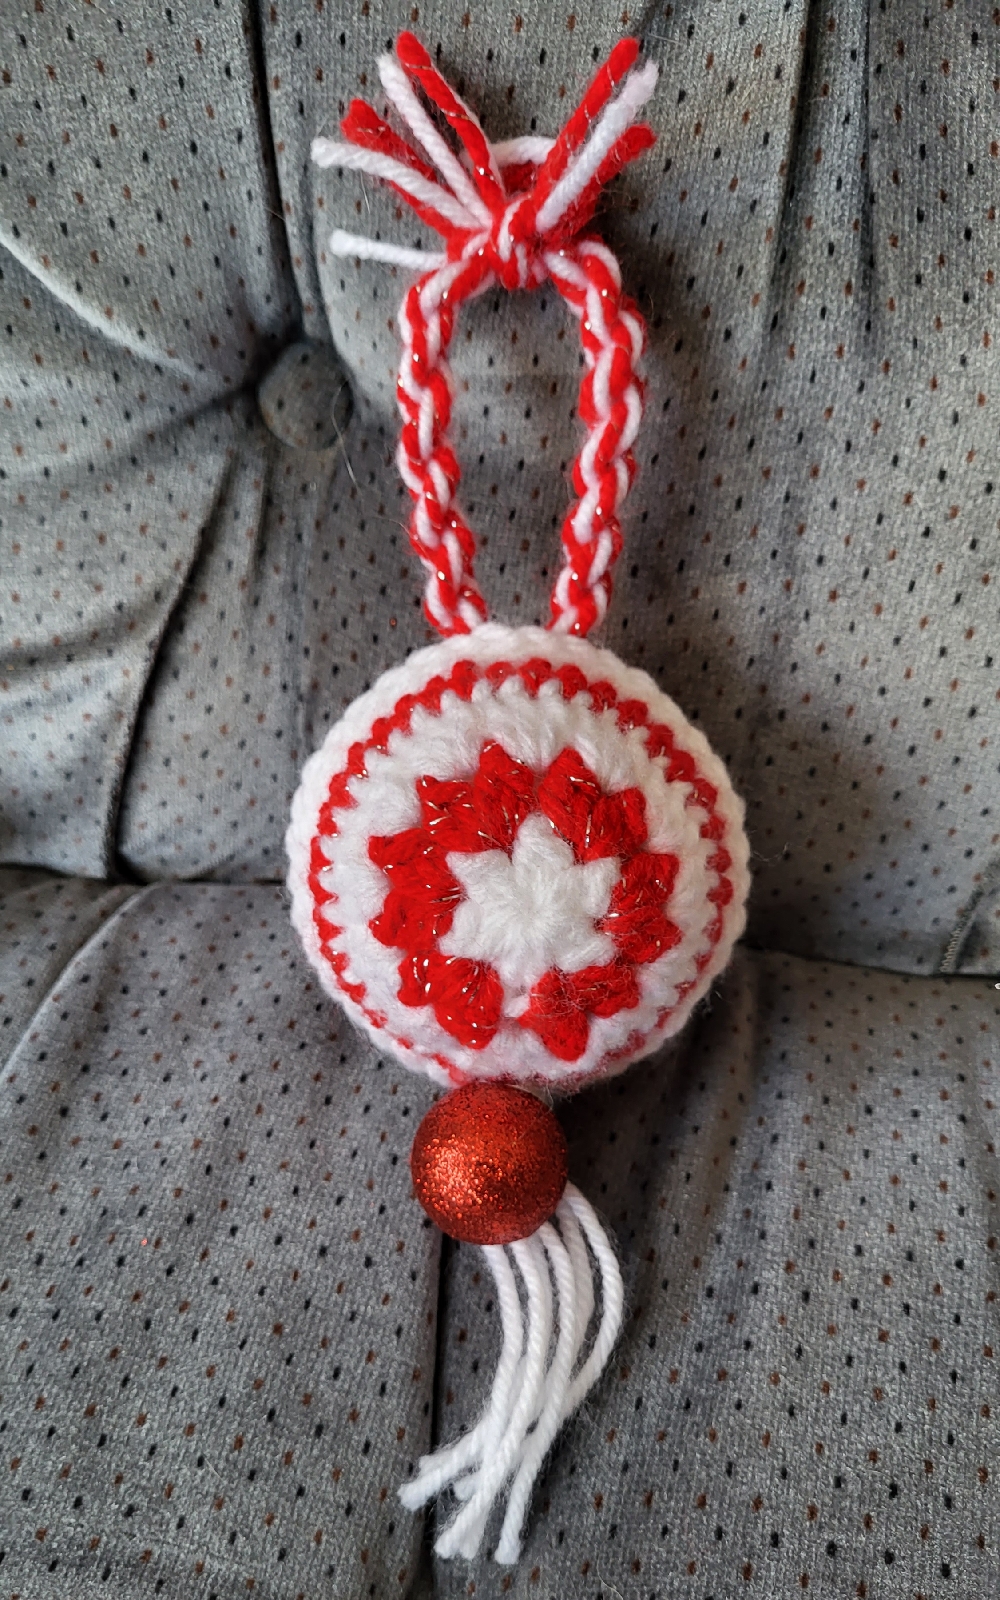
This one was done as two circles. Those were crocheted together, with the ball added inside when they were half joined. This fit more snuggly, so those last stitches were harder to work, but I liked the end result.
Then a friend gifted me with some craft supplies, including miniature decorations! I used a tiny garland in this last one.
The mini garland was worked into the last round on one circle, only. I tried sewing the circles together at first, but they turned out to be juuuust too small. So I did a different crochet join that added the equivalent of another round in the middle. I'm quite happy with how this one turned out!
With the Styrofoam balls, making two halves and joining them together was much easier than working in the rounds, but takes longer. With the stuffed ones, working in the round was easiest and fastest.
I'm rather pleased with how they turned out. Even considering they turned out to all be experiments!
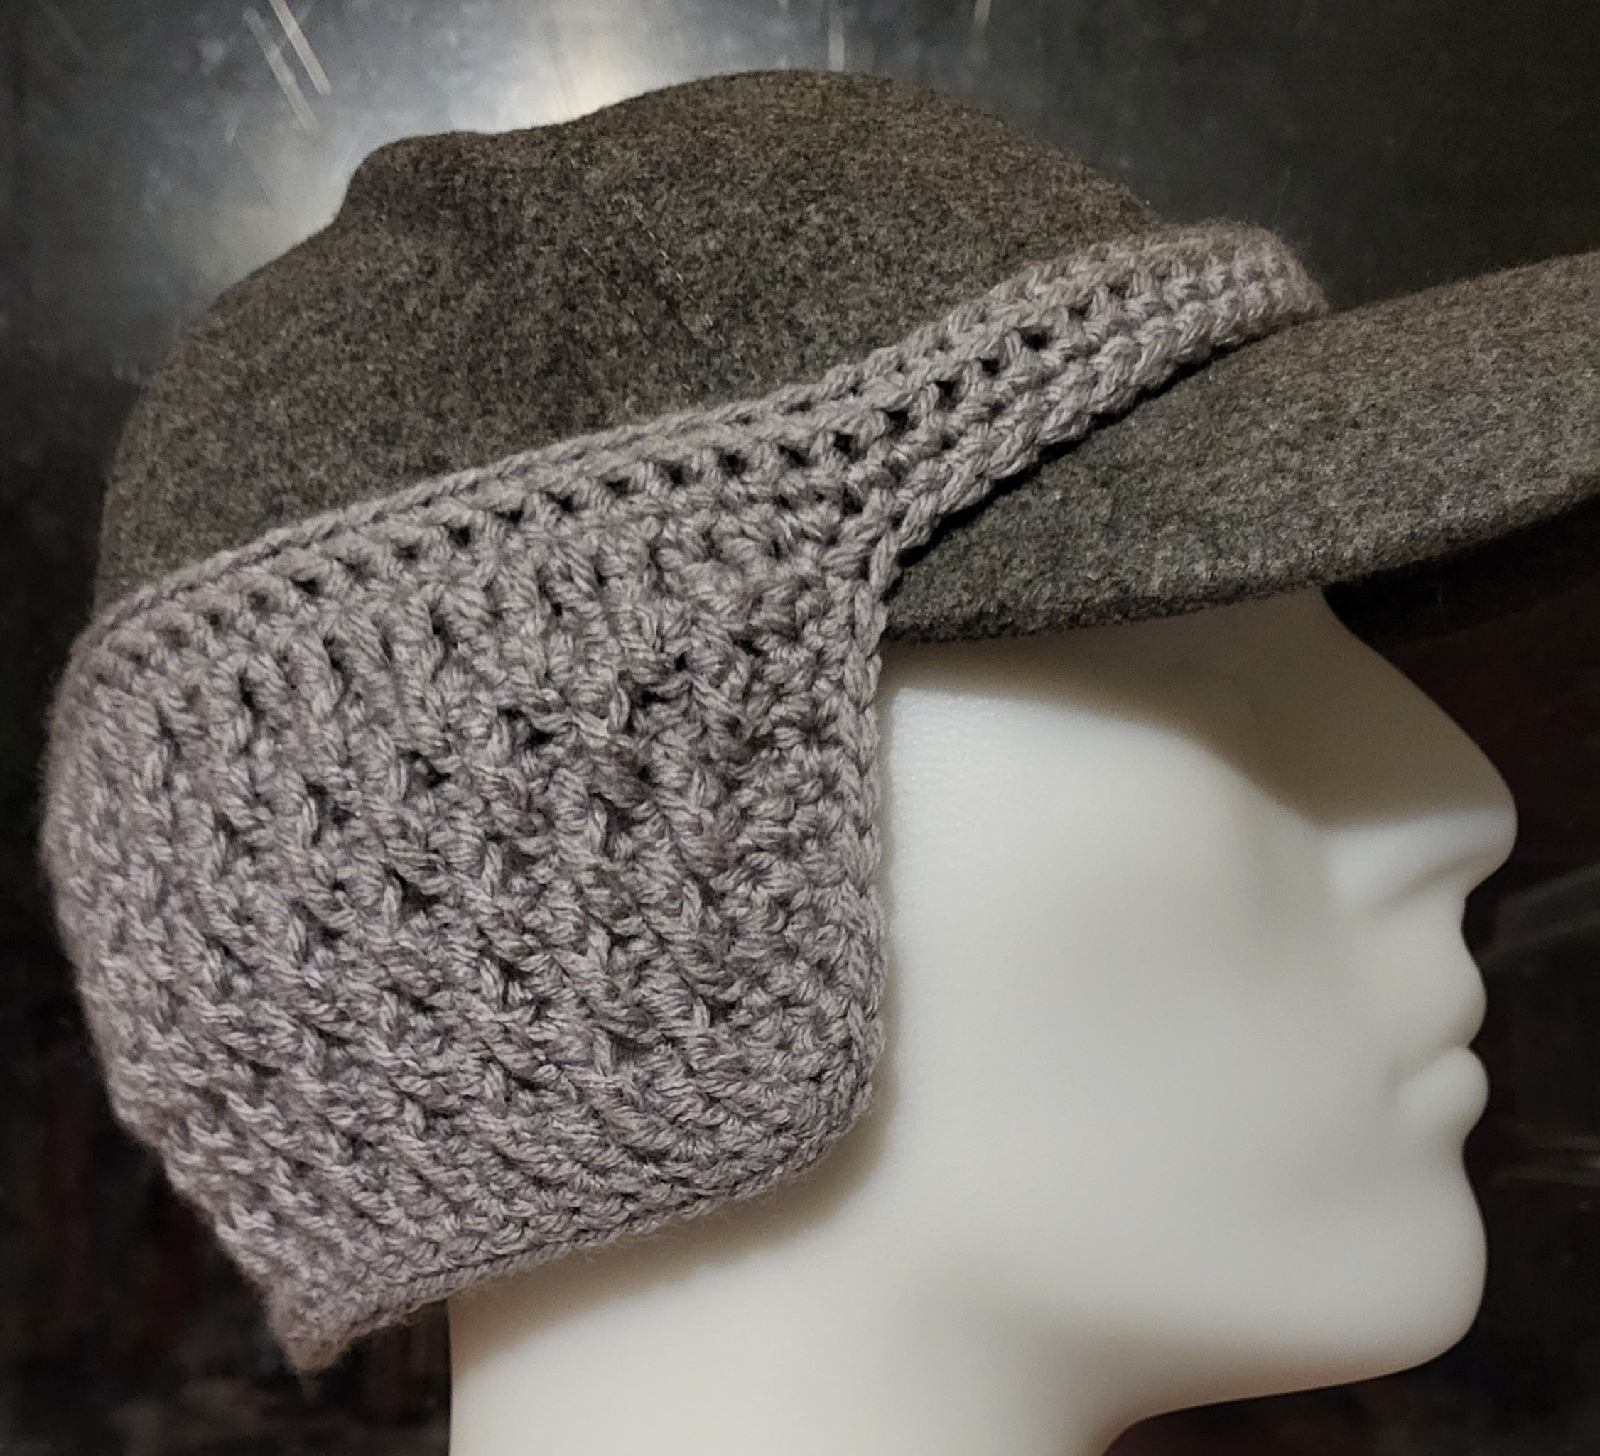
I had a chance to work on a variation of the ball cap ear warmer designs. This time, I also added a reflective strand to the edge rows.
I am not as happy with this version.
The reflective strand just sort of disappears in the yarn.
I used front and back post double crochet stitches for the ear warmer portion, and also reduced to row lengths to create a more curved shape. I think I should have done a couple of rows without decreasing first, to make it wider. It dies cover the ears well enough, though, and curls more snuggly around them, which would reduce drafts.
I think I will play around with other stitch patterns, too. The goal is to make the portion over the ears dense and well insulating.
It's been ages since I've been able to sit down and crochet!
This is an experimental pattern I've finally finished. With the work I do outside these days, I'm always wearing a ball cap to shade my eyes, and protect my hair from tree branches and the occasional grasping cat!
Winter is coming, though, and my usual ear warmers don't work together with my hat. I looked at various ball cap ear warmer designs and came up with one I wasn't happy with. This version turned out much better.
I plan to make some other versions in this grey, adding in reflective thread, as well as some in high viz orange to use during hunting season.
The challenge will be finding the time for it. I'm not getting much crafting done at all, lately!
I was able to do some actual crafting, today! I decided to crochet a ponytail hat, using the reflective thread my husband found for me, as an accent.
The yarn is Accent Brights from "Knit and Purl: Purveyors of Fine Yarn". It's a 100% acrylic yarn produce in Turkey for Aldi. My husband bought a case of it, each package containing 2 of 4 colours, to knit with, not noticing that it was a light weight yarn, when he wanted a medium weight yarn. So I've been using it more than he has!
This hat was worked with two strands of yarn, plus the reflective thread, using a 6mm, or J/10, hook. The design is about as basic as it gets. I started with 8sc around a magic ring, then alternated rounds of double crochet and single crochet for the crown and body of the hat. The reflective yard was used only in the single crochet rounds. The body of the hat is 68 stitches around.
In this shot, you can see the hole for the pony tail to be pulled through. It was made in a single crochet round by chaining 5 and skipping 5 stitches. The next double crochet round was worked into, rather than around, the chain stitches.
The brim of the hat is just 4 rounds of single crochet.
I then wasted a bunch of yarn trying to make a pom pom, which I almost never do with my hats, on a pom pom maker, using templates from the card that each package of yarn came with. The templates are basically circles, with a chunk missing. The instructions said to wrap the yarn around the two, back to back templates, until the card could no longer be seen. Then the wrapped yarn would be cut by sliding the scissors between the templates. Yarn could then be wrapped around the middle to tie it off, and the templates removed.
Except that as soon as I started cutting the wrapped yarn, it basically started falling apart. I even tried to thread the yarn to tie it off with, in between the templates and try and salvage the uncut wraps, but ended up cutting the tying yarn by accident. So I ended up just using a rectangle of light cardboard, folded in half, with the tying yarn tucked across in the fold. Once I was done wrapping, using up the last of the yarn, I tied it off, removed the cardboard, secured the tying yarn some more, then cut the loops. It's looser and floppier than I originally wanted, but it works. After trimming the cut ends to make them neat and even, I used a crochet hook to draw the two lengths of tying yarn through the top of the hat, then just tied it off on the inside with a shoelace knot. This way, the pom pom can be easily removed for washing. I'm pretty sure it would fall apart completely if it went through the wash!
The finished hat has a cozy stretch to it, and is comfortable to wear. I plan to give it as a gift. I hope the planned recipient likes it!
Well, the entire household got hit with colds, and I wasn't able to continue working on the ornaments until yesterday. (You can see my earlier posts here and here.)
I made up for it a bit, but getting six berlingot (also called Dragon Boats) done last night.
I made two starting with 4 inch squares, and four starting with 3 inch squares. Three of the smaller ones were made using a lighter carboard from gift boxes, which works better for the smaller size. I wouldn't want to use it for the larger sizes, though, as the cardboard would easily get squeezed inwards while the strands are being wrapped tightly around the forms. With a 4 inch square, each fold is about 2 inches long, while the 3 inch square results in 1 1/2 inch long folds.
The cats got at my materials and even wrecked the red and gold test berlingot I made, so I made another one using two strands of gold with one strand of red, all metallic yarn. I was able to rescue the tassel, at least, and attached that to the inside, along with the hanger and starting strands of thread, when assembling the shape.
The white and gold one is wrapped with crochet cotton thread. I was able to add beads to the points on that one, but didn't really have anything that matched the others, so the points just have dabs of fabric embellishment glue on them. I'm happy with how they turned out.
Here are some better pictures of the first ornament I successfully made.
For our small tree, I don't plan to make more in this size, but I might go as large as using a 5 inch square for the base, which should result in berlingot that are 2 1/2 inches along each fold. I'll have to find more cardboard that's slightly heavier than the gift box cardboard I used for the smaller ones, though, so I might just make some more from 4 inch squares, first.
Oh! I did finally find some of the double sided tape that I was looking for. It was being sold with the plastic film for winterizing windows. The double sided tape my daughter lent me is in a plastic holder, like Scotch Tape comes in, and the same width. The window tape is a bit narrower, and in a roll with a coated paper backing. I find it easier to be able to cut the strips to the lengths I want, place them, then remove the backing later. The tape is also lighter and more flexible, making it better for the smaller sized ornaments.
I do wish I had more materials suitable for decorating the points, but otherwise, I'm quite happy with how these are turning out!
I was able to get a few supplies for our Christmas decorations, but not everything I wanted. So I will just have to improvise, since I'm not willing to drive to the city to maybe, maybe not, find what I want there!
Since I was planning to make larger ornaments for the tree, I had hope to find some nice Christmas yarn but, alas, there was none to be had in town. Not even in embroidery thread or craft cord! Bizarre.
I did have plenty to choose from at home, though.
I have a small amount of gold crochet thread with a metallic strand for some sparkle. I also have most of a package of sparkly Lion Brand Bon Bons that I had to rescue from the cats a while ago.
I have other colours in the dollar store version, too.
Plus, some more crochet thread. The variegated one is left over from some some crochet covered Christmas ornaments I'd experimented with a while back, and there is still lots left.
Once I gathered up my materials, including pins and beads and other odds and ends I've got, I used a cereal box my daughters sacrificed for me to cut out some 3" x 9" strips, in the same manner I'd done before. Unfortunately, I somehow screwed up with the measurements on one of them and it went to waste.
One of the things I was looking for but had a hard time finding was plain double sided tape. You'd think that would be easy to find, but I kept finding double sided foam mounting tape, or glue dots, and so on. All things that are way too thick for what I had in mind. I did finally find some double sized adhesive in the dollar store, that I could use to adhere the tabs in the cardboard to make the shape, but...
... it turned out to be glue dots.
I double checked. There was nothing in the package that described them as glue dots. Only "double sided adhesive."
Sigh.
Thankfully, I'd picked up some glue sticks as well, just in case, and used that on the tabs to put the form together. Oddly, the glue sticks took longer to dry, and it had to be held together for much longer, before I could set it aside to finish drying.
So for the next one, I decided to try something different. I'd found this video...
It uses a more more compact way to make the shape's form.
Also, I like the idea of tucking a secret message inside the berlingot for the person it is meant to be given to.
I decided to give this method a try.
I started with a 4" square, then marked off the rest. When gathering my materials, I found my scoring tool, so I used that instead of a pen to mark the folds, then cut out the one unmarked corner.
As with the other method, all the folds are creased in the same direction.
Then I used ordinary tape to put it together.
Since I had the glue dots anyhow, I decided to use a couple at the more flattened points that I would be wrapping around, which also would hold in place my starting threads. The adhesive is quite malleable, so I was able to sort of wrap it around the point to cover all sides.
I chose a gold metallic to go with a plain red for this one.
When it was done, I was left with a problem.
A few of them, actually.
When it was time to sew in the thread ends, the glue dot made it very difficult. I had to really fight to get the needle under the strands, and ended up having to scrape adhesive off my needle, afterwards.
I had made a tassel for the bottom, but I have no way to attach it. I don't have needles long enough to go through, but even if I did, the glue dot adhesive ended up over the point, and I simply couldn't get a needle through it. It stuck to the needle to much.
At which point, my daughter brought up the "basket of berlingot" idea again!
I set that aside to think about it later. I still had the larger form I'd made, using the 3" x 9" strip of cardboard. Because of the size, I decided to use the purple and green crochet thread.
I was curious to see if a pattern would emerge, as happens with crochet, but not really. I kinda like it, but it's not very Christmassy. If I can figure out how to add a hanger and decorations at the points, that could easily be changed, though.
For the next one, I decided to start with a square again - I like this version, since it isn't as reliant on having an exact 1:3 ratio that the rectangle does. My daughter also came to my rescue. When I told her I couldn't find plain double sided tape, she told me she had some and offered it to me!
It was much appreciated!
For this next one, I changed things up.
The outer square for this one was 6", and the final result turned out to be very close in size to the 3" x 9" rectangle version.
I also made a hanger first, and taped it in place, on the inside, along with the starting strands of the yarn I chose. For this one, I went with three metallic colours, purple, blue and grey/silver.
Then the form was taped together with double sided tape, which served to help hold the strands in place while being wrapped.
Here is the final result.
When the wrapping was done, I was able to poke holes in the remaining points with a needle, then use a head pin and embellishment glue to add pearl beads.
Then I had to hang it in the tree (currently undecorated while the cats get used to it being there), so that the glue could dry without anything accidentally touching it. It will dry clear. I would have used silver head pins instead of gold, if I'd had any. 🤔
Which makes my third attempt today my first completed ornament!
For the next ones, I think I will stick to using squares to make the forms, instead of rectangles. It will be easier to have a variety of sizes. This finished one is definitely the largest I want to make for our tree. Any bigger would be just too much for it. Plus, smaller ones will need less yarn or thread to cover it, so those supplies will last longer, too.
I now also know that if I want to add a hanger to the top, or something like tassels to other points, those need to be added and affixed to the inside, before the form is folded and taped into place.
Hopefully, I'll be able to get back at it and more more of these, tomorrow.