Pages

Monday, January 25, 2010

Product review - rosewood hook

I finally got some photos of the crochet hook we got my younger daughter for Christmas. Unfortunately, we can't find the packaging for it, so I have no idea what company made it. Nor can I find it at the store's website. :-( I'll have to go back and look it up later.

DSC_8224crop50%

Carved of rosewood, it has a wonderfully shaped hook and throat. My daughter loves how the yarn slides on the wood, with just the right amount of friction.

DSC_8225crop50%

The hook is longer than most, with this attractive decorative end. It feels quite comfortable in the hand, too.

There is only one downside. If you look closely on the left edge in this photo, you can just see some flecks of colour. That's what's left of the size stamp that was there, rubbed off already from use. It's a size 4.00mm hook - at least that's what I remember it being. With my memory, I wouldn't say for sure. *L* I've got a size gauge somewhere, so I can double check.

My daughter loves it enough that she wanted to find more in larger sizes, even at a cost of over $16. To her, it's worth every penny. Unfortunately, they didn't have anything larger than 4.00mm, and they have no way of knowing when they'll be getting more, or what ranged of sizes they'll come in. It seems another company decides what gets sent for these hand crafted hooks and knitting needles. *sigh* Ah, well.

When I find out what brand it is, I'll be sure to pass that on, as my daughter highly recommends this hook.

Crochet - Reminiscence afghan, continued

I'm finally making progress on the Reminiscence afghan, which has been taking me a rediculously long time to do! I keep setting it aside and doing other stuff. My daughter should have been able to use it months ago. :-(

DSC_8233-50%

I'm finally working on the lace border. After reaching 50 inches long on the body portion, a round of sc needed to be worked as a foundation for the border. Getting the right number of sc evenly spaced on each side was irritating, as the number of rows divided unevenly. In this photo, you can see one corner of just the sc and the start of next round of dc, ch2. There were supposed to be exactly 312 ch 2 spaces when the second round was done. I kept getting 313. I thought I knew which corner I'd screwed the count up on and frogged back to it, only to still end up with 313. After checking and counting several times, I finally just spaced the last few out more to make up the difference and bring it back to 312. I just hope it doesn't turn out to be a problem later on. :-P

I'm into the 3rd round now, which includes picots. I don't like working picots. I never quite know where to insert my hook. It looks pretty, though. When I'm done this round, I'll know how badly I screwed up in that second round, if I did at all. :-P

Sunday, January 24, 2010

Book review: 1-2-3 Skein Crochet

Yesterday I took my younger daughter to the yarn shop we got her crochet Christmas gifts from. She was hoping to find another rosewood hook in a larger size. No luck with that, but she did buy 3 skeins of the same yarn we got her for Christmas, in purple. She's already started another shawl, using the same pattern as the one she made for herself. It'll be a bit bigger, since she used 2 skeins for that one. She just LOVES using the rosewood hook. :-D

As much as we loved the yarn shop, the prices often left us in shock. There were a few that were more reasonable that I would have loved to get, but had no real idea of what I'd make with them. I don't want to make more hats and scarves, and I'm not the sort to make purely decorative items. So what can you make when you can only afford a couple of balls or skeins of some gorgeous yarn?

Instead of yarn, I bought myself a book that might just fit the bill.

Title: 1-2-3 Skein Crochet

Edited by Judy Crow

All the projects in this book use, at most, 3 skeins of yarn. At the top of each new project's page, there's the title of the book with the number of skeins needed for that project highlighted, so you can tell at a glance how much is needed. The only thing to keep in mind is that if the project is a 2 parter (ie: hat and scarf, pillow and matching lapghan), that number is for only one project, not both. It's still handy, though.

The book is organized into 6 sections; Just for Men, Just for Women, Just for Babies, Just for Fun, Just for Home and Just Throws & Pillows.

First, my peeve. While I love that there is a section of items that would appeal to men, the whole men/women thing in craft books really irritates me. I like the stuff aimed for men more than for women because the patterns for women have an overabundance of fluffy, ruffly, "feminine" things. Men wear camo-socks. Women wear fuzzy mohair hand warmers. Men wear scarves with cable patterns, women wear scarves with lace and ruffles. Men's slippers are a cool basketweave pattern in brown. Women's slippers are pink with buttons and popcorn stitches (I'd hate to feel those popcorns under my feet while walking!!). Little girls wear lacy dresses. Little boys wear hoodies with Sheriff stars.

This sort of gender assignment is common, and it's why I search out patterns for men whenever possible. I find the stuff designed for women rarely appeals to me.

Which is one reason why I think this book will be quite useful. I like pretty much everything in the For Men section (though the Man's Black Hat looks like a strange combination of military wedge cap and a toque), and most of what's in the Throws and Pillows section. I can see making stuff from the Babies section for some friends who've had children recently. The Home section has the best toilet seat cover set I've ever seen. I don't normally care for those in general, but this set, I'll be making! About the only thing in the For Women's section I'd make is the glasses case - if I used one in the first place, which I don't.

Most of the projects are made using worsted weight yarn, which is pretty convenient. Specific brands used for each project are listed, along with the materials. The recommended yarns range from quite reasonable and easy to find, to brands/materials I wouldn't be willing to spend the money on, even if it's just a couple of balls. There's a skill level rating for each project as well, which is nice. Some of the instructions for projects that take more than a 2 page spread (including photograph) are split, with the remaining instructions continued at the end of the chapter. This is something I'm not too keen on, though I understand why it's done that way. It's not consistent throughout the book, though, as others have several pages of instructions before moving on to the next project.

All in all, this looks to be a useful book for attractive projects that use smaller amounts of yarn. There's a good variety of projects, too. I like it, and would recommend it.

Thursday, January 14, 2010

Knotty Wrap, instructions

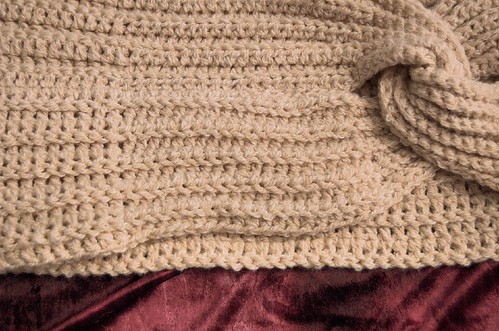
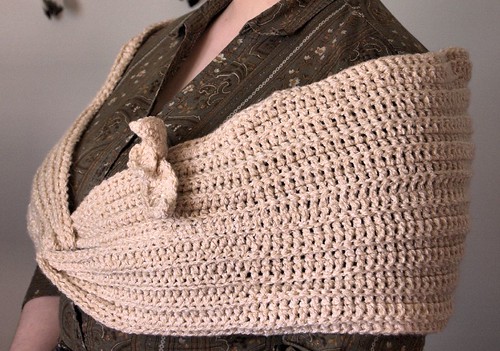
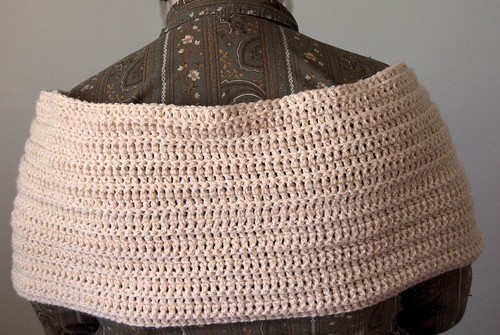
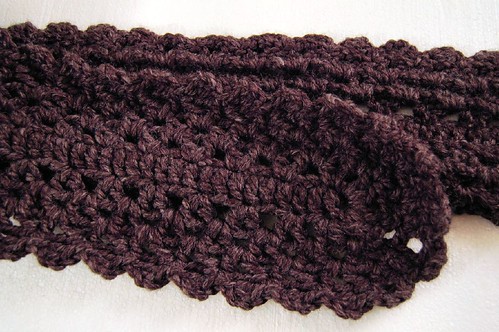
Here are some diagrams to make the Knotty Wrap. The basic instructions are based on my own frame, using medium weight (4) yarn and a 5.50mm hook. This works for about a XXL or someone with a larger bust. It can easily be resized, however, by changing the number of chains forming the back section.

Eight stitch markers will be needed.

Knotty Wrap, step one


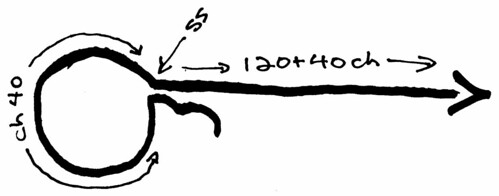
Step One: Ch 40 and ss to form a loop, being careful not to twist the chain. Chain 120 (or to desired length) plus 40.

Knotty Wrap, step two

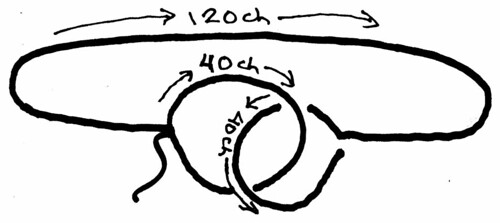
Step Two: Being careful not to twist the chain, pull the hook end through the loop, then ss to make another 40 ch loop. Pull yarn ball through first loop.

Knotty Wrap, step three

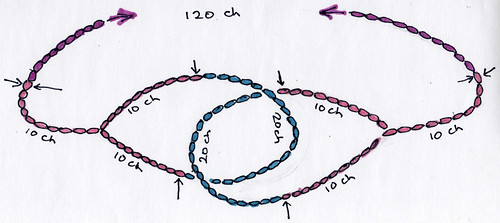
Step Three: place markers.

Counting into the loops from where they are joined, place markers at the 10th chain on either side. This will leave 20 chains, coloured blue in the diagram, in between two markers in each loops.

Counting away from the loops, place a marker at the 10 chain. This will leave the 120 chains (coloured purple) in between. A second marker will be added to this location as the piece is worked.

Knotty Wrap, step four

Step 4: Chain 2. Counts as first hdc. Working away from the loops, work 9 hdc (pink) to first marker. Moving marker up, work 120 (or desired length) dc into each chain to neck marker. Moving marker up again, work 20 hdc to third marker. Moving third marker up, work 20 sc around loop to next marker. Moving fourth marker, work 20 hdc. Stitches are now being worked into the opposite side of the foundation chain. Place new marker in last hdc and work 120 dc. Once again placing a new marker, work 20 hdc to second last marker. Move marker up and work 20 sc to last marker. Move marker up and work 10 hdc and ss into second chain of 2 ch start.

This completes one round. There should now be 8 markers separating sections of sc (blue) hdc (pink) and dc (purple).

To start the second round, ch 2 and turn. Working in back loops only, do 10 hdc, 20 sc, 20 hdc, 120 dc, 20 hdc, 20sc, (pull yarn ball through loop) 20 hdc, 120 dc, 9 hdc. 
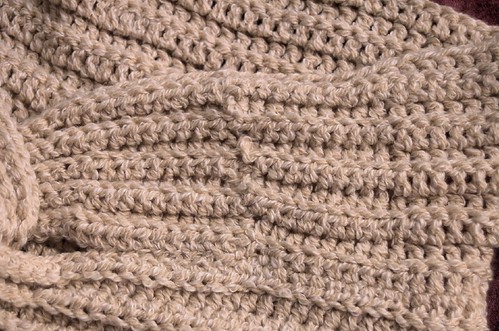
ss into top of turning chain. Repeat this pattern, turning at the end of each round and pulling the yarn through the loop as needed, until desired width is reached.

Finishing:

Sew in yarn ends. If needed, sew loops together for a few stitches to close them up.

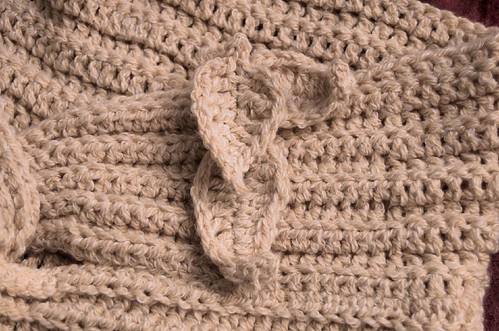
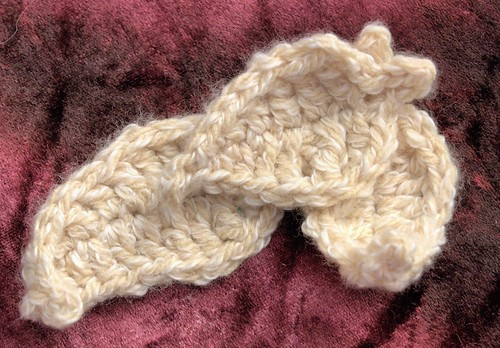
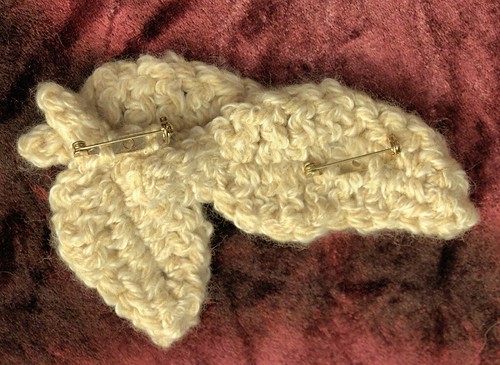
If desired, make pin in left over yarn or contrasting colour long enough to cover the turning seam. I made leaves, but feel free to make flowers or any other shape you prefer.

All tied up in knots - in detail

I'll be going into detail instructions in another post, but for now, here are some close up photos of the wrap's knot.

Knotty Wrap, knot detail

The wrap is worked in the back loops, turning after each round, to imitate a cable pattern. Shaping is done by transitioning from sc to hdc, dc, hdc and back to sc. In this photo, you can see the transitions between the different stitch heights.

Working in the back loops and turning after each round has made this wrap completely reverseable. There's just a front and a back, no inside or outside, or upside down. The loops were made large enough to pass the ball of yarn through. When I decided against going wider, I felt they looked too open, so I sewed about 10 stitches together on each to close them up.

Knotty Wrap... uhm... Hi, Harley.

I couldn't resist posting this one. While going for an overview shot of the knot, my younger daughter's cat decided to investigate and jumped into the photo. *L*

Knotty Wrap, leaf pin

I made up the removeable leaf pin as a way to hide the seam. Here, I've got the seam on the top left, but it can be worn wherever the seam happens to be sitting, and looks just as well on the bottom as the top.

Knotty Wrap, seam detail

The seam that results from turning at the end of the rows is in the middle of a section of hdc. It looked a little messier than I wanted, and I thought the leaf pin was a nice way to cover it up.

Knotty Wrap, leaf detail

The pin is three leaves made the same way, but of different lengths, tacked together with their yarn ends. I started with a foundation chain of the length I wanted. For the stem, I ss'd a few stitches, then used sc, hdc, dc and tdc stitches to get the leaf shape, with a picot to tip the leaf before mirroring the shaping stitches down the other side of the foundation chain. I wanted the leaves to look very organic and loose, so they're tacked together with as few stitches as I felt I could get away with, and I've left the ends and sides to curl and twist naturally.

Knotty Wrap, leaf detail

Because of the length of the seam I was wanting to cover, I went with two pin backs. This keeps the longer bottom leaf from moving around too much as it's being worn.

All tied up in knots...

I've borrowed the book, Wrap Style: Innovative to traditional, 24 inspirational shawls, ponchos and capelets to knit and crochet, by Pam Allen & Ann Budd (Interweave Knits) from the library. While flipping through it, I found a pattern called Twisty Turns that intrigued me. It was a knit project, done in a cable pattern. In essense, it's a long strip of fabric folded and twisted, then sewed together to form a wider fabric that looped together in the front.

I liked it, but there were two things against trying it out. First, I don't knit. Second, I don't like sewing seams.

After some thought, I figured there must be a way of doing it in crochet that wouldn't require sewing it together. A bit of experimentation, and I came up with the Knotty Wrap, which my daughter has been kind enough to model for me.

Here's 3 views of it for now.

Knotty Wrap, front

Knotty Wrap, side

Knotty Wrap, back

The wrap was made using some Bernat denimstyle in Chino. It's medium (4) weight yarn, 70% acrylic, 30% cotton, that's machine washeable and dryable. I love easy care fibres! :-D I was given 2 balls as a gift. Using a 5.50mm hook, it was just enough to complete this project, including the removeable leaf pin and the small amount of sewing I ended up doing. I was tempted to pick up a third ball to make it wider but decided against it, closing up the loops a bit, instead.

I will be posting more detailed photos, as well as information on how it was made, in a seperate post.

Sunday, January 10, 2010

On the quiet side of things...

After the rush to get so many projects done in short times, I'm kinda enjoying the slow down. It makes for a boring blog, though. ;-) I do have some photos of gifts I made waiting to post, but I won't actually be able to mail the packages until next weekend. I did find out how much they would cost. The one going to the US is very reasonable (waves hello in the direction of Illinois), but the one that's going to the UK - good Lord! The boxes are the exact same dimensions. The weight difference is a fraction of a gram. The difference in price? Astronomical. When did mailing things overseas get so bloody expensive? Well, that's what I get for neglecting to send the things I wanted to for 2 Christmases in a row. One thing's for sure - the package *isn't* going by air mail! Sorry, L, yours is going to be spending some extra time in transit.

Which means it'll be a couple of weeks before I post one set of photos, and a month or more for the other.

I'll be sure to have other photos to post before then.

Meanwhile...

For some weird reason, I am totally procrastinating on my daughter's afghan. I'm so close to finishing the body, and I've just stopped. I think I'm getting irritated at measuring it, doing the couple more rows it should take to reach the 50" I'm shooting for, only to measure it again and find I need to do a couple more rows. I'm trying to lay it down just as flat and carefully each time, but ... well... it's not co-operating. Not a real excuse, though. I really need to finish it.

Meanwhile, I was inspired by a book a borrowed from the library. I saw a knit pattern that looked really neat and I'm modifying it for crochet, but in such a way that there will be no seams to sew; it's all being done in one piece. It seem to be working rather well. Once it's done, I'll be sure to post detailed instructions. Assuming it actually does turn out. ;-)

Until then, I really need to get my lazy but in gear and finish things. ;-D

Wednesday, January 6, 2010

Done, and Ready for delivery

Tonight I got my customer order finished. :-)

The yarn used is Lion Brand Wool-Ease Thick & Quick in Charcoal (the closest thing to black they had). It took 4 balls to do all the items. I must've had bad luck this time, though, as every one of the balls had knots in them - yarn ends tied together, not knots within the strands themselves. One of them actually had 2 knots in it! Of all the balls of this yarn I've used, this is a first! Irritating and a waste of yarn, since I have to cut the knot out and leave long enough tails to sew them into the item. I haven't had yarn with this many knots in it since the yarn I used to make my daughter's coat.

All the projects were done using a 9.00mm hook.

DSC_8157scarf

The scarf pattern requested is modified from one in Think Pink, a book of crochet projects for victims of breast cancer and to promote breast cancer awareness. The original used a much finer yarn and was, of course, pink. Using the chunky yarn, the foundation chain is half the number of stitches from the pattern, and there was some modification while curving the ends.


DSC_8152earwarmers

The earwarmers are my pattern, slightly tweaked one last time. Well... maybe I shouldn't say one *last* time, knowing my insatiable urge to muck about. ;-) I'm really happy with the changes, though.

DSC_8151mittens

The mittens are the same pattern I used during my crochet blitz before Thanksgiving last year. With those, I found them a bit short and added the cuff. Using the super bulky yarn, they were a decent length, so I left the cuffs as they were. I didn't bother changing hook sizes for the thumb, though. I found I didn't have to modify the number of stitches in each round with this yarn - the bulk of the yarn itself makes up for the larger sized hook.

I think she'll be quite happy with them. :-)

Saturday, January 2, 2010

This is cool!

In the last little while, I've finished some gifts I've been working on and getting parcels ready to mail out. This has given me a chance to work on the Reminiscence Afghan I was supposed to finish for my daughter before it got cold. *blushing in shame* I'm at the point where I'm stopping to measure the entire piece every couple of rows, as the body is supposed to be done at approx. 50 inches. I'm about 2 rows short... but I've been about 2 rows short the last three times I've measured it. :-P

Today, however, I got an interesting surprise. A phone call from one of the members of the housing co-op we live in. She'd just lost her hat and was wondering, could I make some earwarmers for her? With a matching scarf, like the ones I had in the co-op craft sale? In black?

(Oh, dear... I just realized... she might have meant the single lacy designed scarf I made, not the several others I'd made in a different style. I'll have to call her back about that!)

A few minutes after we worked out some details and said our goodbyes, she called back. Can I do mittens, too? she asks. *L*

So tonight I picked up the yarn and am working on the set. The earwarmers worked up quickly - I've tweaked the pattern a little bit more, and they're the best ones I've made yet. I've finished the first mitten, but will leave the second one for tomorrow. I can then verify the scarf pattern, too. If it is the lace pattern scarf I'm thinking of, we'll need to figure something out, because I've found that pattern really doesn't work well with bulky yarn, never mind super bulky. I can certainly do it, but the pattern will get rather lost with such thick yarn. Especially since she wanted it to be quite long. I'll find out for sure, tomorrow.

Until then, I'm just thrilled about getting a call out of the blue like this for a custom order!