Pages

Thursday, August 25, 2011

Little pieces of history, part four

I've fallen behind on blogging about the wonderful pieces of fancywork I inherited.

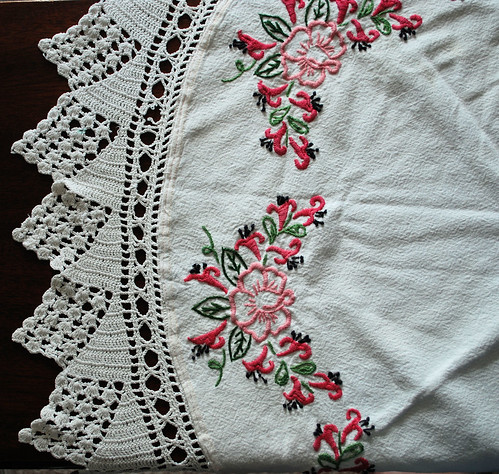
I think this next piece is my favourite of them all. A gorgeous round tablecloth, just over 2 feet across, not counting the crocheted edging.

Hand made beauty

This is another piece from my great aunt. The fabric is thick and densely wove, and looks to be cotton. I got a little surprise when I examined it more closely for this post. A distictive numerical stamp on the back. I do believe this used to be some sort of sack! A flour or sugar sack, perhaps.


Hand made beauty

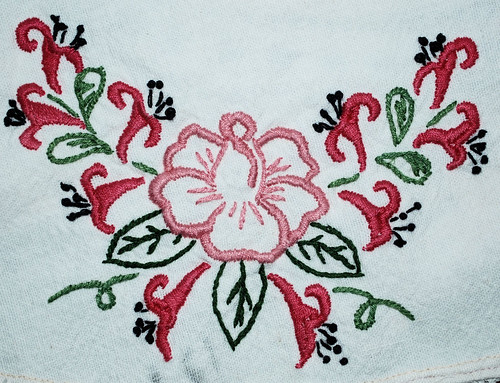
Here's a detail of the repeated floral motive. It is done in embroidery floss using satin stitch, stem stitch and French knots. The black marks that you see on the bottom are from what looks to be other numbers on the back, written in marker, that extend beyound the hem. The fabric was definitely repurprosed.

Hand made beauty

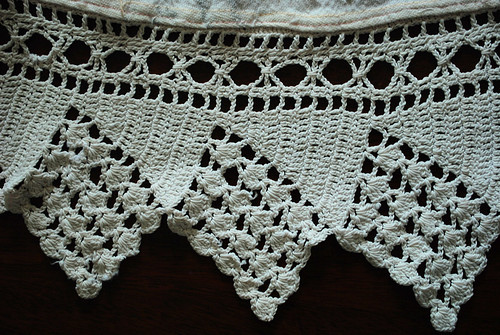
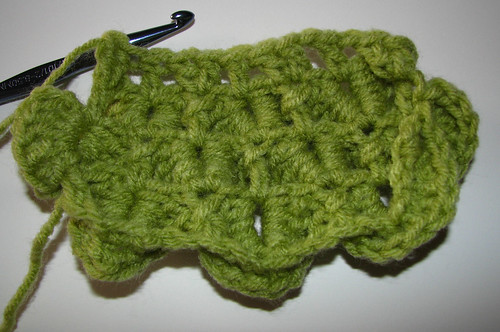
I just love this thread crochet border! There is some minor damage to a couple of lengths of chain that I have found, and a couple of dots of what looks to be rust, but aside from that, this piece is in suprisingly good condition. Very sturdy. I'm pretty sure I can fix the damage to the crochet myself, too, in such a way that it would not be noticable anymore. I just have to make sure I can match the thread, first.

The hem is something I find really remarkable about this piece. As you can see from the photo above, it has two rounds of machine stitch. Hemming something round is always a challange, so I'm impressed with how neat it is right from the start.

It's the back of the hem that has me fascinated! Looking at it, there's a bit more concern about the condition of the piece, and it will need gentle care.

The crochet edging was actually worked directly onto the fabric. It looks like a circle of single crochet was worked around the edge of the circle first, encasing about a quarter inch of fabric, but worked so that the top of the stitches faced *into* the work, instead of out. At least one more round of single crochet was worked after that, then there's a ring of double crochet worked around the edge, serving as the foundation for the rest of the edging, which is worked in rows.

The foundation portion of the edging is fastened down with basting stitches, the edge is folded under for the hem, then machine sewn, creating the hem and turning the crochet foundation to the outside of the piece at the same time. The very first round of single crochet is completely hidden in the back. This is the part that is showing some wear. You can see the loose ends of the weave through the crochet thread, and in a couple of places they've worked themselves out of the loops around them, leaving empty crochet stitches hanging around. Of the two rounds of machine stitch, the inside one used to just catch the edge of the hem, but as the ends worked themselves loose, very little of it is still attached. It's the outer ring of machine stitching that is holding the hem in place.

I can't tell if the edging was completed before or after the hem was turned and sewn. I would guess after, or the pulling on the fabric would have yanked the crochet foundation right out of the weave. Unless the fabric was cut *after* the crochet was worked. That's certainly possible. I would love to have seen it being worked.

It's a remarkable piece, and I just love it!

Lion Brand looking for quest bloggers

Do you have a yarn craft related blog? You might want to check out Lion Brand's Invitation to Guest Bloggers. :-)

Monday, August 22, 2011

What I've been doing

It's been a while since I've posted here, so I thought I'd do an update on what I've been doing.

Swatches.

Lots and lots of swatches.

Swatching away.

These are for the crochet instructor's course I'm working on. There are several parts that I have to work with. A Teacher's Handbook (not pictured), the course binder and the lessons, which you can just see under the yellow and pink swatches on the left. I've been trying to stick to the same type of yarn and range of colours, unless something is specified, to keep it cohesive looking. That's just my own thing. Plus, since I'm doing this as a Michael's instructor, I am sticking to yarns I get from Michaels.

Throughout the course book, there are a number for Teacher Samples to make up. Those are the ones you see on the right. Following the patterns and instructions in the book, a lot of them are quite small; about 4 inches square, maybe.

Then I have to do the same stitches for my lessons. These require re-calculating the gauge to make 5 inch swatches (though with some diamond shapes, the 5 inches refers to the widest row). With 5 inch swatches, I am them supposed to give the gauge for 1 inch, in stitches and rows. I've been able to switch up hook sizes for most of them to get a nice round number in that 1 inch, but for some patterns, it's just not possible. That shell stitch, for example, starts with a chain in multiples of 6 + 1. Counting the turning chain, the pattern always works up to an odd number of stitches in each row. I can figure out how to make it a 5 inch swatch easily enough, the total number of stitches in each row will never work out to be divisible by 5. That means the gauge works out to include fractions of stitches, no matter what. :-P If I were writing a pattern and needed to give the gauge, I would never break it down to 1", but use whatever number of stitches works out into a round number. If I were to look at a pattern for something I wanted to make and saw a gauge of "3.6 dc = 1 inch" I wouldn't buy the thing.

This is just partway into lesson three for the first level. After taking this shot, however, I discovered a mistake I made with the shell stitch swatch you can see in pink. I'd accidentally read the wrong line and used worsted weight instead of sport weight. I caught it when working on the next sample, which was the one that is supposed to be done in worsted weight. I've reworked it since.

I don't really like doing swatches. They are very important for gauge if you're doing something fitted. They are great for practising stitch patterns. They are not a step to skip. I still don't like doing them. My problem with them has more to do with my frugality. *L* They seem like so much wasted yarn! When doing swatches for a project, I'll make up the swatch, without cutting and finishing off the yarn. Then I'll figure out any adjustments I may need to do to get the right gauge, then undo the swatch and use the yarn in my project. I look at my pile of watches and, while I'm quite pleased with how they look, I can't help but wince. I tell myself that they will remain useful as references later, so it's not really wasted yarn. Especially the teaching aids.

Eventually, I'll believe myself. ;-)

Monday, August 15, 2011

Thread crochet flowers

Well, it's official. I am obessed with crochet. I am now doing it in my sleep! *L*

The day before I was to visit a friend in the hospital, I was thinking about how I wanted to bring her something to cheer her up. Brightly coloured flowers came to mind - flowers that would never wilt!

The next morning, I woke and found I'd worked out a completely different way to do flowers than I usually do! LOL I ended up visiting her a lot earlier than originally planned, so I ended up finishing these two off while I was there.

IMG_5047crop50%

I started off with a centre much like I usually do. A bunch of hdc were worked around a chain ring. In these, the ring was 6 ch with 12 hdc. Then I made the loops to work the petals into by doing a front post sc around an hdc, 3 ch, skip 1 hdc. The next round was exactly the same, but worked into the skipped hdc.

The petals were what I changed completely. Usually I work shell stitches into the loops. This time, each petal is worked by doing several foundation dc, 3 dc at the top, then dc into the bases of the foundation dc. Each petal is anchored by slip stitching into the sc in between each loop.

The leaves were also done in the same way as the petals, controlling the width of the leaves by changing the height of the stitches, and throwing a picot in to make a more defined tip. I'll have to write up detailed instructions later on, but I'm still tweaking.

After securing the ends and sewing the leaves onto the backs of the flowers, I left the long ends so that my friend could use them to fasten them to something, if she chooses.

I tweaked the design a bit more to make this flower.

IMG_5070cropped

This Black Eyed Susan was done with dc instead of hdc in the centre, and I worked the petals more like the leaves in the earlier flowers, changing up the front and back petal lengths and widths, as well as adding picots to the tips for definition. That cat hair is just an extra bonus. :-/ LOL I'm really happy with these, and plan to make many more. I don't expect to tweak things much beyond this particular flower.

The red, white and yellow threads used for these are from the stash I inherited from my great-aunt, while the hook I used is from a set given to me by the friend I was visiting in the hospital.

It's little details like this that make hand crafted projects so special! Even the smallest of things can have big stories behind them.


Learning Crocodile Stitch

Not too long ago, I saw some new items on Ravelry that featured crocodile stitch. They looked awesome, and I really wanted to figure out how to do it. Every time I sat down to learn it, though, something would come up and interrupt. Isn't that always the way? *L*

Well today, I was finally able to do it! I got a chance to sit down with hook and yarn and watch this video.


Here is what I made while watching this.

IMG_5059crop50%

A front view of the 7 rows I've worked so far.

IMG_5060crop50%

And here's the view I kept wanting to see every time I saw something done in this stitch - the back! It finally makes complete sense to me.

If you look at the top row in my photos, you can see an alternating pattern of 1 dc, then 2 dc in the same space. These are each seperated by 1 ch (in the foundation row, there are 2 ch in between). The scales are worked around each pair of dc. 5 dc are worked around the post of the first one, then back up the post of the second one. The scale is then anchored by doing a slip stitch around the post of the lone dc. In the next row, the lone dc is worked into the space of the scale, while the pair of dc's are worked into the top of the lone dc that had been slip stitched around. Every even numbered row, which makes the scales, is worked on top of every odd numbered row. It makes for a very interesting effect! Once I've got a bit more practise, I plan to work something up using a much finer yarn. I'm already thinking of ways to modify it, too!

I think I'm going to really enjoy this stitch!

Experimenting with a new yarn.

Michaels has brought in a whole bunch new yarns that have caught my attention. This in particular.

DSC_9096-50%

This is Red Heart Boutique Doodle yarn. It's a 100% polyester yarn that's listed as 6/Super Bulky, with a recommended hook size of Q/16mm or needle size of 50US/25mm. It's the thickest, squishiest yarn I've ever seen! Very soft feel to it, too.

The sample at the display, however, was very disappointing. It's just a length of the yarn, braided. So I went looking at the free patterns available at Red Heart for this yarn.

More disappoint. I can't believe the folks at Red Heart couldn't come up with something more creative. I kept going back to the display, wondering what I would make with such a soft, squishy and bulky yarn.

Perhaps I'm showing my age, but the idea that kept popping into my mind was a butt pillow. *L* There have been a few times recently where I really would have liked having some sort of cushion I could use to sit on, such as during Taste of Edmonton, when what few seats were available were quite wet from the rain.

So I finally forked over the cash and got the two hanks pictured above.

After some thought, I decided to do the equivalent of double ended crochet. I dug up a piece of dowling to serve as a double ended hook. Here is my first attempt.

DSC_9148crop50%


I started off by hand chaining 7 stitches. I picked up the loops through the back bars of the chains, placing them on the dowling. The dowling serves only to hold the loops and nothing else. Tension was all maintained by hand.

DSC_9150crop50%

After turning the work and pushing the loops to the other end, the new colour was pulled through the loops...

DSC_9152crop50%

Then the new loops were drawn up the same way as Tunisian Simple Stitch.

The whole thing was turned and the loops pushed to the opposite end of the dowling to pick up the first colour again.

DSC_9153crop50%

Here the first colour has been drawn through the loops.

DSC_9154crop50%

Then the new loops were picked up again.

Working with the dowling was all right except that it wasn't as smooth as it should have been, making sliding the loops from one end to the other less than idea. Here is how it looked at the end.

DSC_9156crop50%

Here's one side, before I wove the loose ends in.

DSC_9157crop50%

I had more of the lighter coloured yarn left, so I hand chained it to make a carrying loop before tucking the end in.

DSC_9158crop50%

Here's how the other side looked.

I was no happy with this. As the work progressed and I got more used to handling the yarn and loops, my tension changed a fair bit. The last rows were quite a bit tighter and denser, and I found I preferred it. I also didn't like the dimensions very much. So I undid it and started over.

Here's the finished result.

IMG_5064crop50%

IMG_5065crop50%

For this, I worked with 10 stitches, but made everything a lot tighter, making the resulting butt cushion smaller than thicker. I ended up with two fairly long ends, so I hand chained them and tied them together to make a handle.

That's when I discovered a problem with the yarn. The yarn is made up of short lengths of fibres caught in a twisted core. Some of them came loose as I was tying the ends of the two colours together. The next thing I knew, tufts of colour was bursting loose in my hand. I ended up taking the small lengths of yarn that had tied the hanks together to tie around the ends to stop it, but those started coming apart, too. It seems stable now, but I'm now afraid the knot will simply disintergrate at any moment!

Aside from this, however, I consider the project a success. I still ended up with the last rows looking narrower than the first rows, but I don't think much can be done about that.

It is also a very comfortable butt pillow! *L*

Wednesday, August 10, 2011

Demo and class schedule

For those in Edmonton, here's my demo and class schedule at the Clareview Michaels for the next while.

For August, 2011
Friday the 12th: demo, 1:30-3_30pm
Wednesday the 17th: Discover Textured Stitches, 6:00 - 8:30pm
Thursday the 25th: Discover Granny Squares, 4:00-6:30pm

For September, 2011
Friday the 9th: Discover Single Crochet, 1:30-4:00pm
Saturday the 10th: Meet the Instructor, 1:00-3:00pm (meet all the Clareview Michaels instructors)
Friday the 16th: Discover the Tall Stitches, 1:30-4:00pm
Friday the 23rd: Discover Textured Stitches, 4:00-6:30pm
Friday the 30th: Discover Granny Squares, 4:00-6:30pm

For October, 2011
Friday the 7th: Discover Single Crochet, 4:00-6:30pm
Friday the 14th: Discover Tall Stitches, 4:00-6:30pm
Friday the 21st: Discover Textured Stitches, 1:30-4:00pm
Friday the 28th: Discover Granny Squares, 1:30-4:00pm
demo not yet scheduled

I hope to see some of you there! :-)