Someone was kind enough to nominate this blog on TopicsBest.com. My thanks, to whoever it was!
Wednesday, January 26, 2011
Saturday, January 22, 2011
Red and black scoodie - part three
Part One
Part Two
Here is the pattern for the scoodie. If anyone tries it out, please let me know if there were any errors I missed.
(note: I forgot to mention in part one that I ended up changing the hook size, too).
Yarn: Phentex or Bernat Chunky, one 400g ball in red or colour of choice
hook: 9.00mm
optional edging
Yarn: Red Heart Foxy, in black or contrasting colour of choice
hook: 3.50mm
Beginning panel
note: unless otherwise noted, the turning chain is NOT counted as a stitch, and is skipped after turning or starting a new round.
chain 8, plus 2 for turning (total 10 ch). Turn
1) Skip 2 ch; work 1 hdc into the back bar of remaining 8 ch. Ch 1, turn
2) Work 1 hdc into each stitch across, ch 1, turn
3) 2 hdc in first stitch, 6 hdc across, 2 hdc in last stitch. Ch 1, turn
4) 10 hdc across, ch 1, turn
5) 2 hdc in first stitch, 8 hdc across, 2 hdc in last stitch, ch 1, turn
6) 12 hdc across, ch 1, turn
7) 2 hdc in first stitch, 10 hdc across, 2 hdc in last stitch, ch 1, turn
8-15) 14 hdc across, ch 1, turn. For row 15, turn to side.
Side and back
1) Work hdc evenly around 3 sides, working 20 hdc on each side and 8 hdc at the back for a total of 48 hdc. ch 1. Turn
2-9) Work 48 hdc around. Ch 1 and turn
Adding the scarf:
10) 48 hdc around. Chain 101, turn
11) skip first chain stitch, 148 hdc across to opposite end of hood. Work 100 foundation hdc for second half of the scarf. Ch 1, turn.
12-14) 248 hdc to end, ch 1, turn
Row 15 becomes round 1.
round 1) 247 hdc across. In last stitch work [1 hdc, 1 ch, 1 hdc] to turn corner
work 5 hdc across edge, [1 hdc, 1 ch, 1 hdc] to turn corner
work 97 hdc across
In the scarf/hood corner, work 2 hdctog (half double crochet together) using last stitch of the scarf and 1st stitch on the side of the hood.
Work 12 hdc along the side, 14 hdc across the top and 12 hdc along the other side
Work 2 hdctog in last stitch of hood and first stitch of scarf
97 hdc to end
In last stitch, [1 hdc, 1 ch, ss (slip stitch) into first hdc] Do not turn.
2) ch 1, hdc into same stitch as ss. hdc to end. [1 hdc, 1 ch, 1 hdc] in ch 1 space, 7 hdc across end, [1 hdc, 1 ch, 1 hdc] in ch 1 space, 97 hdc across to hood, 2 hdctog, 11 hdc up side, 2 hdctog, 11 hdc across top, 2 hdctog, 11 hdc down other side, 2 hdctog, 97 hdc to corner, [1 hdc, 1 ch, 1 hdc] in ch 1 sp, 7 hdc, [1 hdc, 1 ch, 1 hdc] in ch 1 sp, ss into first hdc. Do not turn.
3) Ch 1, hdc into ss space, hdc to end, [1 hdc, 1 ch, 1 hdc] in ch 1 sp, hdc to next corner, [1 hdc, 1 ch, 1 hdc] in ch 1 sp, 98 hdc to hood, 2 hdctog, 11 hdc, 2 hdctog, 8 hdc, 2 hdctog, 11 hdc, 2 hdctog, hdc to end, [1 hdc, 1 ch, 1 hdc] in ch 1 sp, 8 hdc, [1 hdc, 1 ch, 1 hdc] in ch 1 sp, 1 hdc, ss to first hdc. Finish off yarn.
Optional edging.
Join contrasting yarn. Work 2 sc into each stitch, including ch spaces, around entire scoodie. ss and finish off end.
Red and black scoodie - part two
Part One
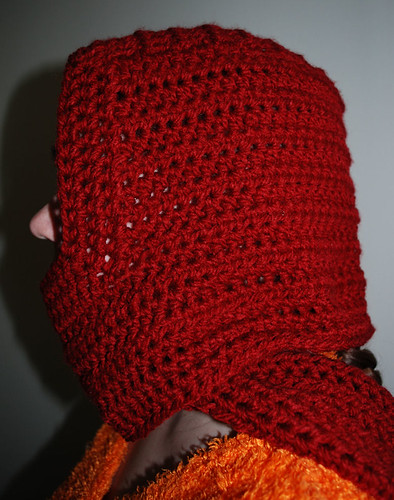
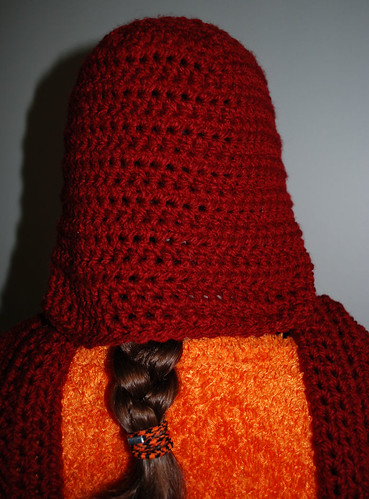
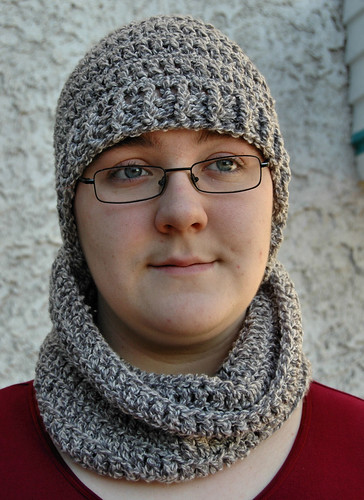
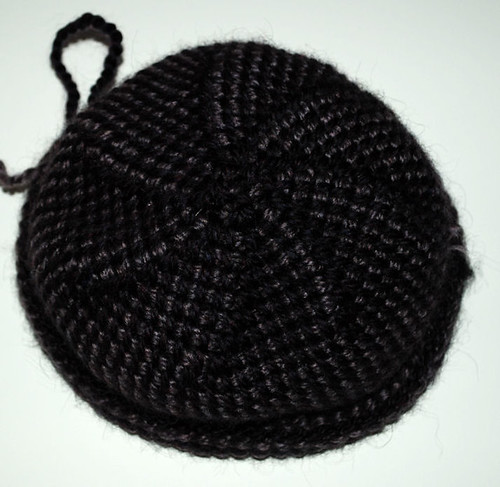
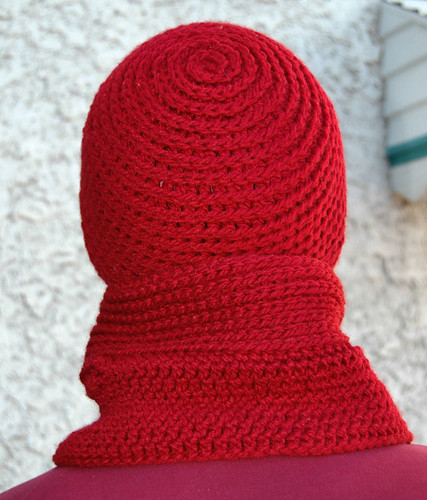
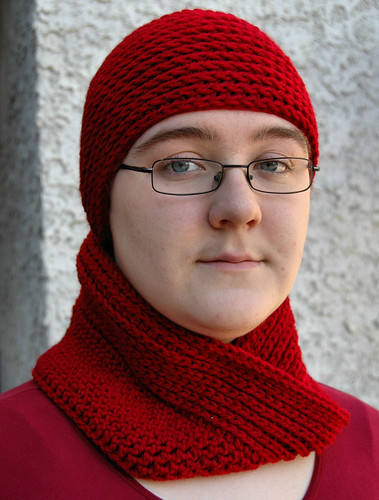
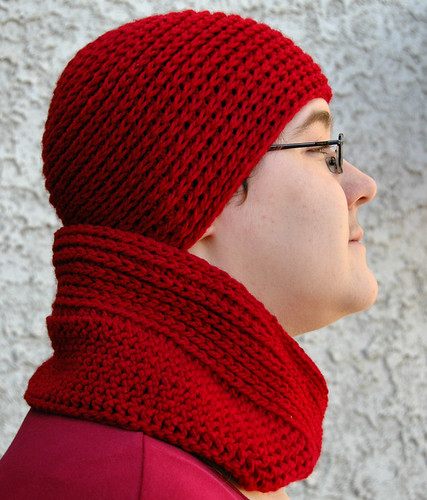
After finishing up the scoodie with the red yarn, it seemed to be missing something. Digging through my stash, I found some fuzzy novely yarn left over from the book cover I'd made before. The black edging against the bright red gave it a nice, finished look.
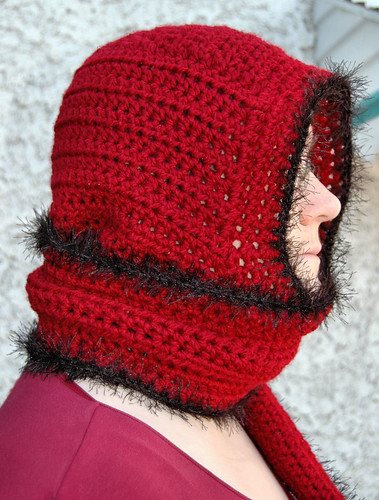
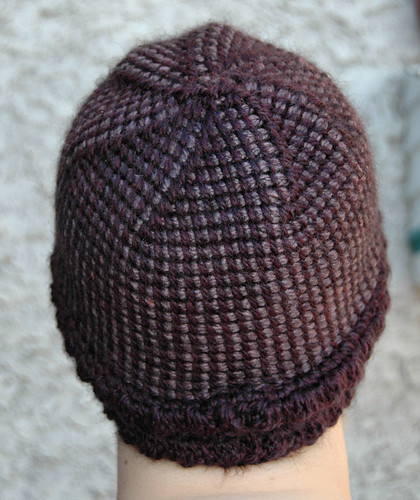
In making the scoodie, this is how it was intended to be worn, with the beginning panel at the top.
This way, the scarf wraps around the face a lot better...
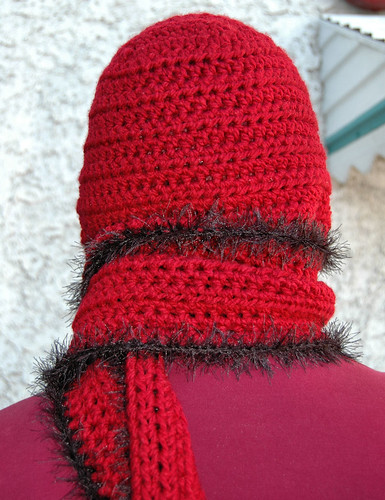
... leaving a smooth, seamless look on the back.
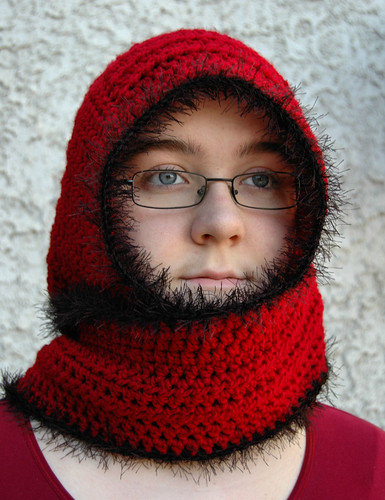
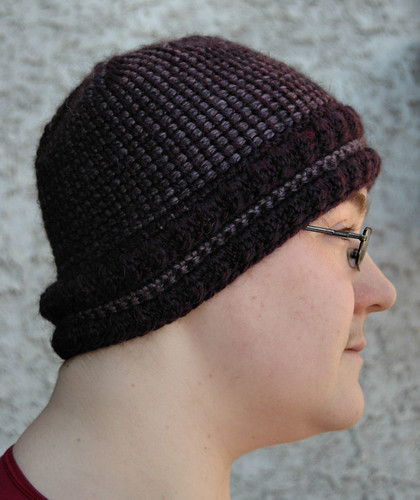
However, we found it worked quite well worn flipped around.
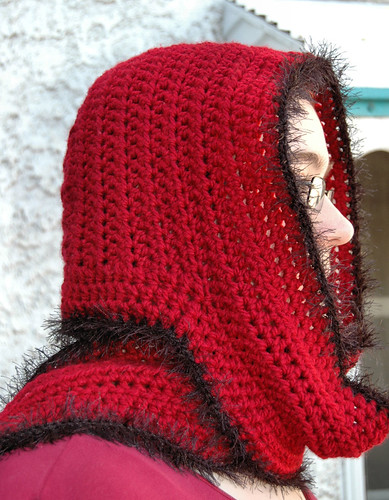
If there's no need to protect the face, the scarf hangs down nicer this way.
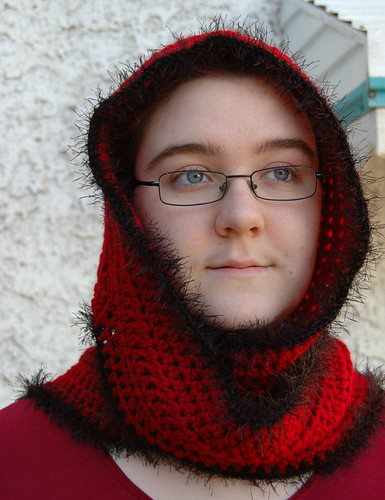
It's long enough to still protect the neck.
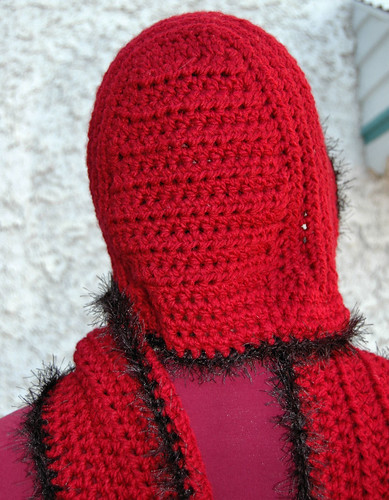
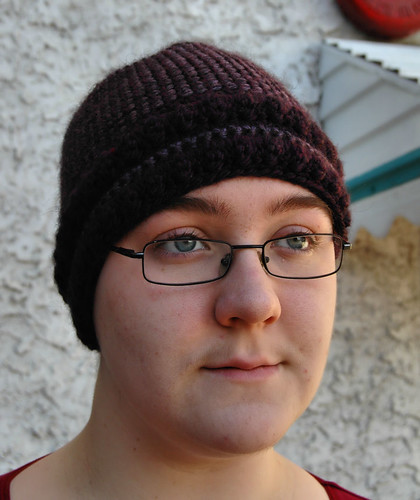
Of course, with the panel now at the back of the head, the seamless look is lost, if that's at all an issue.
All in all, I'm really happy with this version.
After finishing up the scoodie with the red yarn, it seemed to be missing something. Digging through my stash, I found some fuzzy novely yarn left over from the book cover I'd made before. The black edging against the bright red gave it a nice, finished look.
In making the scoodie, this is how it was intended to be worn, with the beginning panel at the top.
This way, the scarf wraps around the face a lot better...
... leaving a smooth, seamless look on the back.
However, we found it worked quite well worn flipped around.
If there's no need to protect the face, the scarf hangs down nicer this way.
It's long enough to still protect the neck.
Of course, with the panel now at the back of the head, the seamless look is lost, if that's at all an issue.
All in all, I'm really happy with this version.
Friday, January 21, 2011
Red and black scoodie - part one
After making my hooded scarf prototype a while back, I wanted to work the design again, this time using a different yarn and actually taking notes of the pattern. I've got a few photos of the start of the process. Unfortunately, I wasn't able to get photos of a number of steps. I will, however, be able to put up the pattern itself later on, so those details won't be included here.
For this version, I chose to work with a bulky yarn, Phentex Chunky. (I'm not bothering to link to them, since they don't seem to have much of a website.) They're a Canadian company, and the yarn is similar to Bernat Chunky, which would probably be fine as a substitute (in fact, I think they're the same yarn - I've found the same free patterns on the labels of both brands). I found the yarn at a Zellers, and worked with a 6.00mm hook.
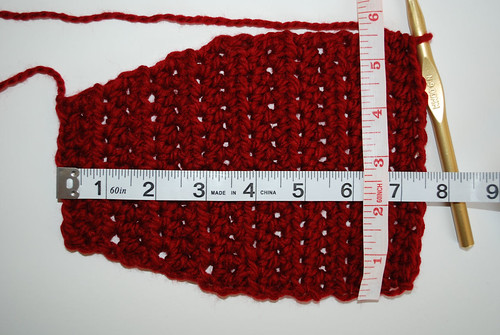
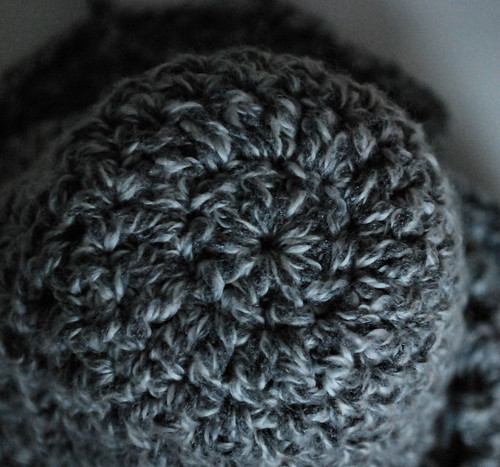
I ended up making a couple of false starts with this. Like my prototype, I began with a top panel, but this time I wanted to have the back slightly narrower than the front, instead of just a rectangle.
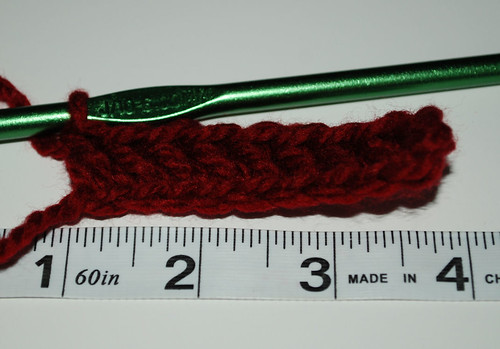
Working into the back bars of the foundation chain, leaving the top loops to work into when the back and sides are done. The first row of this panel is meant to rest at the top of the back of the head.
For my first attempt, I tried working increases into the middle of the panel, instead of the sides, until it reached the width I wanted. At this point, I was still okay with how it was turning out, but not sure if I liked the centre increases.
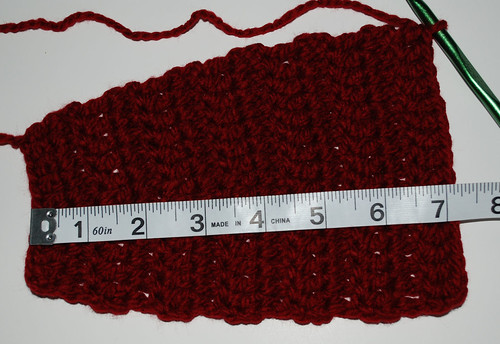
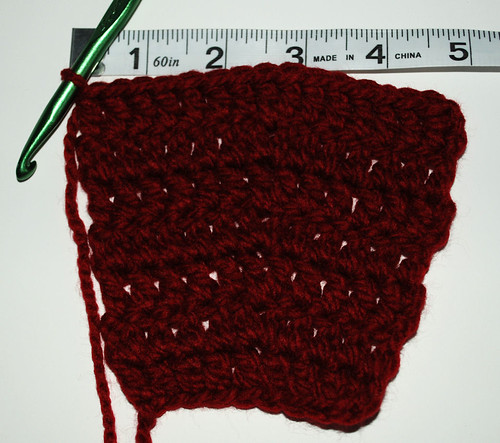
Then I worked straight rows until it reached the length I wanted, which is roughly the distance from the top back of the head to the hairline.
Instead of turning at the end of the row, I just started working along the edge to start building up the side.
After I worked around three sides, I realized I wasn't happy with this. One of the reasons I went with a narrower back is to avoid the "points" that showed up at the corners. This yarn is a lot less flexible than the Homespun I used before, making the points at the corners a lot more pronounced, instead of less.
I ended up frogging the whole thing and starting over a few times.
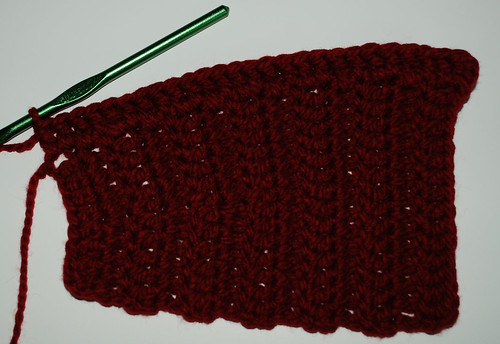
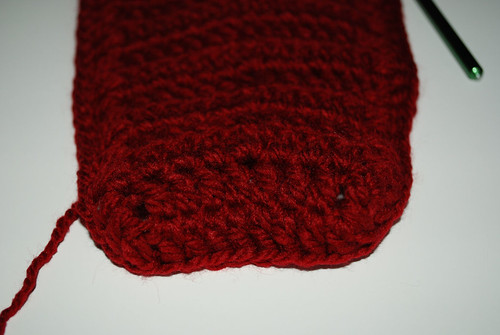
For my next attempt, I did the increases and the start and finish of each row instead of the middle. I also changed stitches from dc to hdc.
Unfortunately, I wasn't able to get any photos of the next steps at all. The details will have to wait until I get the pattern up.
Here is the essentially complete scoodie. I did add to it, but that will be in part two.
In this photo, you can see the different sections fairly clearly. There are no "points" at the back of the head (yay!). I'm happy with how seamless the different areas mesh together.
Another change from the prototype is that I did NOT do any decreases at the back. The scarf portion is long enough to wrap around the back and get tied in the front.
Tomorrow I'll have photos of the finished, embellished scoodie, and then I'll put up the pattern itself.
For this version, I chose to work with a bulky yarn, Phentex Chunky. (I'm not bothering to link to them, since they don't seem to have much of a website.) They're a Canadian company, and the yarn is similar to Bernat Chunky, which would probably be fine as a substitute (in fact, I think they're the same yarn - I've found the same free patterns on the labels of both brands). I found the yarn at a Zellers, and worked with a 6.00mm hook.
I ended up making a couple of false starts with this. Like my prototype, I began with a top panel, but this time I wanted to have the back slightly narrower than the front, instead of just a rectangle.
Working into the back bars of the foundation chain, leaving the top loops to work into when the back and sides are done. The first row of this panel is meant to rest at the top of the back of the head.
For my first attempt, I tried working increases into the middle of the panel, instead of the sides, until it reached the width I wanted. At this point, I was still okay with how it was turning out, but not sure if I liked the centre increases.
Then I worked straight rows until it reached the length I wanted, which is roughly the distance from the top back of the head to the hairline.
Instead of turning at the end of the row, I just started working along the edge to start building up the side.
After I worked around three sides, I realized I wasn't happy with this. One of the reasons I went with a narrower back is to avoid the "points" that showed up at the corners. This yarn is a lot less flexible than the Homespun I used before, making the points at the corners a lot more pronounced, instead of less.
I ended up frogging the whole thing and starting over a few times.
For my next attempt, I did the increases and the start and finish of each row instead of the middle. I also changed stitches from dc to hdc.
Unfortunately, I wasn't able to get any photos of the next steps at all. The details will have to wait until I get the pattern up.
Here is the essentially complete scoodie. I did add to it, but that will be in part two.
In this photo, you can see the different sections fairly clearly. There are no "points" at the back of the head (yay!). I'm happy with how seamless the different areas mesh together.
Another change from the prototype is that I did NOT do any decreases at the back. The scarf portion is long enough to wrap around the back and get tied in the front.
Tomorrow I'll have photos of the finished, embellished scoodie, and then I'll put up the pattern itself.
Wednesday, January 19, 2011
Earwarmer hat with simple matching neckwarmer
The hat in this set has a few minor changes to my basic pattern. The yarn used is Bernat Denimstyle in Sweatshirt, and I used a larger than recommented 6.00mm hook.
The body of the hat was worked in alternating rounds of dc and sc stitch. I changed my basic hat pattern of a flat disc for the crown by doing the usual increases in the sc rounds, but no increases in the dc rounds. The sides are just alternating rounds of sc and dc, ending on a sc round.
The ribbing was done by doing a round of dc stitches, then alternating front post double crochet (fpdc) with back post double crochet (bpdc) for a couple of rounds. Then I started working back and forth for the earflap portion, ending the rows with a fpdc. Each consecutive round started and finished with a hdc intead of a dc, and skipping stitches at the start and end to reduce each round. When the earwarmer portion was as deep as I wanted, I worked sc around the entire hat to finish it.
The neckwarmer is just rounds of dc worked from a foundation chain long enough to go around the head, but not so long it gaped a lot at the neck. I never counted how many stitches that was. It's wide enough to be pulled up over the nose and mouth and still cover most of the neck.
This is a good hat and neckwarmer set for cooler weather, but it won't cut any wind. For windy days and colder temperatures, it works great layered under a hood.
Friday, January 14, 2011
Tunisian in the round - Purple Swirls hat
I wanted to do a variation of the bottom-up Tunisian hat I'd made before. Part of what I wanted to do was see how far I could go with the Tunisian stitch decrease rounds before I had to stop using both ends of the hook and switch to regular crochet to close up the top.
For the yarn, I went with Bernat Alpaca in Plum and Lavender and worked with a 6.50mm double ended hook.

I also wanted to make the hat larger than the first one I'd made, so I started with a base chain of 70 in the darker colour. This photo is after about 5 rounds in Tunisian Simple Stitch.
A closer look at how the side was building up.
Though this is what I was actually working with. The tight curl makes it quite the challenge to work with! It also made it a challenge to judge when to start decreasing my rounds for the crown of the hat. I wanted to make sure it was a deeper hat then previous, and had to keep resisting the urge to start the decrease rounds too early.
Here you can see the first few decreased rounds. Since I started with 70 stitches, I worked the decrease stitches evenly in sevenths, so the first decreased round brought the stitch count down to 63, then 56, and so on.
I changed where I worked the decreased stitches compared to the first hat I'd made. Instead of starting the new decrease in the same place as previous round's decrease, I started the decrease one stitch ahead of the previous decrease. ( I hope that makes sense!) This caused the distinctive swirl to form in the opposite direction from the previous design.
I was also quite surprised to be able to work the Tunisian stitch pretty much to the end. By that point, I was switching back and forth on the ends of my hook every couple of stitches. The final bit was closed up while sewing in the yarn ends to finish them off.
For some reason I can't remember anymore (I actually finished this some 3 months ago), I didn't take any step by step photos of the rest. Oops.
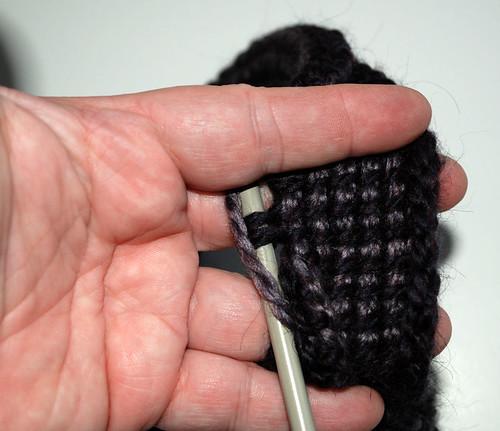
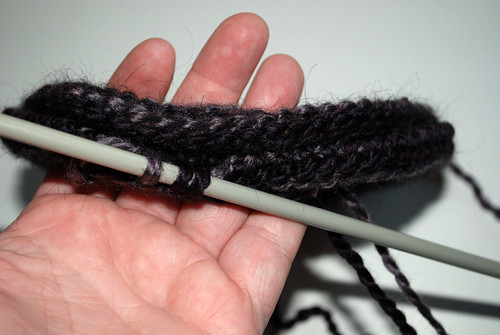
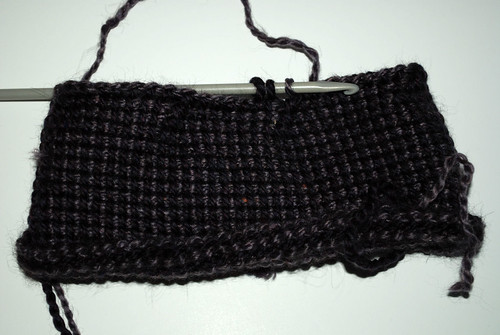
While the body of the hat was worked in a spiral, the base was worked in joined rounds, using only one end of my double ended hook. The first round was just single crochet into the remaining loops of the foundation chain, working from the outside of the hat.
This view shows the transition from working the body of the hat in a spiral from the foundation chain to joined rounds, where it looks a bit like a bump.
After joining the first round of single crochet, I turned the piece to work from the inside for the double crochet bobbles. The bobbles are 3 double crochet together, separated by one double crochet. After joining the round I turned to work from the outside again and worked three rounds of single crochet, with the lighter purple in the middle round, without turning until the end of the third round of single crochet. Another round of bobble stitches was worked from the inside, then the last round was done in single crochet from the outside.
That last round of single crochet pulls the edge in quite nicely, making for a snug and comfortable fit.
I'm quite happy with this version.
For the yarn, I went with Bernat Alpaca in Plum and Lavender and worked with a 6.50mm double ended hook.
I also wanted to make the hat larger than the first one I'd made, so I started with a base chain of 70 in the darker colour. This photo is after about 5 rounds in Tunisian Simple Stitch.
A closer look at how the side was building up.
Though this is what I was actually working with. The tight curl makes it quite the challenge to work with! It also made it a challenge to judge when to start decreasing my rounds for the crown of the hat. I wanted to make sure it was a deeper hat then previous, and had to keep resisting the urge to start the decrease rounds too early.
Here you can see the first few decreased rounds. Since I started with 70 stitches, I worked the decrease stitches evenly in sevenths, so the first decreased round brought the stitch count down to 63, then 56, and so on.
I changed where I worked the decreased stitches compared to the first hat I'd made. Instead of starting the new decrease in the same place as previous round's decrease, I started the decrease one stitch ahead of the previous decrease. ( I hope that makes sense!) This caused the distinctive swirl to form in the opposite direction from the previous design.
I was also quite surprised to be able to work the Tunisian stitch pretty much to the end. By that point, I was switching back and forth on the ends of my hook every couple of stitches. The final bit was closed up while sewing in the yarn ends to finish them off.
For some reason I can't remember anymore (I actually finished this some 3 months ago), I didn't take any step by step photos of the rest. Oops.
While the body of the hat was worked in a spiral, the base was worked in joined rounds, using only one end of my double ended hook. The first round was just single crochet into the remaining loops of the foundation chain, working from the outside of the hat.
This view shows the transition from working the body of the hat in a spiral from the foundation chain to joined rounds, where it looks a bit like a bump.
After joining the first round of single crochet, I turned the piece to work from the inside for the double crochet bobbles. The bobbles are 3 double crochet together, separated by one double crochet. After joining the round I turned to work from the outside again and worked three rounds of single crochet, with the lighter purple in the middle round, without turning until the end of the third round of single crochet. Another round of bobble stitches was worked from the inside, then the last round was done in single crochet from the outside.
That last round of single crochet pulls the edge in quite nicely, making for a snug and comfortable fit.
I'm quite happy with this version.
Wednesday, January 12, 2011
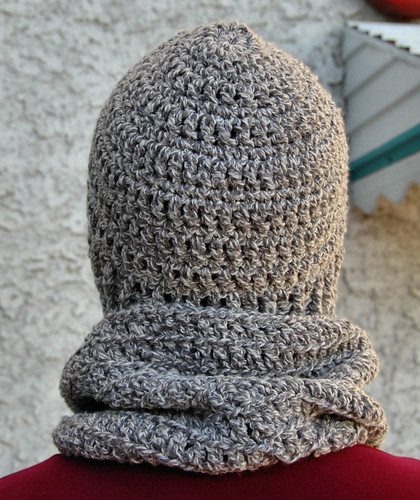
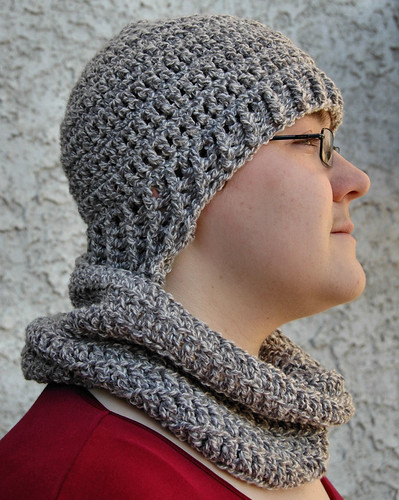
Surface braid hat and cowl set
Time to go back to some pieces I made before taking our Christmas season break.
First up, a matching hat and Moebius cowl set. The hat is inspired by one I saw on Ravelry. The free pattern and an instructional video on how to do the surface braid stitch is available at The Laughing Willow.
I didn't follow the pattern on the site, but worked it using the same basic pattern I use for most of my hats. The crown is a flat disk (I started with 8 hdc in the ring) worked in a spiral, then when it got to the diameter I wanted, I stopped increasing to do the sides.
The cowl is done in the same surface braid stitch (which is just a half-double crochet worked into a bar on the back of the previous stitches, instead of the top loops). I don't know that I even counted how many stitches were in the foundation chain; I just worked the chain until it was long enough to fit around the neck as close as I wanted it to, then closed it up with the Moebius twist and worked as many rows in surface braid stitch as it took to get the width I wanted.
The twist can be moved to the back so that the cowl can be worn over the face to better protect from the elements.
When finishing off the ends in the hat, I made sure to hide them well so that the hat is reversible. You can see what the inside texture looks like in the bottom half of the cowl.
This stitch makes for an amazingly stretchy and flexible fabric, and is very comfortable to wear. I think it's a stitch I'll be using a lot more often.
Tuesday, January 11, 2011
Another drawstring bag for coffee cup
This is the second bag I made for my daughter's "take out" coffee cups.
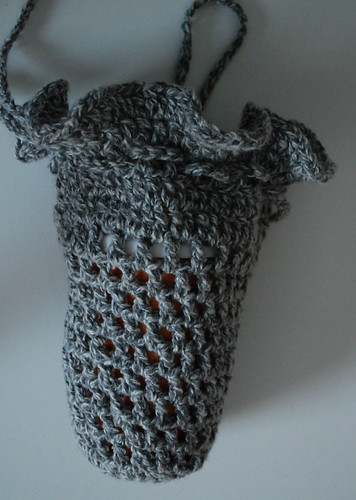
This one is a bit larger and looser than the first one, making it easier to take the cup in and out.
For this one, I started with a ch 5 loop and worked 10 half double crochet stitches into it. The second round is 2 dc into each stitch of the first round. This made a slightly larger base than with the first bag.
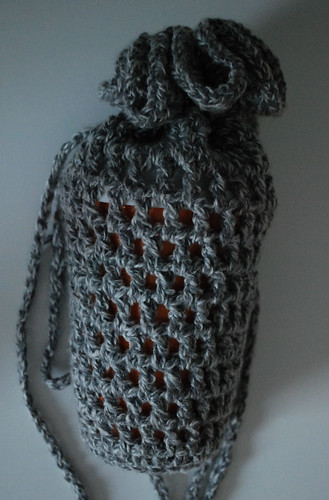
To build up the sides, the next round was 1 dc in each dc of the base. With the base being larger, I didn't bother working into the back loop only, as I did for the red bag, but into both loops as usual.
The first mesh round was 1 dc worked into the first dc slip stitched into (I started each round by doing 1 loose chain, then a dc into the same spot), then ch 1, skip one, 1 dc in the second stitch from the start. The pattern was continued around, ending with a ch 1 slip stitched into the top of the first dc.
When working the next few rounds, it's one dc worked into each ch 1 space, ch 1. After several rounds (to about the middle of the height of the cup) I did one increase round by doing [1 dc, ch 1, 1 ch] into two spots opposite each other in a round. Then I continued working rounds without increase until it was about the height of the cup without its lid.

At the top, I switched back to all dc stitches, working 1 dc into each dc and each ch 1 space all the way around. Another round was done with 1 dc into each stitch of the previous round.
The drawstring round was done with 1 dc, ch 1, skip 1, similar to the first round of mesh at the bottom. If I remember correctly, I ended up with an odd number (you can see in the photo that the drawstrings go around pairs of stitches) and I ended up skipping an extra stitch at the end of the round. Or something.
The next round was back to working dc stitches into the stitches and chain spaces all around. I decided to add a ruffled top by doing one more round with 2 dc into each stitch.
The drawstrings are simply two long chains. I weaved them in, then stitched the ends together end-to-end to try and make it as smooth as I could. The drawstrings on this one are long enough that the bag could actually be worn on the shoulder.
There was a bit of yarn left over, so I once again made a little flower.
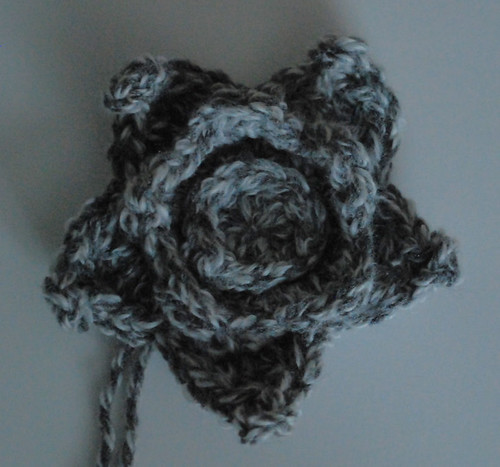
This is another variation of my book cover flower, starting with a centre ring of 10 stitches to get the 5 petals. The pointed petals in the back are done by working a sequence of [sc, hdc, dc, tdc, picot into top of tdc, dc, hdc, sc] into each loop.
My daughter hasn't sewn it onto the bag yet, so I don't know if she'll decide to add any extras to the middle or now.
Between the two of them, my daughter finds the grey bag easier to get the cup in and out, but she finds the straps too thin and doesn't like to use them. I guess I should have gone down the back like I did with the red bag after all! *L* So because of the straps (and because she finds it prettier), she uses the red bag more often, even though it's a bit of a pain to get the cup out.
This one is a bit larger and looser than the first one, making it easier to take the cup in and out.
For this one, I started with a ch 5 loop and worked 10 half double crochet stitches into it. The second round is 2 dc into each stitch of the first round. This made a slightly larger base than with the first bag.
To build up the sides, the next round was 1 dc in each dc of the base. With the base being larger, I didn't bother working into the back loop only, as I did for the red bag, but into both loops as usual.
The first mesh round was 1 dc worked into the first dc slip stitched into (I started each round by doing 1 loose chain, then a dc into the same spot), then ch 1, skip one, 1 dc in the second stitch from the start. The pattern was continued around, ending with a ch 1 slip stitched into the top of the first dc.
When working the next few rounds, it's one dc worked into each ch 1 space, ch 1. After several rounds (to about the middle of the height of the cup) I did one increase round by doing [1 dc, ch 1, 1 ch] into two spots opposite each other in a round. Then I continued working rounds without increase until it was about the height of the cup without its lid.
At the top, I switched back to all dc stitches, working 1 dc into each dc and each ch 1 space all the way around. Another round was done with 1 dc into each stitch of the previous round.
The drawstring round was done with 1 dc, ch 1, skip 1, similar to the first round of mesh at the bottom. If I remember correctly, I ended up with an odd number (you can see in the photo that the drawstrings go around pairs of stitches) and I ended up skipping an extra stitch at the end of the round. Or something.
The next round was back to working dc stitches into the stitches and chain spaces all around. I decided to add a ruffled top by doing one more round with 2 dc into each stitch.
The drawstrings are simply two long chains. I weaved them in, then stitched the ends together end-to-end to try and make it as smooth as I could. The drawstrings on this one are long enough that the bag could actually be worn on the shoulder.
There was a bit of yarn left over, so I once again made a little flower.
This is another variation of my book cover flower, starting with a centre ring of 10 stitches to get the 5 petals. The pointed petals in the back are done by working a sequence of [sc, hdc, dc, tdc, picot into top of tdc, dc, hdc, sc] into each loop.
My daughter hasn't sewn it onto the bag yet, so I don't know if she'll decide to add any extras to the middle or now.
Between the two of them, my daughter finds the grey bag easier to get the cup in and out, but she finds the straps too thin and doesn't like to use them. I guess I should have gone down the back like I did with the red bag after all! *L* So because of the straps (and because she finds it prettier), she uses the red bag more often, even though it's a bit of a pain to get the cup out.
Monday, January 10, 2011
Drawstring bag for coffee cup
Now that the holiday season is all done, it's time to post about some of the things sitting on the sidelines while we were busy with other things.
My older daughter got a couple of "take out" coffee cups for Christmas. They're made to look a bit like the disposable cups with lids, except the cups are double walled ceramic and the lids are a soft silicon. They hold the equivalent of a medium coffee.
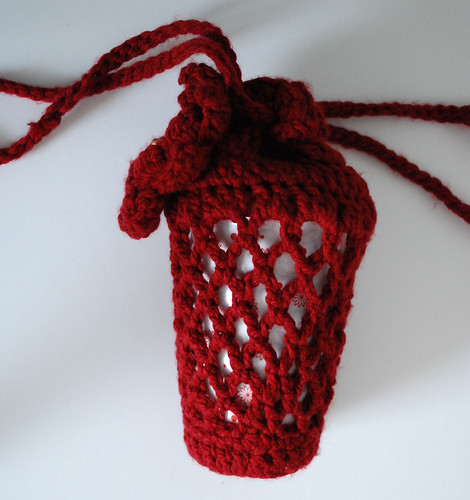
The problem, however is how to carry them. They're not the sort of thing you just shove into a purse or pocket, like the java jackets. So I made a pair of shaped drawstring bags for them. Here is the first one, in a shade of red I had left over from another project that perfectly matches the red in one of the cups. I used a 5.00mm hook.
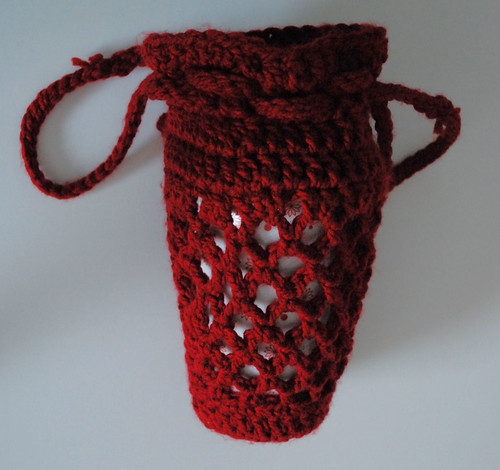
I didn't take any pictures while making it, partly because I just sort of made it up as I went along. This bag fits the size and shape of the cup rather closely.
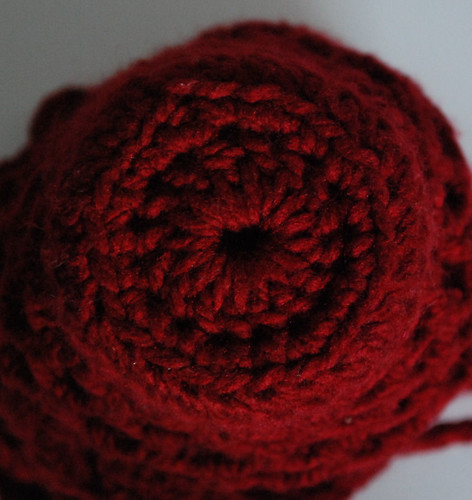
I used the base of the cup as my guide, I started with a ring of 8 chain stitches, then worked 16 double crochet into the ring. The next round was a ring of 2 single crochet into each double crochet around. The third round was building up the sides, so they were worked into the back loops only of the single crochet (one dc in each sc) around. The front loops made for a nicely defined edge at the base of the bag. They could also be used to add decorative features, such as a fringe, after the bag is done, if desired.
Another round of sc was worked into the round of dc, then I started working the mesh. The first round of mesh is 1 sc, ch 5, skip 2, 1 sc into the 3rd stitch around to almost the end. For the last loop in the round, instead of a ch 5, it's ch 2, 1 dc into first sc of round.
To work the next round of loops, ch 1, then sc into last loop made, around the top of the dc stitch. Ch 5, sc stitch into next ch 5 loop and repeat until the second last loop. As before, the last loop is ch 2, 1 dc into first sc.
That round is repeated once or twice, depending on the height and width of the cup, then an increase round is done. For this cup, I did only one repeat before increasing
The increases are worked by adding an extra ch 5, 1 sc into two loops. Which loops they're worked in doesn't matter, so long as they are opposite each other on the bag.
The mesh pattern is then repeated until it just reached the height of the cup, without the lid.
For the first dc round after the mesh, 3 dc are worked into each loop. There are a variety of ways to start it in the first loop. My preferred method is to do one very loose chain, which is not counted, then work a dc around the top of the dc stitch of the last loop. Work one more dc before doing groups of three dc into all the other loops. After doing the last group of three, work 1 dc into the first loop to complete the grouping and slip stitching into the top of the first dc.

The next round is 1 dc into each dc of the previous round.
To make the drawstring round, do a dc into the same stitch slip stitched into (I used the same method as described above), then ch 1, skip one stitch, dc into the next, all the way around. It ends with the last ch 1 slip stitched into the top of the first dc.
The last round is 1 dc into each dc and each ch 1 space.
The drawstrings are chains made to whatever length I thought would work out, then I slip stitched back down the length of the chain, working into the back bar of each stitch, rather than the loops. After the lengths were made, they were woven into the spaces in the drawstring row, making sure that they crossed each other from inside to outside. When I sewed the strings closed, I sewed them end to end (after making extra sure there were no twists in the strings) to make them as smooth as I could. I made a point of leaving those portions of the drawstrings visible, which you can see in the first pictures, so you can see how that turned out. Not as neat as I would have liked, but they can be hidden in the folds of the bag itself when used.
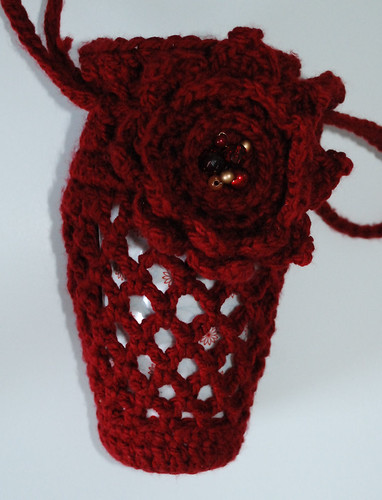
I still had some yarn left, so I used it to make a flower, using the same method I used for the book cover I made for a gift exchange. My daughter then used the wire and bead decorations we'd kept from our Christmas crackers to decorate the middle, then sewed it onto the bag.
We were really happy with how this turned out. The only quibble with it is that it fits the cup a bit too closely. That's great for carrying it, but it makes taking the cup in and out of the bag a bit of a hassle.
Tomorrow, I'll post a step-by-step of the other bag I made, which fixed that problem.
My older daughter got a couple of "take out" coffee cups for Christmas. They're made to look a bit like the disposable cups with lids, except the cups are double walled ceramic and the lids are a soft silicon. They hold the equivalent of a medium coffee.
The problem, however is how to carry them. They're not the sort of thing you just shove into a purse or pocket, like the java jackets. So I made a pair of shaped drawstring bags for them. Here is the first one, in a shade of red I had left over from another project that perfectly matches the red in one of the cups. I used a 5.00mm hook.
I didn't take any pictures while making it, partly because I just sort of made it up as I went along. This bag fits the size and shape of the cup rather closely.
I used the base of the cup as my guide, I started with a ring of 8 chain stitches, then worked 16 double crochet into the ring. The next round was a ring of 2 single crochet into each double crochet around. The third round was building up the sides, so they were worked into the back loops only of the single crochet (one dc in each sc) around. The front loops made for a nicely defined edge at the base of the bag. They could also be used to add decorative features, such as a fringe, after the bag is done, if desired.
Another round of sc was worked into the round of dc, then I started working the mesh. The first round of mesh is 1 sc, ch 5, skip 2, 1 sc into the 3rd stitch around to almost the end. For the last loop in the round, instead of a ch 5, it's ch 2, 1 dc into first sc of round.
To work the next round of loops, ch 1, then sc into last loop made, around the top of the dc stitch. Ch 5, sc stitch into next ch 5 loop and repeat until the second last loop. As before, the last loop is ch 2, 1 dc into first sc.
That round is repeated once or twice, depending on the height and width of the cup, then an increase round is done. For this cup, I did only one repeat before increasing
The increases are worked by adding an extra ch 5, 1 sc into two loops. Which loops they're worked in doesn't matter, so long as they are opposite each other on the bag.
The mesh pattern is then repeated until it just reached the height of the cup, without the lid.
For the first dc round after the mesh, 3 dc are worked into each loop. There are a variety of ways to start it in the first loop. My preferred method is to do one very loose chain, which is not counted, then work a dc around the top of the dc stitch of the last loop. Work one more dc before doing groups of three dc into all the other loops. After doing the last group of three, work 1 dc into the first loop to complete the grouping and slip stitching into the top of the first dc.
The next round is 1 dc into each dc of the previous round.
To make the drawstring round, do a dc into the same stitch slip stitched into (I used the same method as described above), then ch 1, skip one stitch, dc into the next, all the way around. It ends with the last ch 1 slip stitched into the top of the first dc.
The last round is 1 dc into each dc and each ch 1 space.
The drawstrings are chains made to whatever length I thought would work out, then I slip stitched back down the length of the chain, working into the back bar of each stitch, rather than the loops. After the lengths were made, they were woven into the spaces in the drawstring row, making sure that they crossed each other from inside to outside. When I sewed the strings closed, I sewed them end to end (after making extra sure there were no twists in the strings) to make them as smooth as I could. I made a point of leaving those portions of the drawstrings visible, which you can see in the first pictures, so you can see how that turned out. Not as neat as I would have liked, but they can be hidden in the folds of the bag itself when used.
I still had some yarn left, so I used it to make a flower, using the same method I used for the book cover I made for a gift exchange. My daughter then used the wire and bead decorations we'd kept from our Christmas crackers to decorate the middle, then sewed it onto the bag.
We were really happy with how this turned out. The only quibble with it is that it fits the cup a bit too closely. That's great for carrying it, but it makes taking the cup in and out of the bag a bit of a hassle.
Tomorrow, I'll post a step-by-step of the other bag I made, which fixed that problem.
Subscribe to:
Comments (Atom)