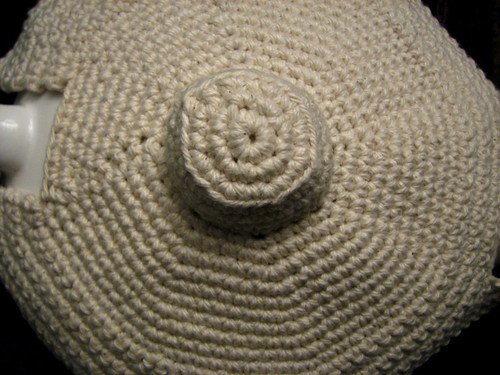
Pages

Friday, January 30, 2009

New project - crochet slipper sock.

Having finished the tea cozy, I wanted to try something challenging. I figured learning how to turn a heel would fit the bill.

This project will be slow going. Although my arm is much better, I need to really pace myself to avoid making it worse again, so I'm taking it easy. My arm is a bit sensitive after a physio session yesterday, so today I only managed a row and a half. That was enough to finish the section I was working on.

I am following a pattern from the book, Lion Brand Yarn "Just Socks." As usual, I've changed things before starting. ;-) I'm using a thicker yarn, but with the hook sizes I'm using, the gauge is the same as the pattern's size medium (women's) sock. The thicker yarn makes it more slipper than sock.
(full size photos available here)


This pattern starts at the cuff and in the flat, with the sock sewn into a tube at the end.

The cuff is 10 stitches wide in sc, with each row done on the back loop only, using a smaller hook. G/6 - 4.25mm


At 40 rows, the piece is pivoted and 40 stitches are done along the side. The rest is done is a larger hook. H/6 - 5.00mm

The body is just rows of ordinary sc (into both loops), until it reachs a length of 7 inches. The yarn is then cut, and the top of the foot is started in another area.

I'll get to that in a day or two, depending on my arm.

The finished tea cozy.

I actually finished it a while ago, but didn't get around to taking photos until today.

(full photos available here)


I embroidered the letters in ordinary DMC embroidery thread, trying to match the scrawly font on the pot itself.


I also matched the sides, so the English embroidery is almost exactly on top of the English writing on that side, etc.

After the embroidery was done, I tossed it in with the laundry. Although the rest of the load was dry, the cozy was still quite damp. Even though we almost immediately put it on the pot and sort-of massaged it to form to the pot's shape, you can still see that it creased a bit in the wash.

You can also see by the stain that the spout portion is doing its job quite well. :-D

Sunday, January 25, 2009

Work in progress: tea cozy, finishing touches

larger photos available here

My arm was feeling really good today, so I finished off the crochet portion of my tea cozy.

I didn't have much to do from where I left off yesterday. Basically, just one row of dc, decreasing at every marker, plus and extra in the middle under the spout. When I got to the end of the row, I used a marker to keep in in place, then switched to working on the spout opening (the fun part of making centre-pull balls of yarn - I have access to both ends of the yarn).


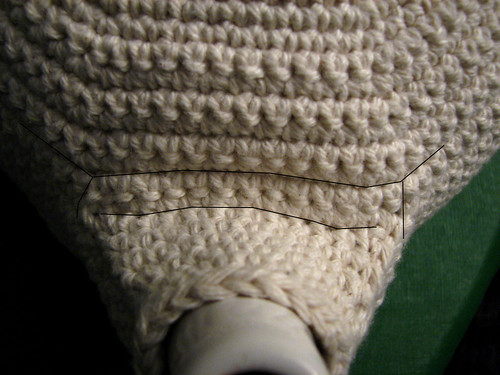
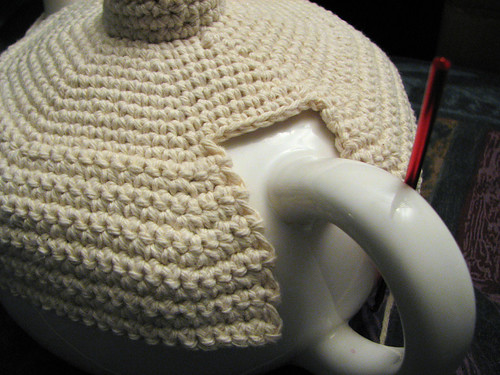
For the spout section, I wanted to bring the body section forward a couple or rows before I started working around the whole edge. In this photo, I've marked where the last round before the split is marked, and where the chain around the spout area is. The short line shows where I switched to working in the round.

Because the last row of sc I worked before making the spout opening was worked on the right side (RS), I joined the yarn into the side of the spout opening, into the first chain, on the wrong side (WS). This way, the two filler rows I made would match the body of the cozy. I worked the first row across to the other end of the chain row, slip stitched into the last chain, then turned it and worked my way back again, making two rows that were bascially straight out from the main body. I turned it again and worked another row of sc into the front loops only, as at this point the stitches were running up the spout. Joining 2sctog at the corner, I kept on going around the spout opening, working into the other side of the foundation chain. When I reached the other side of the foundation chain, I did another 2sctog to turn the corner, then continued on. I worked in a spiral at this point, just going around until it was the height I wanted. Only the last row did not have 2sctog at the corners.


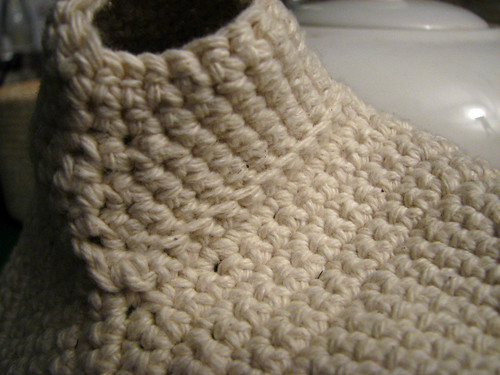
Here's a different view of the spout section. You can see where I've worked into the foundation chain, as well as the 2sctog stitches.


For this shot, I turned the spout area inside out. You can see the line where I'd done the stitches into the front loops only.

One of the reasons I wanted the spout area to go up so high is because, like most teapots, ours dribbles when we fill our cups. The cozy will not only keep the tea warm, but will make things less messy. With a cotton yarn, it'll be easy to clean, too.


One the spout section was finished, I went back to the base of the cozy.

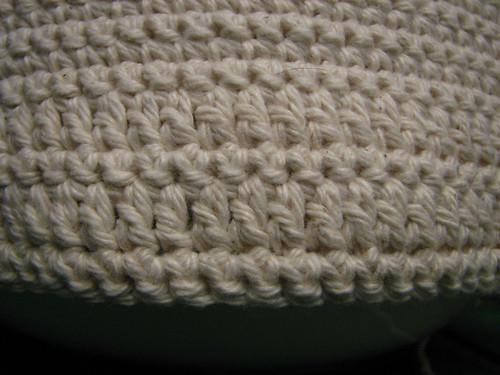
Starting from where I left off at the end of a dc row, I kept on going around the corner rather than turning again. I did 2 sc into each dc and 1 sc into each sc along the sides of the rows, with 2sctog to turn the corners.

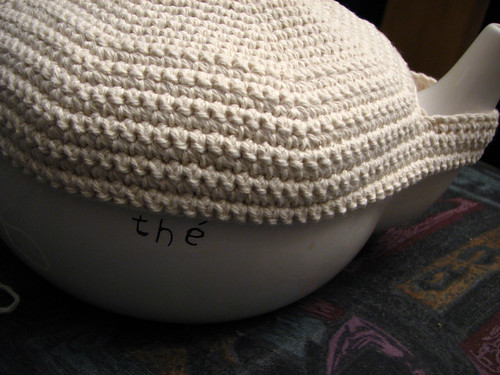
When I finished edging the handle opening, I kept on going in sc around the bottom of the cozy. I didn't do any more decreases, but I did make sure the stitches were tight so that it still pulled in a bit.


When I reached the end, I put it on the pot and marked where I wanted to have button loops, then did a second round of sc into the handle opening, placing loops at the markers, and finishing at the opposite corner.

In this photo, I've marked outside edges of the handle opening that I worked the edging sc stitches into.


I raided my elder daughter's button box and found these cow print buttons. I thought they were a hoot. After I finished off the tail end, I added the buttons into the cozy. Using the same yarn as the cozy, I used a tapestry needle to thread 2 lengths of yarn through the cozy, into the button, then back through the cozy. On the inside, I double knotted the ends, which left me with 4 tail ends at each button to finish off into the back of the cozy.

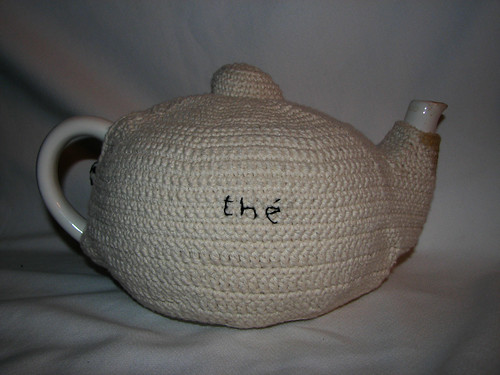
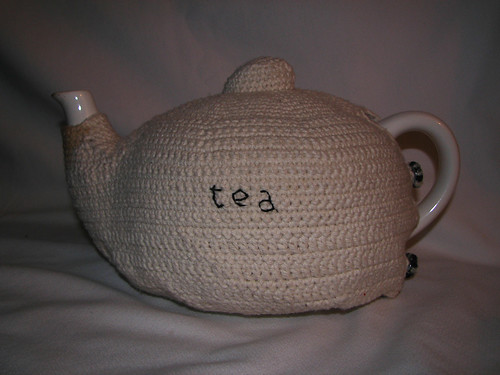
The only thing left to do now is a bit of embroidery. My pot has "tea" written on one side, and "thé" on the other. I plan to match the writing on the cozy. :-D

Meanwhile, we've already tried it out, and it does it's job quite well.

Friday, January 23, 2009

Work in progress: tea cozy


larger sized photos available here


This is a project I started that has been interrupted by my elbow problems. I'm working on a tea cozy sized and shaped to fit my 14 cup teapot. The yarn is Lily Sugar 'n Cream, 100% cotton, in coconut. I'd bought a 400g/14 oz ball and had started using it to make a tank top but ran out and couldn't find any more - it was a discontinued line, I discovered. Considering how short a time I've re-started crocheting, I've had that happen too often. *L* I frogged the pieces I'd done so far and am using it for other things. I find I really like how well it holds its shape when I use smaller than recommended hooks (the label recommends using H/8 - 5mm hooks) and sc stitches. It's great for can cozies, which is what gave me the idea to make a shaped tea cozy. The pot is big enough that, even with 3 or 4 people drinking tea, we're not constantly running out. That means we tend to take more time in drinking our tea, knowing we don't have to beat each other off for a second or third cup. Unfortunately, it also means the tea in the pot sits long enough to actually get cold.

So this is the tea cozy I'm NOT working on because I'm NOT supposed to be doing crochet until my arm heals. *ahem*


Using a size F/5 - 3.75mm hook, I started off with a "magic ring" and 8sc into the ring. The next rows were done with increases to make a flat disc until it was as wide as the knob of the pot's lid. To make a nice, crisp angle into the side of the knob area, I did the first row without increases into the back loop only. When I got the depth matching the height of the lid's knob, I continued increasing into a flat disc, with the first row being done into the front loop only for the direction change. Working in 8ths, the disc was a handy octagonal shape.


Here's the inside of the knob area, where you can see how working into the front loops only makes the directional change nice and crisp.

Once I got the disc the same size as my pot lid, I started alternating increased rows with rows that had no increases at all. This gave a gentle curve that matched the curve of the top of my pot.


When I got to a point a little above the handle, I stopped working in the round and, leaving one side of the octagon unworked for the handle space, began working the rows back and forth, still increasing every other row.


When I got to just above the spout height, I started a length of chain at a point where two sections of the octagon met, long enough to fit snugly around the spout, then re-joined at the other end of the same section of the octagon. When doing the next row back, I continued the sc into, rather than around, the chain, as I plan to do a finishing edge around the spout itself.

When I reached the top of the pot's widest point, I stopped the increased rows completely, except on either side of the handle (which you can see in the above photo) to keep the sides of the handle opening straight.


With my arm starting to bother me a lot, I found I could only do a few stitches at a time. Since I'd like to actually use this cozy some time soon, I decided to start alternating rows of dc and sc. This way, it would work up a bit faster, while adding a bit of textural change to the cozy. Here you can see where the pattern changes, with dc worked on the right side and sc on the wrong side.


After only one row of dc, the cozy had reached the farthest point of the spout. I marked the center of the spout section and, in the sc row, reduced by one stitch. The next dc row was reduced by one stitch in the same spot. I was now past the depth of the spout, so I marked stitches on either side of the spout in the dc row and, in the next sc row, did a decrease at each marker.


I was now past the widest area of the pot. I then placed markers to match the increases at the top of the pot, working out where they would be on either side of the spout, since that area is now wider than the other sections.

Then I stopped to give my arm a break.

Tuesday, January 20, 2009

larger images available here

Today, my daughter's and I made a special trip to a yarn shop we've passed many times, but never visited. We caught signs saying that they were moving, with 20-80% off all stock, the last time we went by and I wanted to check them out before they disappeared. I'm glad we did. Not only did we find some nice yarns, but we found out they don't have a new location yet. They're moving because the landlord doubled their rent, but their potential new site is still in negotiations.

These are the yarns my elder daughter picked. She doesn't knit or crochet. She uses them for things like doll hair or other interesting fibre sculptures she makes - I'll be getting photos and posting some of them another time.

The Rosarios 4 yarn is 35% mohair, 60% wool, 4% acrylic and 1% polymide. She thought the mossy look would be perfect for something like a mermaid's hair. ;-D I was eye-balling it myself, but would have no use for a yarn with this texture. It was regular price %7.99. She got it for $3.50

The other two are Noro yarns. Both are 45% silk, 45% kid mohair and 10% lamb's wool. I was looking over these ones, too, but with one at $8.99 (regular price $11) and the other at $8.75 (regular $10.99), I couldn't justify it. For the number of skeins I'd have to buy for them to be any use for the sorts of things I make, I just couldn't afford it. Gosh, they feel gorgeous, though!! I don't think my daughter has anything in particular in mind for them, but that's ok. :-D


These are my purchases. I had the hardest time not buying one of each color of the Phildar thread yarn. There were 5 different colours, sparkling like jewels. At $5 each, with a regular price of $10.50, they were a great deal, except I had no idea what I'd use them for. I got this one, thinking of potential crochet edging on a top. It's 65% viscose, 35% polyester.

I grabbed the last for skeins of this colour in the Needful Yarns, Piccadilly. I got them for $5 each, regular price $9.95. I can't find a website for the company. They're from Italy, and made of 54% nylon, 24% acrylic, 20% mohair and 2% lurex. I'm thinking these would make a glorious shawl.

Unfortunately, I still can't crochet. I've still got the tea cozy I'm working on, and all I can manage is about quarter of a row before I have to stop.

*sigh*

Friday, January 16, 2009

Score!

The girls wanted to check out the local Salvation Army and Goodwill stores. We are fortunate to have a couple of really good ones here. We've only been to either of them once before and were looking forward to going again.

While at the Salvation Army, I remembered they'd had a section of yarn, so I went looking. I had an excellent find!


I picked up 4 skeins of this yarn - the only ones of this colour. There were another 6 or so skeins of the same thing in a really horrid green that I left behind. *L*

It's Pinguoin yarn, made in France. From what I've been able to find online, it's a company that got bought out, and the line discontinued - much to the dismay of many knitters on online forums. It's 50% mohair, 25% wool and 25% acrylic. Each 50g (1 3/4 oz) skein is 110 m (121 yds). They feel gorgeously soft and light.

The best part? A couple still had the original price tags on them. $6.95 I got them for $1.49

With only 4 skeins, there's not enough yarn to do a large project, but there should be enough to make a decent sized shawl or stole.

Except that I still can't crochet. I did try anyways, working on a tea cozy for my 14 cup teapot, doing my best not to move my injured left arm. I thought the project would be small enough. Unfortunately, it did make my elbow worse and I had to stop. I'm past the half-way point, too. :-( I've had my first physiotherapy session yesterday, and it's even more tender than it was before. Until it's better, crochet is out.

*sigh*

Sunday, January 11, 2009

Work in progress - knotted shawl

This is a project my elder daughter is working on, with the help of her sister.


It's going to be a shawl when it's done. She wanted it to be very organic and viney looking. The knots are deliberately uneven in their rows. She started off using 7 different types of yarn, but has lost track of how many other's she added along the way. She thinks there's 10 altogether now.


A closer look at the knotted area. It's going to look quite interesting when it's done.

Saturday, January 10, 2009

Crochet stars

One more post and I'm done for today. :-)


Here's a star I made using a pattern from a magazine I can't find right now, so I can't tell you the name. *L* It was either Crochet Today or Interweave Crochet.

Anyhow, the design was for this star mounted on a Christmas card. I skipped the card and just stuck it on the tree as is.

I discovered I dislike doing picots. Especially the triple picots on the tip of each point.

Looks pretty, though.


Having found some more glow in the dark yarn - way too late for the garland I'd needed it for - I made this. I used the free pattern from Bernat to make a pair of stars. I put them together by doing a round of sc along the edge and stuffed it with polyfill.

Blast from the past - I didn't make these

First off, I want to make it very clear. I did not make these. *L*

We'd been living in Richmond, BC, far longer than we expected. Finally, we were heading back home to Manitoba. As we were packing and getting ready, one of my husband's co-workers gave us these as a gift. She made them herself. I think she did a fabulous job! They're quite heavy - I have to bend the tree tips to keep them from sliding off when the weight pulls them down. I try to place them in front of lights to them off a bit more. :-)

Blast from the Past - mini felt stockings

Christmas again - this time, 1999. Less than 2 months before, we'd moved back to BC, after being away for several years. We had two children now, and were renting a house in Richmond. This move was supposed to be temporary - my husband had signed on for a 6 month contract - so we didn't bring much with us. My husband had driven out a couple of weeks ahead of us, with the car loaded down with everything we could fit. The girls and I flew out later with a few suitcases. That was all we ever brought with us.

We ended up there for almost 2 years. His contract kept getting extended by 6 months, so we never did ship anything out after us.

Our first Christmas in Richmond found us with no tree and no decorations. We bought a small artificial tree (I know this is sacrilage for some, but we never use live trees) and placed it on the top of a large storage bin for extra height, with the bin covered by a white table cloth. That came in handy, as the empty bin was used to hide the gifts until Christmas Day.


These are the only decorations I've made that included the year on them. I figured the turn of the century was a good time to do it. ;-) I had very little in the way of supplies. A few pieces of felt and a cardboard template. Some embroidery thread, ric rac and glow in the dark pain in a tube.

These have a plain back to them, and can be used to hold small items, if we want. I've never bothered, though.

That year, our tiny tree had these and some fancied up clam shells from a little basket of shells my daughter's had. When the tree came down, the shells were de-fancified and went back to the girls. Throw in a cheap dollar store garland and string of lights, and we had a pretty decent little tree that year. *L*

Blast from the Past - the ones that started it all

Christmas, 1993. My husband was still in the military, and we were living in a PMQ (military quarters) in Victoria, BC.

It was also my elder daughter's first Christmas.

One of the things I didn't want to do during her first Christmas was to worry about the tree. I wanted her to be able to enjoy the tree. She was pretty mobile already - in fact, she took her first independant steps on New Year's Day, at 9 1/2 month's of age. I wanted her to be free to be around the tree, and even handle the decorations, if that's what she wanted.

That led me on a search for child proof Christmas decorations. I had a few that were ok - some birds, apples and strawberries - but they would've meant a very empty tree. After searching many different stores, I found nothing. Decorations were either pretty, but not safe, or safe and butt ugly.

So I decided to make them. I'd just taught myself how to crochet not long before. (Story here.) It was time to extend my novice skills. I bought some sparkly yarn at Walmart, found some instructions, and made these.

(more and larger photos available here)

The first bunch were simple spirals - three double crochet into each stitch of a base chain, then finished with a row of single chain. For some, I left the ends from the sc row as tassles. The two on the bottom were from a much thicker yarn without the sparkley strand I decided to try as well.


More challenging where these balls. I hadn't done increases or decreases before, and I didn't have a pattern, either. I just winged it.

The large and small balls are made exactly the same way. I just used dc instead of sc for the larger ones. They're kind of lumpy and shapeless after all these years, but they still look kinda nice on the tree.

That first Christmas, our tree was decorated entirely with these, the birds and fruit I already had, and some lights. My daughter was free to explore the tree to her heart's content - and it didn't take long for her curiousity to be satisfied. She mostly left the tree alone after that.

I think the whole plan worked out rather well. :-)

Wednesday, January 7, 2009

Quandry

I'm still having fun with crochet as my active craft right now - I tend to go through phases, it seems. *L* I've actually started another sweater for myself. This one's going to be big, bulky, light and - hopefully - snuggly warm.

I'm in a bit of a quandry, however.

I saw my dr. yesterday about my left arm. It's been bothering me since late October. More specifically, my elbow has been giving me pains. It's my dominant arm, so it's been quite the inconvenience.

It turns out I've got Tennis Elbow, most likely due to repetitive strain from work, though I can only guess at that. There was no sign of any pain until after a shift, as I was getting into the car to go home. One minute, no pain, next minute, "gee, it hurts to open the car door." The next day, I could hardly move it. Although it got better, it never went away. The simple act of pushing up my glasses or scratching my face can be quite painful. Sometimes, I'd have to use my right arm to lift my left one, because it just wouldn't respond. Since, after 2 + months of giving it time to heal (I've worked only a couple of shifts since then, and made a point of taking it easy with that arm), the doctor wants me to do physio.

As we were talking about it, I happened to rotate my wrist from side to side. The doctor cut off what he was saying with "don't do that - that's one of the things that will make it worse!"

My quandry? That twisting motion is the same motion I use to put the yarn over my hook while doing crochet! No wonder it wasn't getting any better. :-/

So I'm going to have to slow down on the crochet for the next while. Time to either try something new, or dig out some of my older supplies.

Hmm... I wonder what I can decorate with shisha mirrors?