Friday, June 24, 2011
Testing
Just a test post to see if i can blog from my phone.
Sunday, June 19, 2011
Ruffled Reading Jacket
There's going to be a brief hiatus in posts soon, as I will be doing some travelling.
During my travels, I will be giving the reading jacket shown below as a gift to my mother. I do hope it fits her well. She likes the 3/4 sleeves, but the cuffs might be snug for her liking. I'll find out in about a week!
This is a variation of my Simplicity Itself Reading Jacket. The main body is made the same way. The entire work, except for the ruffled edge, is worked in the back loops.
First, the yarn.
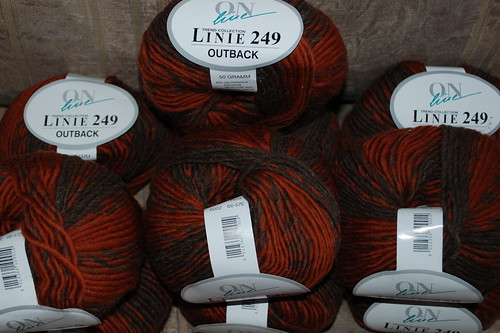
The owner of one of our local yarn shops was retiring and selling off her stock some months ago. Sad to see her go, but it did allow me to buy 10 balls of this yarn, which would ordinarily have been completely out of my budget. I had no plans for it at all; just couldn't pass up the deal! It's a hand-wash only blend of two wools. I used all 10 balls to make the jacket, using a 9.00mm hook. Cuffs were done in sc, cuff to elbow in hdc and the rest in dc.
After working up the main body of the jacket, I sewed the cuffs and sleeves to about the elbow.
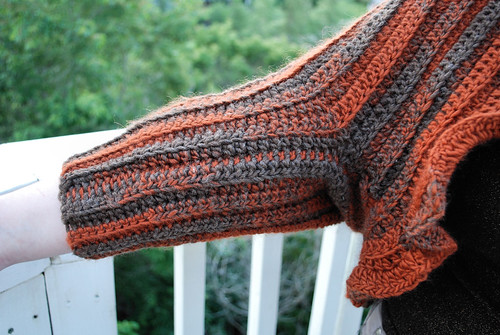
This shows the seaming on the arm, were you can also see part of the turning seam as I build up the body. After the sleeves were sewn closed, I joined the yarn again near a seam and started working around the edge, making sure to start the first round from the inside, so that the peaks and valleys of working in the back loop continued uninterrupted. In the first round only, I did 2 dc together at the sleeve seams to avoid a gap.

Here's a more detailed view of the rounds at the sleeve seem, and showing the ruffle.
The rounds were done in dc except for the last round before the ruffle, which was done in hdc. The ruffle was done by doing [1 dc, 1ch, 1dc] into each hdc stitch.
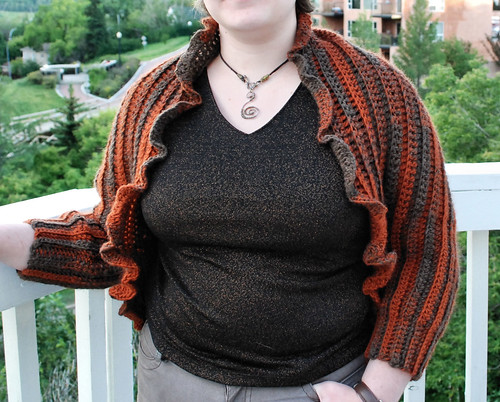
Here's a front view of the jacket, as worn by my younger daughter.
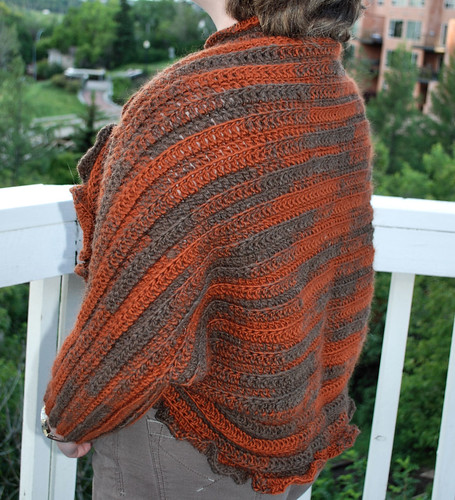
Because of how it was made, there is no right side up or upside down to this jacket.

From the back, it's hard to see where the rounds done to build up the body start. If you look closely at the bottom, you can see the round where it was worked into the foundation chain.
Here's hoping it fits my mom okay! :-)
During my travels, I will be giving the reading jacket shown below as a gift to my mother. I do hope it fits her well. She likes the 3/4 sleeves, but the cuffs might be snug for her liking. I'll find out in about a week!
This is a variation of my Simplicity Itself Reading Jacket. The main body is made the same way. The entire work, except for the ruffled edge, is worked in the back loops.
First, the yarn.

The owner of one of our local yarn shops was retiring and selling off her stock some months ago. Sad to see her go, but it did allow me to buy 10 balls of this yarn, which would ordinarily have been completely out of my budget. I had no plans for it at all; just couldn't pass up the deal! It's a hand-wash only blend of two wools. I used all 10 balls to make the jacket, using a 9.00mm hook. Cuffs were done in sc, cuff to elbow in hdc and the rest in dc.
After working up the main body of the jacket, I sewed the cuffs and sleeves to about the elbow.

This shows the seaming on the arm, were you can also see part of the turning seam as I build up the body. After the sleeves were sewn closed, I joined the yarn again near a seam and started working around the edge, making sure to start the first round from the inside, so that the peaks and valleys of working in the back loop continued uninterrupted. In the first round only, I did 2 dc together at the sleeve seams to avoid a gap.

Here's a more detailed view of the rounds at the sleeve seem, and showing the ruffle.
The rounds were done in dc except for the last round before the ruffle, which was done in hdc. The ruffle was done by doing [1 dc, 1ch, 1dc] into each hdc stitch.

Here's a front view of the jacket, as worn by my younger daughter.

Because of how it was made, there is no right side up or upside down to this jacket.

From the back, it's hard to see where the rounds done to build up the body start. If you look closely at the bottom, you can see the round where it was worked into the foundation chain.
Here's hoping it fits my mom okay! :-)
Labels:
crochet,
crochet - finished details,
reading jacket
Thursday, June 9, 2011
Capelet
Recently, my younger daughter picked a few balls of Patons Lace, and is really loving it. She got a ball in Midas to make something for her sister. After going through a bunch of books we had on hand, she chose a pattern from Doris Chan's Amazing Crochet Lace.
The pattern is called Plum Blossum Capelet, which actually calls for a much heavier weight yarn. To do it using the Paton's Lace, my daughter ended up using a 7.00 mm hook to get the guage right. She also skipped the last round of the body, which was supposed to include beads. Her sister wanted to add beads herself later on.
Here is a front view of how it turned out. (click on the image to go to my flickr page for larger views)

It is SO light! My girls are both really happy with how it looks.
The design elements aren't as defined as in the pattern photo with the heavier yarn, but they're quite happy with that. Here's a closer view...
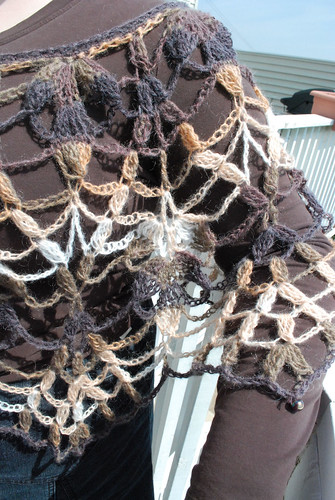
... and a bead detail.

With such a light yarn, the beads are really necessary to add a bit of weight.

My older daughter thinks it's just awesome!
Now my daughter is working on a hat for herself, using some Patons Lace in Bonfire.
The pattern is called Plum Blossum Capelet, which actually calls for a much heavier weight yarn. To do it using the Paton's Lace, my daughter ended up using a 7.00 mm hook to get the guage right. She also skipped the last round of the body, which was supposed to include beads. Her sister wanted to add beads herself later on.
Here is a front view of how it turned out. (click on the image to go to my flickr page for larger views)

It is SO light! My girls are both really happy with how it looks.
The design elements aren't as defined as in the pattern photo with the heavier yarn, but they're quite happy with that. Here's a closer view...

... and a bead detail.

With such a light yarn, the beads are really necessary to add a bit of weight.

My older daughter thinks it's just awesome!
Now my daughter is working on a hat for herself, using some Patons Lace in Bonfire.
Thursday, June 2, 2011
Offering crochet classes
Hello again! It's been a while since I've posted. I've got a couple of projects in the works that I'm photographing for future posts. Those should be ready for me to write up about by early next week, if all goes well.
Meanwhile, I am now available to teach crochet classes through Michaels in Edmonton, currently at the Clareview location. Michaels is going through a whole bunch of changes right now, and that includes offering classes in knit, crochet, beading and scrapbooking as well as the Wilton classes they already have.
My certification will be through the Craft Yarn Council, and I will be teaching their Discover Knit and Crochet classes. There are four classes available, including Discover Single Crochet (a perfect start for someone who's an absolute beginner, or hasn't touched a hook in years), Discover the Tall Stitches, Discover Textured Stitches and Discover Granny Squares. Each class will be 2 1/2 hours and will include a tour of the yarn department. They cost $30 a class, and a supplies list will be provided. Registration is through Michaels.
I will be at the Clareview location doing a demo from 9 - 11am on Thursday, June 2. I hope to see some of you there!
Subscribe to:
Comments (Atom)