I was thinking about that hat and how I might do a crochet version. Once I turned various techniques around in my head, I dug through my stash for a yarn I could experiment with. I discovered an untouched ball of the same yarn I used for the pixie hat. Dang it. If I'd remembered the second ball, I wouldn't have mixed yarns and colours with my pixie experiment. Ah, well. That's the fun of experimenting. :-D
I also found a light weight yarn that had some fuzz to it. The colours didn't match at all, but being an experiment to figure out construction, I decided to use it as well as some sort of contrasting texture.
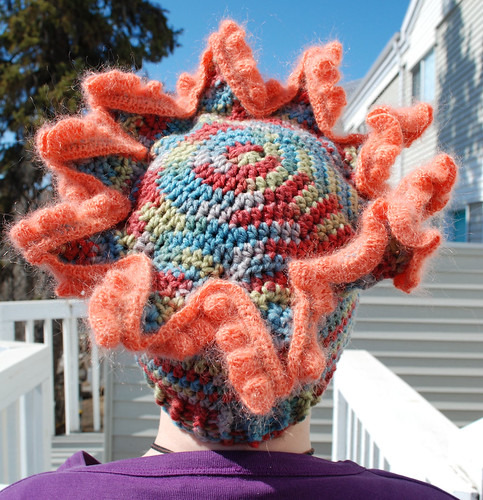
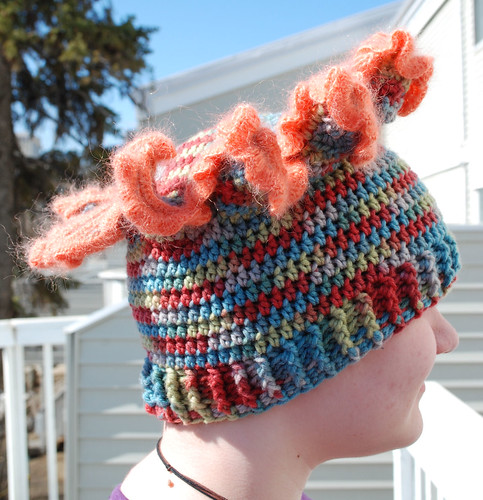
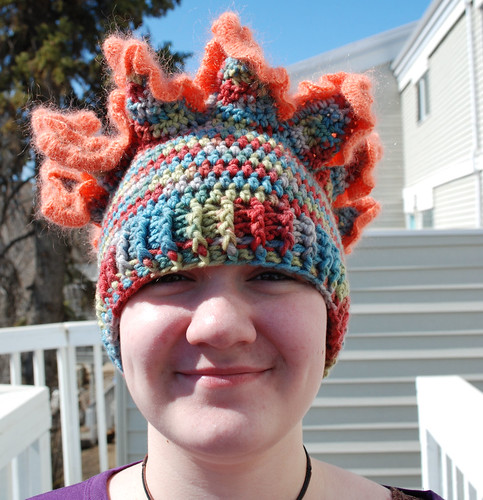
What I came up with was a hat made in two parts. The top began as a flat disc until I reached the width where I would normally stop increasing at and start building up the sides. Then, instead of making straight sides for the body of the hat, I made points. The second part was the brim and body of the hat worked bottom up, then I made matching points. The two were then stitched together with sc, and finally I used the light weight yarn to do a contrasting edge. The ruffled texture reminded me of some types of nudibranch. I didn't have enough of the light weight yarn to finish what I had started, but it did give me ideas for any future versions I will be making.
Here is the end result. First, from the back with a view of the top section.

The variegated yarn is a worsted weight, and I used a 6.50mm hook. I started with a magic ring of 7 dc, then increased evenly until I got it to 70 dc.
There are 10 points on this version. After the final round of 70 dc, I made a turning chain, then did 7 dc (I did not count the turning chains as stitches). I turned again and did 6 dc in the next row, working the decrease in the middle. I continued that pattern, decreasing by 1 stitch every row, until I was down to 1 dc plus the turning chain. Then I slip stitched down the side to the top of the first 7 dc row. At that point, I worked another 7 dc into the next 7 stitches of the crown of the hat and worked the next point. This was continued until I finished all 10 points.
With an odd number of stitches, it worked out that the slip stitch down the side always put me on the correct side to do the next point. When I did my next version of this, I made points that were 10 dc wide at the base, and for that I had to turn the piece before slip stitching down the side. I will have a separate post for that version.

Once the crown was done, it was time to do the body. I started from the brim, with a 70 ch foundation ring, then alternating front and back post stitches to make the ribbed brim. After 3 rows with front and back post dc stitches, I switched to just dc and worked the rounds until it was the depth I wanted. I then added point to the body using the same method as for the crown. After the points were done, I went back to finish the edge of the brim by adding a single round of alternating front and back post sc stitches. That tidied up the edge quite nicely.

Then it was time to put the two together. After lining up the point, I joined them using sc, which you can sort of see on one of the points in the above picture.
In joining the two pieces, something interesting happened. Because the side of the points with the slip stitch ends up slightly tighter than the other side, and the way the top and bottom points lined up, the points developed a natural twist to them. I found this effect rather nice!
I could have stopped at that point, but wasn't happy with how the edges looked. Especially on the underside (I worked the sc from the top). That's where the light weight yarn came in.
Switching to a much smaller hook (a 3.25mm, I think) I worked the contrasting yarn in two rounds. From the top, I worked two sc stitches of the contrasting yarn into the front loop only of the joining sc stitches. Then I turned it and worked two sc stitches into the remaining back loop (which was now the front loop, since I turned it and was working in the other direction) of the joining sc stitches.
Then came the nudibranch ruffle. Working from the underside of the hat, I alternated between doing 3 dc and 2 dc into each sc in the underside round, except when it came to the space in between the point. There I reduced the number of stitches per sc and also brought it down to hdc and sc. At the very center of the join between two points, I did 2 sctogether. Then, working back up the side of the next point I worked up to hdc back to dc stitches and continued the ruffle. I found no need to change the ruffle pattern at the tips of the points.

Returning to the back view of the hat, you can see the inside round of sc stitches in the contrasting yarn. It had been my intention to do a second round of ruffled stitches into that round as well, but I didn't have enough yarn. That will have to wait for a future version.
Some final thoughts. From a construction point of view, I'm very happy with how the concept turn out. There are a few things that I decided needed to change (aside from the colours. *L*). I had worked the decreases in the points in the middle of each row, rather than the start or the end, because I thought it would make a difference in attaching the two pieces together. I didn't like how it ended up looking, though, so for my next one, I did the decrease as the start of each row. More on that when I post about that version.
With the contrasting edge, I definitely want to do another version with ruffles, but I'm not sure I'd go with two rounds of it, as I'd planned to here. I think it would depend on what contrasting yarn I ended up going with. I definitely want to go with the nudibranch look, though, and am thinking of ways to make the hat look even more like a nudibranch!
As with the previous hats, this was an experiment that was never really meant to be worn. The family was very enthusiastic about the results, though, and have already asked for other versions. My kids have even worn this in public! *L* It's quite comfortable to wear.
2 comments:
Actually, I rather like the colors - they look nudibranchishly flamboyant & bold...
*L* Thanks! I'm a solid or muted colours sort of person, but my kids sure like the bright stuff, so this is right up their alley. ;-)
Post a Comment