Free style embroidery uses the same stitches are non-freestyle embroidery - and there are a great many types of stitches! The only difference is that it's not usually done from a pattern or transfer. I prefer freestyle, as I like to make things up as I go along.
There's a bit of a story behind the piece featured below.
I've always been a doodler. Few surfaces escaped my restless hands. One of my first jobs after I moved out on my own was at a sports apparel company, prepping orders, doing quality control and packing them for shipping. What my clothes looked like didn't matter a whole lot, since clients never saw me. I wore the same kind of heavy duty jeans I used for throwing bales on the farm, and always had in my pockets a pen, box cutter and permanent marker.
During breaks, my restless fingers soon had me doodling on my own jeans with the permanent marker. I usually drew a particular image, upside down, on the front of my thighs. After a few washes, the doodles would fade, and I'd draw over the lines again with my marker.
The job entailed a fair amount of wear and tear on my clothes, so it wasn't long before I had holes in my knees. Being the frugal sort (or perhaps miserly would be more appropriate a description), I chose to repair the holes in my knees. I didn't like patches. Instead, I drew a loose outline of a rose that covered the hole by a generous amount, then filled it in with satin stitch. The result was a very durable patch that didn't look like a patch.
Fast forward a few years. Now married and living in BC, my husband found himself a denim jacket that had a large blank panel on the back. He let me draw on it using fabric markers. I did drawings up the sleeves, across the yoke on the back and, of course, the large back panel. Those still faded with washing, so I tried fabric paints in one section. I didn't like how the fabric felt afterwards, so I didn't do any more. I kept recolouring with fabric markers as the jacket faded, and the designs along with it.
By this time, my husband had given me the jacket.
Eventually I got tired of that and decided the only way to make the back design permanent was to embroider it. Until then, my knee patches were the most ambitious pieces I'd attempted. This was to be my first major embroidery piece.
It took me 6 months of stitching - spread over 9 months.
I loved that jacket so much, I wore it until it fell apart. When it was no longer salvageable, I cut off the back panel, and have kept it ever since.
Here it is.
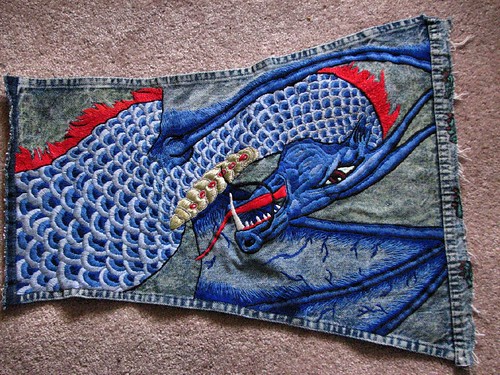
This is an overview of the entire piece, which is done mostly in satin stitch, which remains my favourite stitch.

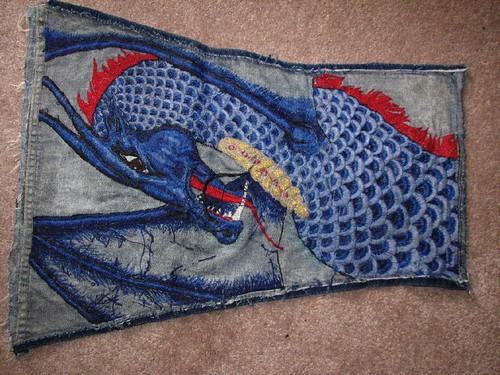
I played around with different blues to shade the face. In this photo, you can actually see the sloppier stitches where I'd started, and hadn't quite gotten the hang of stitching, at the top of the neck, between the head and red mane. The mane was done in long and short stitch, with a strand of metallic filament added to the embroidery floss for a bit of sparkle. I'd added a silver strand to the white thread I did the teeth with.
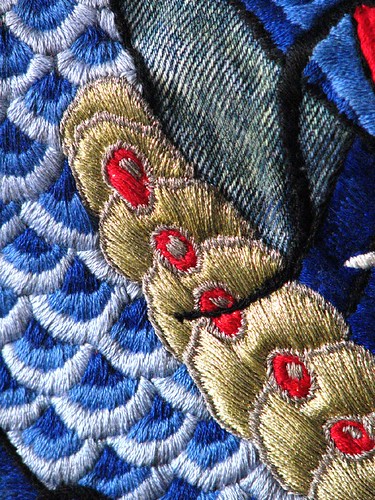
The chest plate was done in metallic embroidery thread in gold and silver, with embroidery floss for the red "rubies." The metallic thread was an incredible pain to work with! It was constantly fraying at the ends and breaking at the needle. After a while, I gave up on using the short threads recommended. Instead, I used a very long thread, with the needle near the very end. I'd do a few stitches, move the needle down and away from where the thread was already starting to break, trim the end of fraying bits, do a few more stitches, move the needle again, and so on. There was a lot of wasted thread that way, but I was no longer starting new ones every ten or so stitches!
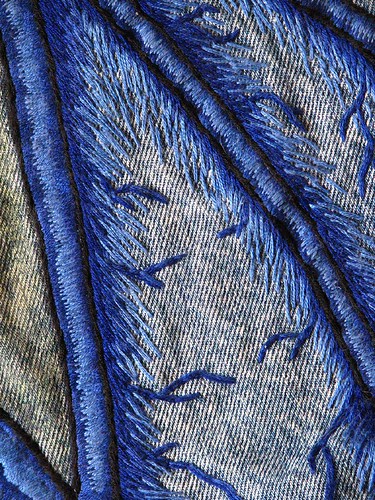
The shading of the wings were done in long and short stitch, while the blood vessels were done in stem stitch.
When it was finished, I covered the entire inside of the panel with embroidery glue to protect the strands from catching on anything.
The very last thing I did was some time after the embroidery was finished. If you look back at the photos above, you might notice a difference in colour in the denim surrounding the dragon, but not in the wing area. That is from glow in the dark paint. Once fully charged, the phosphorescent paint formed a bright outline of the overall dragon shape.
I got a lot of compliments and feedback while wearing this jacket, and one guy at a bus stop even offered to buy it. I wasn't willing to part with it.
This is just one rather large example of freestyle embroidery. Over the years I've done a few other small pieces. When my girls were small, I made a couple of vests for them. One, in royal blue, has seashells, an eel, and fish done in white stem stitch outlines. Another, in dusty rose, has several butterflies. That one was made extra special, as the embroidery threads, including some in silk, were from my late Great Aunt's stash, which my mother got after her aunt died and passed on to me, since my mother doesn't do embroidery herself.
Freestyle embroidery is a great way to embellish wearables - and can have the extra benefit of strengthening clothing in hard wearing areas.
If you're not too keen on sketching your own designs, go ahead and find some iron on transfers. There's no need to learn a lot of stitches and their variations, either. Most of my own work has been done in only three stitches - long and short (great for shading or blending colours), stem (excellent for curved lines) and satin (for a solid sheen). There's certainly no shortage of colours to choose from in basic cotton embroidery floss, though if you have access to a specialty shop, it's fun to try out different fibres, too.
Fabric or some clothing item to stitch, a variety of sharp pointed embroidery needles (which have larger holes than sewing needles), a pile of floss in different colours, scissors and maybe an embroidery hoop. You don't need much to get started. Practise some stitches on some scrap fabric, or even create your own little sampler of different stitches to see how they look.
Hhhhmmm... now I'm itching to stitch!
No comments:
Post a Comment