My arm was feeling really good today, so I finished off the crochet portion of my tea cozy.
I didn't have much to do from where I left off yesterday. Basically, just one row of dc, decreasing at every marker, plus and extra in the middle under the spout. When I got to the end of the row, I used a marker to keep in in place, then switched to working on the spout opening (the fun part of making centre-pull balls of yarn - I have access to both ends of the yarn).

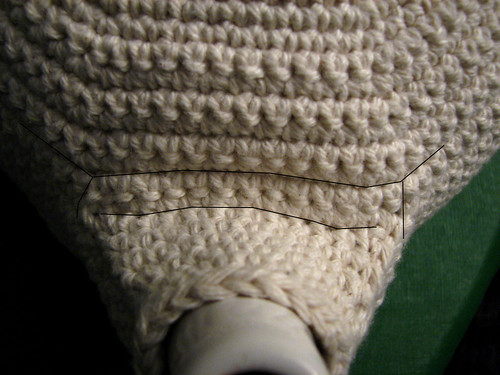
For the spout section, I wanted to bring the body section forward a couple or rows before I started working around the whole edge. In this photo, I've marked where the last round before the split is marked, and where the chain around the spout area is. The short line shows where I switched to working in the round.
Because the last row of sc I worked before making the spout opening was worked on the right side (RS), I joined the yarn into the side of the spout opening, into the first chain, on the wrong side (WS). This way, the two filler rows I made would match the body of the cozy. I worked the first row across to the other end of the chain row, slip stitched into the last chain, then turned it and worked my way back again, making two rows that were bascially straight out from the main body. I turned it again and worked another row of sc into the front loops only, as at this point the stitches were running up the spout. Joining 2sctog at the corner, I kept on going around the spout opening, working into the other side of the foundation chain. When I reached the other side of the foundation chain, I did another 2sctog to turn the corner, then continued on. I worked in a spiral at this point, just going around until it was the height I wanted. Only the last row did not have 2sctog at the corners.

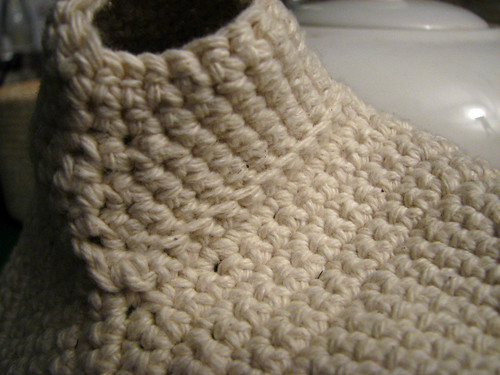
Here's a different view of the spout section. You can see where I've worked into the foundation chain, as well as the 2sctog stitches.

For this shot, I turned the spout area inside out. You can see the line where I'd done the stitches into the front loops only.
One of the reasons I wanted the spout area to go up so high is because, like most teapots, ours dribbles when we fill our cups. The cozy will not only keep the tea warm, but will make things less messy. With a cotton yarn, it'll be easy to clean, too.
One the spout section was finished, I went back to the base of the cozy.
Starting from where I left off at the end of a dc row, I kept on going around the corner rather than turning again. I did 2 sc into each dc and 1 sc into each sc along the sides of the rows, with 2sctog to turn the corners.
When I finished edging the handle opening, I kept on going in sc around the bottom of the cozy. I didn't do any more decreases, but I did make sure the stitches were tight so that it still pulled in a bit.

When I reached the end, I put it on the pot and marked where I wanted to have button loops, then did a second round of sc into the handle opening, placing loops at the markers, and finishing at the opposite corner.
In this photo, I've marked outside edges of the handle opening that I worked the edging sc stitches into.

I raided my elder daughter's button box and found these cow print buttons. I thought they were a hoot. After I finished off the tail end, I added the buttons into the cozy. Using the same yarn as the cozy, I used a tapestry needle to thread 2 lengths of yarn through the cozy, into the button, then back through the cozy. On the inside, I double knotted the ends, which left me with 4 tail ends at each button to finish off into the back of the cozy.
The only thing left to do now is a bit of embroidery. My pot has "tea" written on one side, and "thé" on the other. I plan to match the writing on the cozy. :-D
Meanwhile, we've already tried it out, and it does it's job quite well.
No comments:
Post a Comment