Looking at the different types, an idea began to percolate in my brain. After twisting and turning the various permutations around in my head, I decided to give it a go with yarn and hook.
First off, the structure.
I didn't want a hood that came to a point in the back. I also wanted more depth to the hood, rather than just a folded in half scarf. Because I like making things difficult, I guess. ;-) This got me thinking of different sewing patterns I've encountered over the years for hoods. I decided that I would have a flat panel for the width of the head, then build up the sides and/or back.
Next, the construction.
I wanted to be able to work it all in one piece. I didn't want to be stopping in one place, then restarting the yarn somewhere else. Nor did I want to be sewing sections together.
I had some Lion Brand Homespun from a project that needed less than I expected, so even though I dislike working with the yarn, that's what I used for this prototype. I love the colours, softness, weight and easy care of Homespun, but it's a PITA to work with. Ah, well.
I didn't take photos of the piece as I worked it, simply because I had little idea of what I was doing. I was just mucking about to see how it turned out. This is the finished hood.
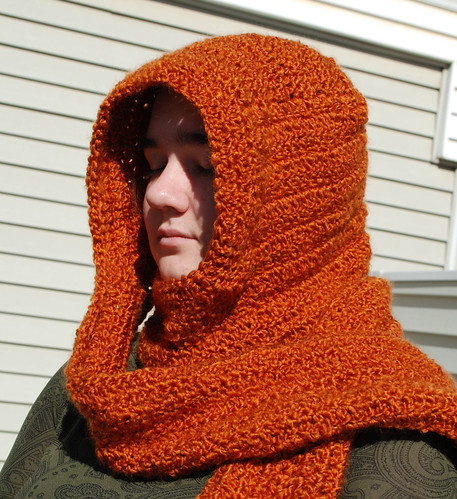
My poor daughter. I made her face the sun so I could get this picture, and she was totally blinded!
I'm pretty happy with how it turned out, though there are a number of things I will be changing for the next one I make. I'll explain that as I go along.
First up, the top panel.
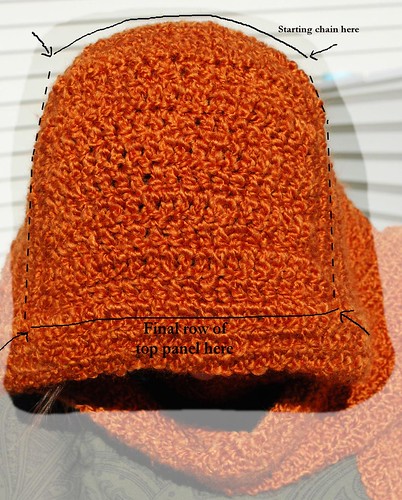
Using the Homespun and a 6.00mm hook, I started off making a rectangular panel 20 dc wide. I worked the length so that it reached from the crown of my head to my hairline, which worked out to be about a dozen rows. I was more interested in the dimensions than how many rows at this point.
Next, it was time to build up the sides and back. Here's a back view.
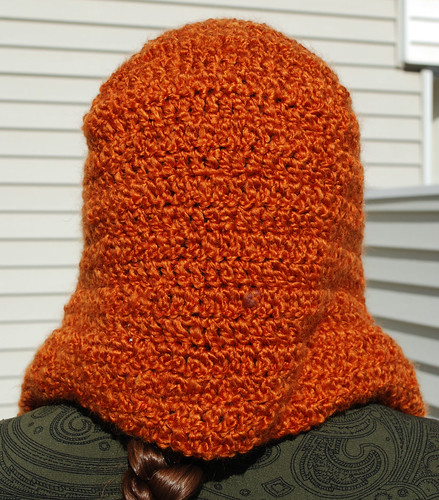
To work the sides and back, I turned the top panel and started working dc along three sides, without adding extra stitches to the turns at the corners. I built these up until, when worn, it reached about the base of the head. This worked out to be another dozen or so rows.
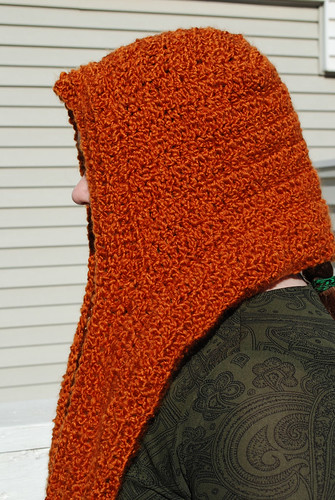
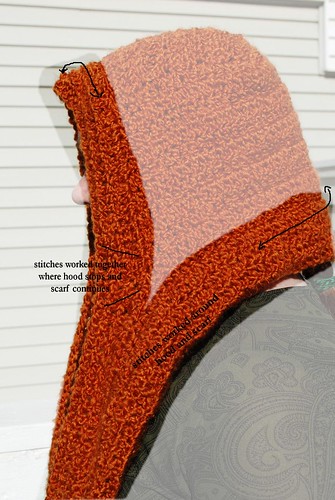
Next up, it was time to add the scarf portion. Here is a side view of the piece.
And so you can tell what is where...

To start on the scarf portion, I simply extended the last row of the hood by working a chain to the length I wanted. Once I had a length that I could wrap about myself the way I'd want to while wearing it, I counted the number of stitches (+2 ch to turn), then worked dc back to and across the bottom of the hood. When I reached the other end, I kept going by doing foundation dc to the same number of stitches as the other side (I believe I settled on 120 dc beyond the hood portion to get the length I wanted). I worked rows of dc until the scarf portion was 4 rows wide, then started working around the entire edge of the piece.
Without turning at the end of the row, I worked 3 dc into the corner (counting ch3 as my first dc) and started working dc stitches along the end, 3 dc to turn the corner, then kept on going. This first round got worked into the remaining loops of the foundation dc and foundation ch stitches of the scarf portion. It's a bit of a pain, but I figured it would look better than changing to work in between the dc stitches. That would have been easier, but not the look I wanted.
First, a back view...

I wanted the scarf portion to be a bit more formed in the back, so that there wouldn't be any gaps in the back letting in drafts. To do that, I decided to start reducing the number of stitches in the back as I worked the rounds. I found the middle and put in a stitch marker. In the first round, I worked the decreases (2 double crochet together or 2 dctog) with 3 regular dc stitches in between (the stitch marker being in the middle stitch). In each consecutive round, I spaced the decreases farther apart; as I worked my way into the back section and reached the first decrease of the previous round, I'd start the decrease into the stitch just before the previous decrease, rather than into the top of it, then the start of the next decrease of that round was worked into the stitch just after the decrease of the previous round.
Here's the side view again.
In my first round, when I reached the turn where hood and scarf met, I worked 2 dctog, making sure one of them was right into the corner to prevent any gap. In subsequent rounds, I worked 3 dctog in the same area.
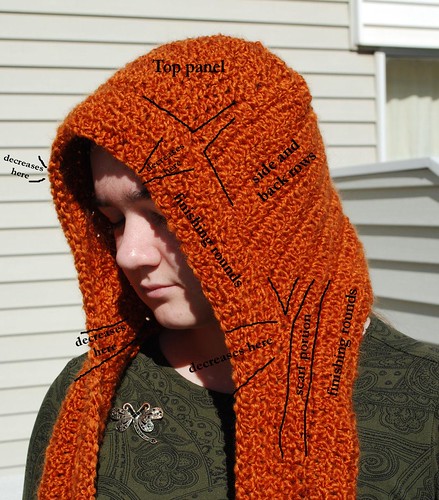
I also worked decreases across the top of the hood, placing the first ones right where the top panel and side sections were joined, then working subsequent decreases closer together in the next rounds. So as I worked up one side and reached the dc of the previous round, I worked the first half of the decrease into the top of the decrease of the previous round, then the second half into the next stitch at the top of the hood. Then when I worked across the top and reached the next decrease, I would work the first half of the new decrease into the last stitch just before the previous decrease. This way, in each round, the number of stitches in front of the top panel was reduced, not the stitches on either side.
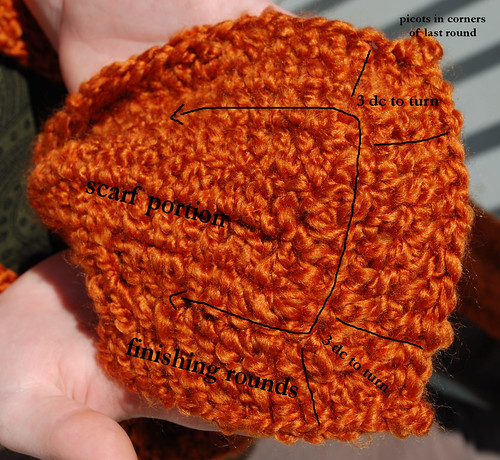
In the very last round, I added a picot into the 3 dctog at the corners of the scarf portion. Just because.
Final verdict.
I find my basic premise is sound. I like the flat top panel idea, but found that, instead of one large point in the hood, like in the scarf-folded-in-half type, I have two very slight points at either end of the starting chain. I also think it's a bit too wide. Next time, I'm going to start with a shorter foundation - perhaps half the width of what I have here - and work increases into the next few rows until it's the width I want. I think I'd go about an inch or two narrower on the total width, too. I think I'm good with the depth of the hood, so I'd probably work the top panel to the same length as I did here - long enough to reach from crown of the head to the hairline.
For the shaping at the back, I think I would actually start working decrease rows in the scarf portion, rather than in the finishing rounds. I might even go so far as to start the decreases in the back of the hood portion. I'll have to think about that.
I'm not entirely sure what I think about where I started the scarf portion. On the one hand, I'm thinking of starting it higher up (by reducing the number of rows in the hood portion), which would make it go across face at a higher point. On the other, I'm thinking of starting it lower down (by adding more length to the hood portion), so that it's not in the way of the face when not wrapped up.
I'm also debating whether or not I'd like the scarf portion wider or not. With a core width of 4 rows, plus another 4 rows added by the finishing rounds, it's a decent width. When wrapping it around the face and neck, though, it tends to be a bit gappy. I think that has more to do with the fact that the scarf is attached to the hood, rather than the width.
Hmm... I wonder if there's a way to make a keyhole, instead. That would solve that problem.
Those are just a few of the ideas I'm bouncing around.
Other things I would change or keep:
I would stay with the same hook size and yarn weight. I'm happy with that. If I were to experiment with that, I'd probably go with a bigger hook and chunkier yarn, rather than the other way around. I wouldn't want to stay with this particular yarn, though. The Homespun splits and catches on the hook horribly, and I was forever having to undo and redo stitches because of it. I'd definitely go with something that's got a better twist to it.
Once I get the basic idea down to my satisfaction, I might play with textures and/or colours. Perhaps adding a contrasting colour for the last round, for example, or adding textured stitches or cables to the hood and scarf potions.
Experimenting will be fun!
1 comment:
This is a great idea. All of a sudden tonight I need hooded scarf. Don't know why, but I love your concept.
Post a Comment