Another brand has popped up, though. Red Heart Collage. The price is pretty decent, so I picked up a ball to experiment with, choosing Landscape Green, though I was pretty torn between that and Wood Trail and Crimson Maple.
The yarn is made up of 2 strands. The primary colour - in this case a green - is a strand that stays the same throughout. The second strand has the graduated colour change. With this colourway, it ranged from pinks to greens to a pale, almost blue-green. It's a combination that's gone over rather well with everyone in our household.
It's a 100% acrylic yarn which, unfortunately, you can feel. There's a very slight scratchiness to it. Certainly better than many acrylics, but not quite the best, either. Care instructions are warm water wash, gentle cycle, and drier on low. The recommended hook size is 5.50mm or 6mm. The weight is rated as a 4, medium. One ball has 218 yards/200m
So I found myself with a single ball of yarn, and needing a project to use it for. I wanted to do something that would show off the self-striping effect, so I didn't want any fancy stitches or patterns to distract. I also didn't want to make something I'd wear, because of the slight scratchiness it has. It would probably be find in a hat, but I didn't like the idea of that texture around my neck in a scarf, for example.
After hemming and hawing and digging through my craft supplies, I decided to make use of a pair of round bamboo handles I picked up at the Reuse Centre some time ago. I would make a small hand bag, worked vertically, using only hdc and sc stitches. Since I still wanted some texture, without detracting from the yarn itself, I decided on using the back loops only. I figured the resulting texture would accentuate the self-striping even more.
It worked our rather well, I think. :-D Here is my step by step process.
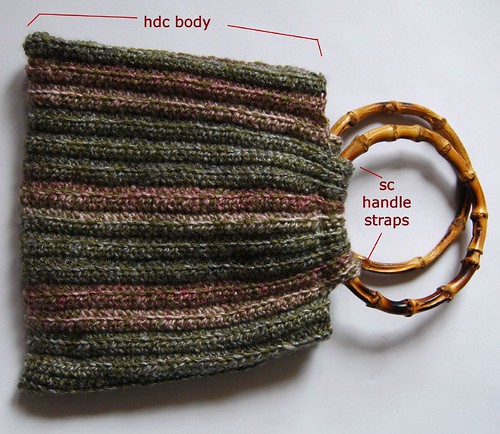
Here is the mostly finished bag. The body is worked in one piece, folded in half. I chose to use a 4.0mm hook to tighten up the resulting fabric, and I'm glad I did. I found the yarn didn't have a consistent width, and actually got rather thin at points, so using the smaller than recommended hook size was much more practical for a hand bag, where I wanted a sturdier fabric.
I started out with a foundation chain of 100 (leaving a long strand to sew up the side seam later), but felt it looked too long for what I wanted, and not quite in proportion to the size of handle rings I had. I brought it down to 75 stitches, and was much happier with it. So the foundation chain for this purse was 75 ch, plus 2 for turning.
The first 6 rows were done in hdc. In the 6th row, I chained another 11, turned, did 10 sc (turning chains are not counted in this project), went back to hdc for the 75 stitches of the body, then did 10 sc foundation chain to extend the handle strap. (Here's a good video tutorial on how to do that, though when I didn't work them into both loops of the foundation chain, as is demonstrated).
Counting that first row with sc in it, I did a total of 18 rows with the handle strap. On the last one, I ss'd 10 stitches back to the hdc section, then continued the 75 hdc body area for another 6 rows, finishing with a long strand of yarn left behind to sew up the side seam.
To sew up the side seams, I decided to go with a whip stitch instead of my usual choice, which is ss'ing the sides together.
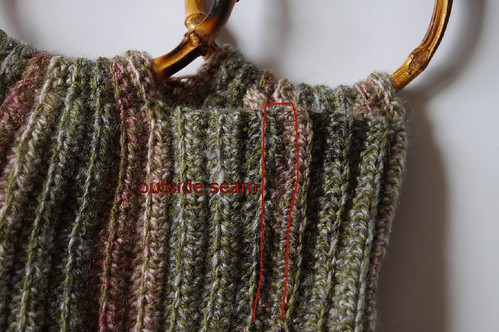
Here's what the side seam looks like from the outside. I chose this seam because you can actually see the stitches, due to the colour change. The other seam was pretty much invisible, and I found myself later having to look for it, even when working from the inside.
The next step was to attach the handles.
In retrospect, for the width of the handles I had, I probably should have made the sc handle straps slightly longer. It would at least have made sewing them around the handles a bit easier. On the other hand, I do like the snug fit. If I were to extend it, it wouldn't be by more than 2 stitches.
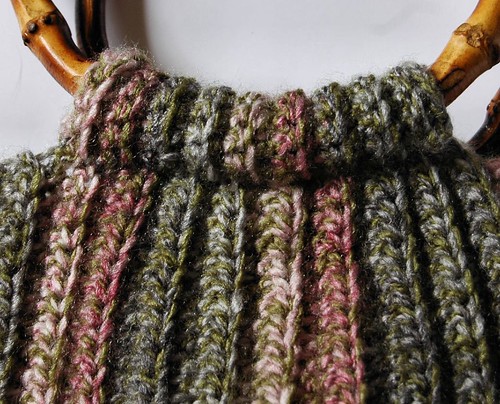
Like the side seams, I chose to whip stitch the handle straps in place, being careful to keep the stitches on the inside only, so they wouldn't be visible from the outside. With the colour change in the yarn, I didn't want to have horizontal colour changes visible on a vertical pattern. As you can see in this photo, it worked. The handles are securely attached, and there are no visible stitches on the outside.
I am quite happy with how the yarn looks. The colour change was more subtle than I expected, based on the project photo on the label, which I'm happy with.
I could have called the bag finished at this point, and just added a liner. I still had plenty of yarn, though, so I decided to add a pouch to hold my cell phone. I'll go through that in my next post.
No comments:
Post a Comment