I spent a bit of time trying to decide what sort of phone pouch to make, and how I wanted it to be attached to the bag. For the pouch itself, I wanted a rather snug pocket that still had enough give that I could put it in and take it out easily. I decided I also wanted to have a flap closure to reduce any risk of the phone falling out. As for attaching it to the bag, I wanted more flexibility, and was trying to think of a way I could use it both inside and outside the bag.
Here's what I came up with, designed to fit my very basic Telus LG phone.
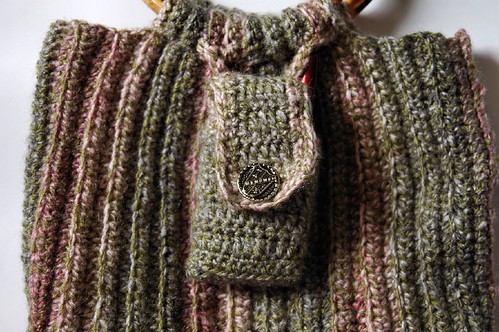
I started by making a flat base that more or less matched the bottom of my phone. Still using a 4.0mm hook, I started with an 8 ch foundation, plus 1 ch for turning. I did 2 rows of sc, but at the end of the second row, I turned the corner using (1 sc, 1 ch, 1 sc) in one stitch, then continued using sc around the remaining 3 sides. I then started the sides by doing a round of sc in the back loops only, skipping the 1 ch in each corner entirely, which worked out to a total of 24 stitches. Turning at each round, I did 1 more round of sc, then began alternating between dc and sc rounds until I reached the height I wanted, which was shorter than the actual height of my phone, finishing on a sc round. I turned and continued the pattern to make a flap that was narrower than the phone itself. In this case, the turning area happened to be in the right spot to start the flap. If it hadn't been, I would have ss'd a stitch or two to get to where I wanted. The flap turned out to be 10 stitches wide.
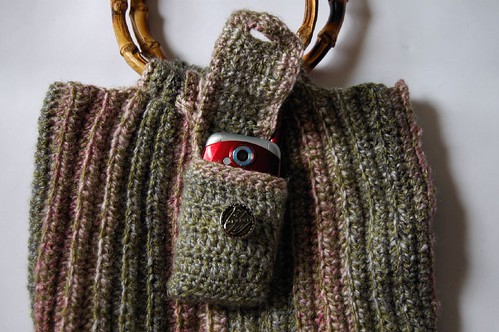
For the length of the flap, kept repeating the pattern until, with the phone in the pouch, it was just short of where I wanted to put a button. For the last row, I did 2 sc, 6 sc foundation chain, 2 sc to create a button hole to fit the button I'd already chosen from my daughter's stash. I then turned the corner (1 sc, 1 ch, 1 sc again), then followed the entire opening in sc to finish. Putting the phone in the bag, I worked out where to place the button, then sewed it in place.
To attach the phone, I first made a chain of the length I wanted, then ss back down the length of it to strengthen the ch and reduce stretch. I wove the resulting strap into first row of dc in the flap, then tacked the ends very thoroughly onto the inside of one of the handle straps, just above the stitching of the strap to the body. I can leave the phone hanging inside, as it is in this rather unfortunate photo, or it can be passed through the opposite handle. In that position, it does double duty. The phone, and its button closure, is easily accessible from the outside, while it holds the bag closed.
The only down side of this arrangement is that the weight of the phone does off-balance the bag a bit - the handle it's attached to tends to sag inwards when I try to access the inside. It's better than if I'd attached it to the side of the bag itself, though, as the handle adds extra support.
Once again, I could have called the purse finished here, but I still had some yarn left! So I decided to make an inside pocket.
On to part three! :-D
No comments:
Post a Comment