Last one! I now have 20 pieces (actually, I think I ended up with 21 - I'll have to recount. *L*), and still several days before we leave for our road trip.
I got the pattern for this from Getting Started Crochet. It's a good sized bag, though I find the tie straps a less logical design element from the usual loop type straps. The bag has a large flat, solid bottom done in hdc, so nothing's going to slip through that way - a problem I've noted with other types of bags.
I did find myself with a mystery, though. The last row on the base has 120 stitches. The first row of loops was done in groups of 4 (3ch, 1sc), for 120 stitches. The 5 chain loops were closed off at the top with the same 4 stitch sequence as the first loop row, then it was back to hdc for the top. For some reason, I went from 120 stitches to 112, and I can't for the life of my figure out how that happened! I could find no errors anywhere in the pattern.
Not that it makes a different, really. I just adjusted the numbers accordingly when making the straps.
I'll have to make another one of these for myself. :-D
Wednesday, September 30, 2009
Blitz - Market bag
Labels:
blitz,
crochet,
crochet - misc
Blitz - sc slippers
After making the hdc slippers, I decided to make another pair in a smaller size. They were made the same way except with single crochet stitch and fewer stitches in each round.
Sorry for the crappy picture. This was the best of the bunch. :-P
These fit my daughter much better than the hdc pair, which is what I was after. I'm not as happy with these as with the first pair, though. The first slipper I worked up was fine, but for some reason, I had the hardest time matching the second slipper. I kept counting and ripping and counting again. Still, it worked out well enough. I'm ok with it.
Labels:
blitz,
crochet,
crochet - slippers
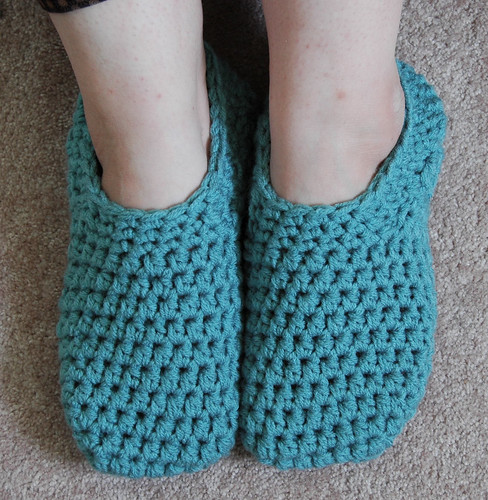
Blitz - hdc slippers
I had a decently sized stash of hardy acrylic yarn. Perfect for stuff that gets a lot of use and abuse. I used it to make my last three projects.
First, I made a pair of slippers in half-double crochet.
They're sized to fit my feet, so they're a bit bit on my daughter, who's modeling them. Hence the bulge visible at the heels. These were worked toe up starting from a chain of 5 and doing rounds of hdc. I worked back and forth, so that there would be no change in pattern when I split the rounds for the foot opening. The heel turn is done with reduced rows of sc. The opening is tidied up with 3 rounds of sc, reducing at the back of the heel in each row to prevent gaping.
The yarn was from a mill ends bin, so I don't know what it actually is - it just feels like the sort of acrylic that's used so much for afghans and such. I used 2 strands together on a 9.00mm hook, so they worked up nice and fast. I'm happy with how they turned out.
Labels:
blitz,
crochet,
crochet - slippers
Friday, September 25, 2009
Blitz - arm warmers
I've been looking at all sorts of arm warmer patterns of various complexity. I ended up going with simple, without using a pattern at all.
I used a 4.00mm hook again - this size is becoming my favourite, it seems. I have no idea what the yarn is. I got it from a fabric and yarn exchange a couple of years back. With only a partial ball, I had no idea what to use it for until now. Whatever it is, it was pure luxury to work with! I think it might actually be a silk blend of some kind. Whatever it is, it's smooth, soft, and has a wonderful sheen.
The arm warmers are 40 stitches long, worked side to side in hcd in the back loops only. I ended up doing 24 rows before closing it up. It took several tries before settling on where to put the thumb opening. The opening is wider than usual, but it felt more comfortable on the hand that way. I ended up closing it up for 8 stitches along the palm, then leaving a 12 stitch opening for the thumb. I worked the seam by ss the sides together, so when I got to the opening, I continued to ss into the foundation chain only for the 12 stitches, before joining the two sides up and continuing to the end.
One of the beauties of working side to side in the back loops is that the resulting fabric is quite flexible. In this photo, my 13 yr old is wearing them, but the fit me, too.
Blitz - java jacket
In looking at the various projects I've been doing, I have a serious dirth of guy-friendly patterns. Thinking about my various family members, I remembered that I have some serious coffee drinkers in there. Having seen some interesting ideas in pattern books and online, I decided to make up a java jacket for coffee mugs.
I worked this using Bernat handicrafter cotton and a 3.50mm hook. It's done much the same way as my can cozies, except that I was working in circles instead of a spiral. After working up a flat circle for the bottom (actually, it ended up being an octagon until I started working up the sides). The first round for the sides was done in the back loop only. I kept a mug beside me determine how high to go before starting the space for the handle, then adding the length for the closure.
The mug I used as I worked it up was a standard sized mug, and it ended up feeling a bit loose. It fits much better on this larger sized mug.
Blitz - Mohair hat
For this project, I used another one of gorgeous mohairs I found at Goodwill. This pattern is from Hip to Crochet: 23 Contemporary Projects for Today's Crocheter. The pattern recommended a sportweight yarn, but I thought it would work well with this mohair blend.
I used the recommended 4.00mm hook size. The yarn is from les fils marnel yarns, Rainbow - a French named yarn made in Italy. It's 70% acrylic, 20% mohair and 10% wool. It's machine washable in warm water, which is an added plus.
The pattern is worked in hdc, including the strange little nipple at the top. The down side of working in this pink colour is that I couldn't past the image that I was crocheting a giant breast. LOL It's meant to be worn with the bottom turned up, but my kids like it better down. It's much lighter and thinner than the recommended yarn would have been, while remaining beautifully warm. It does look strangely lumpy when not being worn, though.
Labels:
blitz,
crochet,
crochet - hat
Blitz - Cowl Hood Neckwarmer
This is a pattern from Crochet! magazine, Fall 2009 - the same one I got the beaded bracelet pattern from. Here, my demure looking younger daughter is modelling it for me. :-D
The pattern called for Bernat Soft Boucle bulky (5) yarn and a size J 6.00mm hook. I used the recommended hook size, but I changed the yarn. I also made added a few rows to make a longer tube, once the seam was closed.
I don't know what the yarn actually is - it came from an unlabelled pack of mill ends. It was quite a bit thinner than the recommended yarn, so I used two strands. The end result isn't as floppy and flexible as the recommended yarn would have been. It is, however, very soft, warm and cushy.
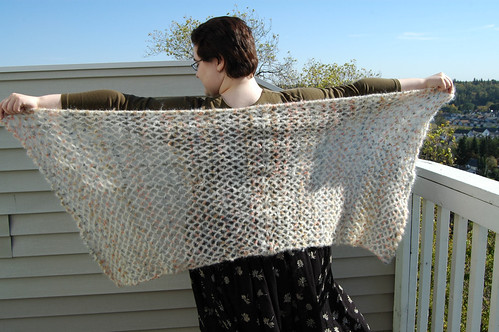
Blitz - mohair stole
Some time ago, I found a treasure of yarn at a local Goodwill. A bag full of fancy mohair blend yarns, including 9 balls of one type. Enough to make a very decent sized project. I've been hanging onto it for a while, thinking of what I could use it for. Because of the light airiness of the yarn, I was thinking of a shawl or a stole.
After looking at the various patterns, I ended up not using a pattern at all and just did a mesh pattern repeat. Here it is, modelled by my older daughter.
The yarn is Gypsy, from Jaeger. It's 71% mohair, 13% wool, 9% nylon and 7% acrylic; hand wash only.
To make the stole, I used a 4.00mm hook (mine is labelled F, but other brands label that size a G). I worked outwards from the centre foundation chain, in 5 ch loops. Because I had 9 balls of this yarn, I worked the first half until I finished 4 balls, which turned out to be 45 rows. Then I just matched the number of rows on the other side. When I completed the last row of loops, I kept on going around the entire stole, using up the last ball of yarn. Each long side has 2 sc into the ch and dc spaces along the edge, while the ends were done in scallops of (1sc, 1hdc, 3dc, 1hdc, 1sc) into each loop.
This project took me two evenings to finish. The finished result is incredibly light and fluffy, and surprisingly warm, considering how open the pattern is. I'm quite happy with my first stole. :-)
Monday, September 21, 2009
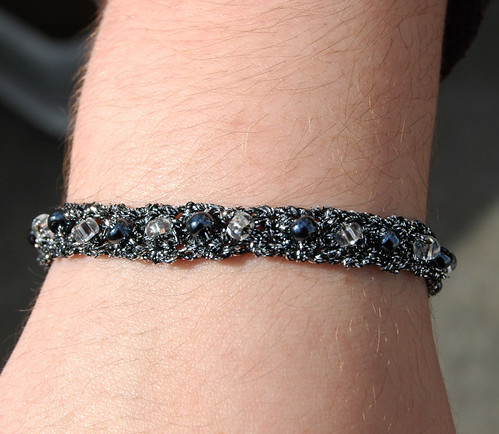
Blitz - beaded bracelet
This is a pattern from the Fall 2009 Crochet magazine. The original used gold metallic yarn with alternating green and pearl beads and a toggle clasp. It also called for a 1.80mm hook. I used a 2.35mm hook, as I don't have a 1.80mm, though I do have smaller. Too small for the yarn. I have a rather large size gap in my thread crochet hooks that I need to fill!
The yarn is the same Phildar Sunset brand I used for the filigree choker and earrings set. The beads were taken from mixed bead sets I got at DeSerres some time ago.
I used a magnetic clasp instead of a toggle clasp, too. That did make using a needle to attach the clasp and sew in the loose ends interesting. The clasp kept sticking to my needle. *L*
Because of the larger hook size, the bracelet is somewhat wider and looser than in their sample. This actually worked out well. The bracelet fits my daughters, but it's got enough elasticity to it that I can wear it, too.
I'm very happy with how this turned out. :-)
That should be it for the next while. I still got another project I didn't get a good photo of, so that will wait until later. For now, it's back to work! :-D
Labels:
blitz,
crochet,
crochet - jewelry
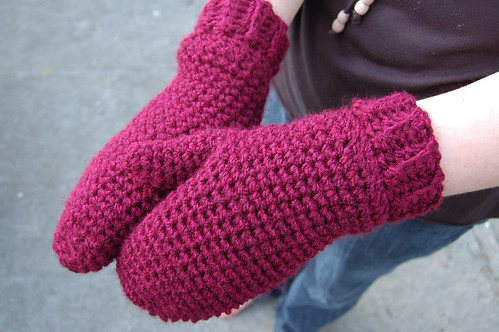
Blitz - mittens
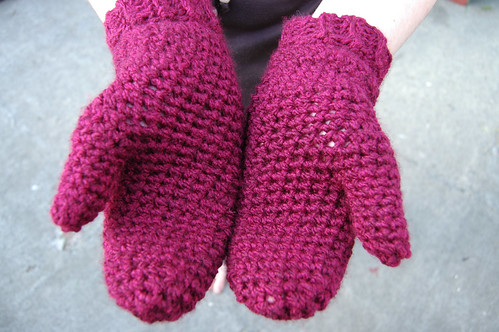
These are a variation of a free pattern I found at the Bernat website. The original instructions were for Softee Chunky yarn and a 6.00mm hook. I kept the hook size, but I used Northern Chunky from Kertzer, which I picked up at a yarn store I recently discovered. It's 100% acrylic, machine wash and dry-able. The colour is Cranberry Cocktail. It's a very lovely yarn to work with.
A couple of modifications were made from the original pattern. The pattern called for 2 colours. The first was used for the first couple of rows, then a second colour was added, and the rest of the pattern was to be worked up with 2 strands on the hook. I chose to stick with just the one colour.
To the pattern itself, I didn't change anything other than doing the thumb in a spiral after the first joining round. I didn't want a "seam" on the thumb.
The Bernat pattern also didn't have a ribbed cuff. I added that on myself, as longer cuffs offer better protection against the elements. I started by doing a row of sc into the foundation chain at the wrist. Then I chained 6, then worked back along that foundation for 5 sc, slip stitching back into the row of sc along the edge. Then I did another slip stitch before working 5 stitches back up the cuff, working in back loops only.
My daughters really like how they turned out. I will probably be making more of these for ourselves after our trip.
Labels:
blitz,
crochet,
crochet - misc
Blitz - Son of Skully
This is a variant of the Skully I did before. The pattern itself is the same, except for changing the total number of dc stitches per row, and the total number of rows. The yarn is the same worsted weight yarn I used for the Biker Beret, except that I used 2 strands on a 9.00mm hook.
With the extra thick yarn, closing up the top was slightly different from before, too. I only needed 2 rounds of sc and, rather than doing two sc together every few stitches to decrease, I did on sc into the "hill" of back-loop crocheted rows, skipping the "valleys" in between. For the last round, I reduced it the same way. With the yarn this thick, it was better to skip stitches completely than to bulk things up by doing 2 stitches together.
Labels:
blitz,
crochet,
crochet - hat
Blitz - pale hat
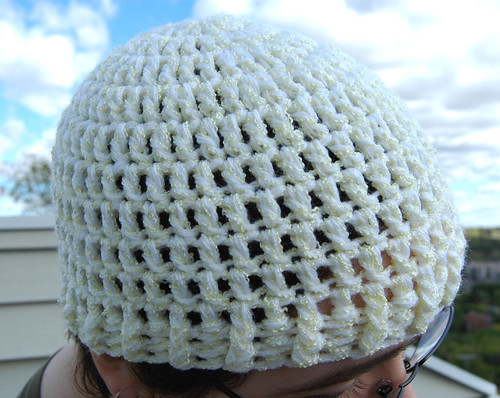
I made up this hat using a yarn I picked up at a yarn and fabric exchange a couple of years back. I have no idea what it is, but it's quite nice. A bit difficult to work with, as it's made of of two strands of white yarn, and one squiggly strand of pale yellow that was almost like a string, wrapped loosely around the other two strands. It made for an interesting texture, but tended to get missed by the hook as I worked.
For this, I used 2 strands together on a 6.50mm hook. The main part of the hat is done in basic double crochet, with the last several rows done in alternating front and back post double crochet. With this yarn, using the two strands together resulted in a very squishy feeling texture that's quite warm and cozy.
Labels:
blitz,
crochet,
crochet - hat
Blitz - hat and scarf
These two were a bit of a frustration for me. I only had two balls of the yarn I used for these. It's a gorgeous yarn, Maxi Tosca from Lang Yarns. It's 55% new wool and 45% acrylic. It's even machine washable, though in cooler water, gentle cycle and with detergent for fine wash and no softener. No drier. At that point, I figure hand washing would be better. *L*
I picked it because I loved the colour gradients (I like the slow transition of colours better than variagated yarn) and how incredibly soft and light it felt. I choked a bit at the price, but I loved it enough that I considered getting more so that I would have enough to make something wearable; something where I could enjoy its beautiful softness.
By the time I was done this pair, I was glad I changed my mind!!
The hat is a simple double crochet hat, very much like the Biker's Beret I'd done previously. I changed the increases per round and number of increased rounds slightly, to suit the yarn. I used a 5.50mm hook.
The scarf was incredibly frustrating. I ripped this several times before settling on a basic double crochet pattern to match the hat (I originally wanted to work it lengthwise, but that didn't work out) and finding a width that let me get a decent length with the amount of yarn I had left over, including what remained from the hat. Once I did find the dimensioned I needed, I just kept adding rows until I was out of yarn.
By the time it was done, I discovered welts on my arm, where I would drape the scarf as I was working it. It turns out I'm allergic to this yarn! I thought I'd developed an allergy to wool. At the moment, however, I'm working on a stole using a blend of wool and mohair, and I'm not reacing to it. Granted, it isn't "new wool" like this is, so maybe that is making a difference? I have no idea.
I did find it strange that I developed hives on my arm, but that my palms and fingers, which had much more contact than the back of my arm, didn't react at all. Either way, now that I know, I'm glad I didn't hang on to it for some future sweater or something!
Anyhow, this set worked out all right, and I still love the colours and how soft it is.
Labels:
blitz,
crochet,
crochet - hat,
crochet - scarf
Sunday, September 20, 2009
Blitz - update
I'm about to go through the photos I took of my latest blitz projects, but I thought I'd do a quick update, first.
I hit a bit of a slump a few days back. First, I tried another pattern from 24 Hour Crochet Projects. This time, a brimmed hat. Now, I DID check the gauge when I started: 2 rounds = 2 inches. Well, for some reason it didn't quite work out. The pattern worked fine and the hat was adorable - but it was baby sized. Thankfully, I know a baby, so my husband took it to work with him to pass it on. I hope it fit. I'll have to ask the parents about it, but haven't had a chance to yet.
So that lost me a day on my goals. I went looking through my pattern books and found a pattern for slippers that were different from anything I've done. Usually, I make slippers that are kinda like toe-up socks. They take a bit longer than I want for right now. These were like the Mary Jane style I've seen around but have never tried.
They worked up fast, but I'm not happy with them. Although they're worked identically for all but the very last row, one ended up looser than the other. Then there was the strap. This is worked in at the very end of the last row. Since the button closure is on the outside, that meant one foot's last row was done in the opposite direction of the other. In one of them, the strap ended up further back on the slipper than the other.
So that lost me another day.
We were back at the library, so I went through what books I could find on the shelf, looking for inspiration. Most of them were patterns that took a lot more time than works for my goals, but I did take a few out, including one on making crochet jewelry. I wasn't too inspired, though, and it was starting to frustrate me.
Then we went out again that evening, and I found the fall issue of Crochet magazine. It's a special gift issue, I guess, as it's not on their site right now. Not that it matters. That one magazine has more in it that's of use to me than all of the books I'd looked at at the library put together. It definitely helped me get things going again!
As for now, I need to go through my photos and see which ones turned out. More posts to come. :-D
Sunday, September 13, 2009
Blitz - Chillbuster Scarf
This is actually my first scarf.
I've seen designs for scarves with a split to put the end through around, but haven't seen a pattern for one yet. So I made one up.
The yarn used is Bernat Softee Chunky in Terra Cotta Mist. 100% acrylic; machine wash and dry. The colours are actually a lot brighter in the photo than it is in reality - that bright sunshine really brings the colours out. It's really soft and warm.
The hook I used was a 5.50mm
This pattern would be very easy to modify. I chose to put in 2 slits, but it can be made with just one on one side, or none at all.
Using the Softee Chunky yarn (2 balls) and 5.50mm hook, this is how I made this scarf.
Chain 160 + 2
1st row: working into the BACK of the chain, work 1dc into the 3rd loop from the hook. Do not count turning chain here and throughout. Continue working dc into the back of each chain to end. Ch 2 and turn.
Remaining rows are worked in back loops only.
2nd row: work dc into each stitch to end. Ch 2 and turn
repeat for rows 3 and 4 if making a split scarf. If skipping the splits, repeat to desired width and finish off.
* (see note below) Count 30 dc from the end. Place a marker in the 31st stitch. Counting the marked stitch, count 18 dc and place a marker on the 18th stitch. Repeat on other end.
5th row: Work dc into the first 30 stitches, stopping just before the marker. Ch 18. Continue dc after second marker to skip 18 stitches. Dc to stitch before next marker. Ch 18. Continue dc from stitch after last marker to end. Ch 2 and turn (don't forget that the dc are still all worked in the back loop)
6th row: Dc to end. At the chains, dc into the chain, not around. Ch 2 at end and turn.
repeat row 2 for rows 7-9.
Finish off yarn and weave in loose ends.
*NOTE: determining where to make the splits.
Work up the scarf until it is half the width you want it to be, ending on an even numbered row.
Find the centre of the scarf in progress. Put it around your neck with the centre placed in the middle of the back of your neck, ensuring the working row is at the top. Cross the ends comfortably in front of your neck. Place a stitch marker in a stitch close to where they cross near your neck.
How wide to make the split is determined by width of the scarf, which needs to be an odd number of rows. The centre row must be an odd number, so that the width is the same on either side. Each row of dc = 2 chs and 2 stitches skipped in the split. Therefore a scarf that's 9 rows wide like this one, needs a split that's 18 stitches wide.
One you have determined the number of stitches you need to skip, count them out from the marker towards the end and place another marker. The markers need to be in the first and last skipped stitches.
If are making just one split, you can continue on from there. For two splits, place matching markers along the opposite end of the row, adjusting as needed to ensure they are equally spaced.
Continue working as for 5th row.
Labels:
blitz,
crochet,
crochet - scarf
Blitz - Can Cozies
I have made a lot of these in various shapes and sizes, including variations for small, handle-less teacups. Those do double duty - they insulate the cup, keeping the tea hot longer, and prevent burning your fingers when handling it.
I made these three in one evening.
As you can see, they're not just for pop cans, even though they're all the same size. :-D
These can be made in any material you'd like, but my preferance is for Bernat Handicrafter Cotton Ultrasoft, which is often marketed as dishcloth yarn. It's 100% cotton and machine washable and dryable. Though the label recommends a 4.5mm hook, for these I use a 3.5mm hook. This makes them better able to hold their shape when they're empty.
For a cooler that fits an ordinary pop can, using the yarn and hook size I did, this is how.
Start with 8sc into a magic ring. DO NOT JOIN. The rounds are worked in a spiral.
Increase each consecutive round to make a flat disc as big as the bottom of a pop can. For these, that worked out to 16sc, 24sc , 32sc, 40sc in each consecutive round.
After this, you can just keep working 40sc rounds, but I like to do the first side round in the back loop of the last disc round. You can see that round in the second photo. I find this gives a more defined crease between the base and side rounds. Either way, just keep going until the cozie is the height you want it to be. Feel free to change colours and add texture stitches as desired. As you work up the height, put a can (or whatever you're making the cozie for) into it every now and then to check height and fit.
If you find that the fit is a bit snug, making it hard to put the can into the cozie, try doing 1sc, 3ch, 1sc in one stitch, evenly spaced around the top of the cozie. It gives a slightly fancier looking cozie, but it also flares out the top row enough to make it easier to put a can in, while still keeping the rest of the cozie snug enough not to fall off too easily when the can it picked up.
The first one of these I did was the dark blue with light blue stripes and textured stitches. I was just playing around as I worked. I got positive responses from the family over it, but my personal preference is for simpler designs, so for the others, I stuck to the basics.
Labels:
blitz,
crochet,
crochet - can cozie
Blitz - Skully
Catching up on the last few days of my blitz. First, what is basically a crochet version of a toque (or tuque)
Pattern: Skully
From: Get Your Crochet On: Hip Hats & Cool Caps by Afya Ibomu
Recommended yarn: worsted weight
Yarn used: Bernat Satin.
Hook: 3.75mm
Changes made: added an extra round to close up the top.
This hat, and several other projects in the book, uses the same shaping/sizing technique Mary Jane Hall puts to such good use in clothing in Crochet That Fits. After working the rows and seaming it into a tube, the top is closed up with reducing rounds of hdc. The instructions said 2 rounds, but I found that still left a rather large opening, so I did one more reducing round, then wove the tail end through to close it up tight.
The hat is light and comfortable, but took far longer to make than I wanted for my blitz. If I do it again, and I most likely will, I'll use a chunky yarn and larger hook.
Labels:
blitz,
crochet,
crochet - hat
Saturday, September 12, 2009
Blitz - filigree choker with matching earrings
This project pattern was for just the choker. I modified a portion of the pattern to make the earrings.
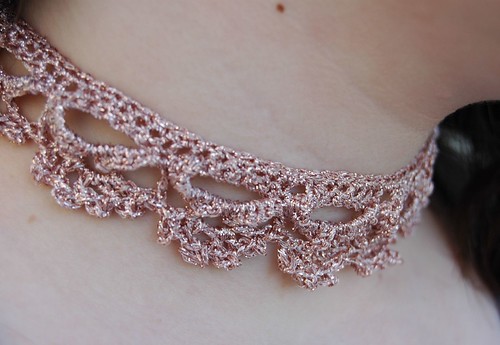
First, a couple of views of the choker.
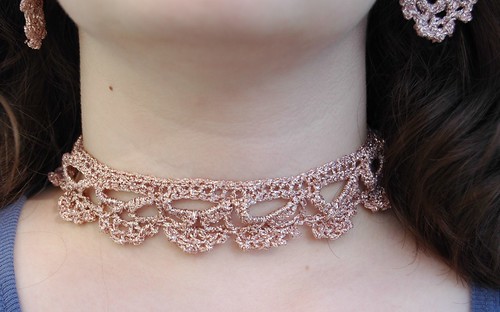
For the clasp, I stole a dragonfly toggle clasp from my older daughter's jewelry findings stash.
I like it better than the button used in the book's sample.
Before I go on to the earrings, here's the details on the choker.
Pattern: Filigree lace choker
From: Easy Crocheted Accessories: 30+ fun and fashionable projects by Carol Meldrum
Recommended yarn: light-weight yarn (80% viscose, 20% polyester) in gold.
Yarn used: Phildar's Sunset, 65% viscose, 35% polyester.
Hook size recommended: D (3mm)
Hook size used: 2.55mm steel thread crochet hook
Other recommended: medium button for closure
Use: decorative toggle clasp
Changes made: Because of the smaller hook size I used, I lengthened the foundation chain by 1 extra pattern repeat. It still ended up a bit short, and only fits my 13 yr old daughter.
The pattern in the book is made up of a foundation chain and two rows. The first row is a bit weird in that the pattern repeat involves doing a number of sc into the foundation chain, then ch a loop that gets worked into the first of these sc. That loop is then wrapped in sc, with a 5 chain loop in the middle of it, before getting back to the foundation chain, where it's repeated to the end. The second row involved dc with picots into each of the 5 ch loops and triple stitches in between. What I found was that the whole thing looked rather scraggly at the foundation chain, so rather than ending off with a button loop clasp, I worked in a bit of length and crocheted in one end of the toggle clasp, then did a row of sc along the top of the choker. I found this gave the choker more body, and it actually looked more like the sample in the photo. At the end of this extra row of sc, I added the opposite piece of the toggle clasp the same way I did at the other end. I did 2 ch, took the loop of the hook and threaded it through the clasp, put the loop back on the hook, did 2 more ch, then slip stitched back to the body of the choker.
I was happy enough with the results that I decided to work up matching earrings.
The hooks were also from my daughter's stash. ;-)
I made the earrings by chaining 2, then working 24 sc into the second ch from the hook, with a 5 ch loop after every 6 sc. I added the earring hook to one of the 5 ch loops the same way I attached the toggle clasps. For the second round, I did 2 ch, then [1 dc, 1 picot] 3 times into the 5 ch space, added 1 more dc, then repeated for the other two 5 ch loops. Another 2 ch, then I slip stitched into the base of the loop the hook was attached to.
To finish the earrings, I used a sharp needle to weave the first end into the ring, gently pulling it snug so that there were no gaps in between the stitches. For the second yarn end, I wove it into the ring in the opposite direction, so that it wouldn't end up looking lopsided. It still isn't a perfect circle, but that's ok. I'd debated using an actual ring of plastic or metal as a from for the first round of sc. It might have worked out tidier, but they would also have been heavier. These are so light, it's almost as if they're not there.
I think, if I did this again, I'd find a different yarn. This stuff is a pain to work with. *L*
I did finish a new project today - another hat - but I haven't taken photos of it yet. That will be in my next post.
First, a couple of views of the choker.
For the clasp, I stole a dragonfly toggle clasp from my older daughter's jewelry findings stash.
I like it better than the button used in the book's sample.
Before I go on to the earrings, here's the details on the choker.
Pattern: Filigree lace choker
From: Easy Crocheted Accessories: 30+ fun and fashionable projects by Carol Meldrum
Recommended yarn: light-weight yarn (80% viscose, 20% polyester) in gold.
Yarn used: Phildar's Sunset, 65% viscose, 35% polyester.
Hook size recommended: D (3mm)
Hook size used: 2.55mm steel thread crochet hook
Other recommended: medium button for closure
Use: decorative toggle clasp
Changes made: Because of the smaller hook size I used, I lengthened the foundation chain by 1 extra pattern repeat. It still ended up a bit short, and only fits my 13 yr old daughter.
The pattern in the book is made up of a foundation chain and two rows. The first row is a bit weird in that the pattern repeat involves doing a number of sc into the foundation chain, then ch a loop that gets worked into the first of these sc. That loop is then wrapped in sc, with a 5 chain loop in the middle of it, before getting back to the foundation chain, where it's repeated to the end. The second row involved dc with picots into each of the 5 ch loops and triple stitches in between. What I found was that the whole thing looked rather scraggly at the foundation chain, so rather than ending off with a button loop clasp, I worked in a bit of length and crocheted in one end of the toggle clasp, then did a row of sc along the top of the choker. I found this gave the choker more body, and it actually looked more like the sample in the photo. At the end of this extra row of sc, I added the opposite piece of the toggle clasp the same way I did at the other end. I did 2 ch, took the loop of the hook and threaded it through the clasp, put the loop back on the hook, did 2 more ch, then slip stitched back to the body of the choker.
I was happy enough with the results that I decided to work up matching earrings.
The hooks were also from my daughter's stash. ;-)
I made the earrings by chaining 2, then working 24 sc into the second ch from the hook, with a 5 ch loop after every 6 sc. I added the earring hook to one of the 5 ch loops the same way I attached the toggle clasps. For the second round, I did 2 ch, then [1 dc, 1 picot] 3 times into the 5 ch space, added 1 more dc, then repeated for the other two 5 ch loops. Another 2 ch, then I slip stitched into the base of the loop the hook was attached to.
To finish the earrings, I used a sharp needle to weave the first end into the ring, gently pulling it snug so that there were no gaps in between the stitches. For the second yarn end, I wove it into the ring in the opposite direction, so that it wouldn't end up looking lopsided. It still isn't a perfect circle, but that's ok. I'd debated using an actual ring of plastic or metal as a from for the first round of sc. It might have worked out tidier, but they would also have been heavier. These are so light, it's almost as if they're not there.
I think, if I did this again, I'd find a different yarn. This stuff is a pain to work with. *L*
I did finish a new project today - another hat - but I haven't taken photos of it yet. That will be in my next post.
Blitz - Lovely Lid
Here's the next cap I finished on the first day of my crochet blitz.
Pattern: Lovely Lid
Designed by Denise Black
Pattern from: 24 Hour Crochet Projects by Rita Weiss
Yarn recommended: bulky brushed mohair type yarn - Lion Brand Jiffy
Yarn used: Bernat Harmony (bulky) in silk green
Hook: K (6.50mm)
Changes made: just the different yarn; no changes to the pattern.
A little more complex, this pattern is still done in all dc. It starts out with regular dc stitches, then crossed dc, and finally, alternating front and back post dc for the "cuff."
This one took a bit longer - about 2 hours - and is a real hit with the girls. I'm going to have to make more for ourselves. The yarn is wonderfully soft, light and warm. Perfect for those Manitoba winters. It's an acrylic that's washable and dryable in warm water.
Labels:
blitz,
crochet,
crochet - hat
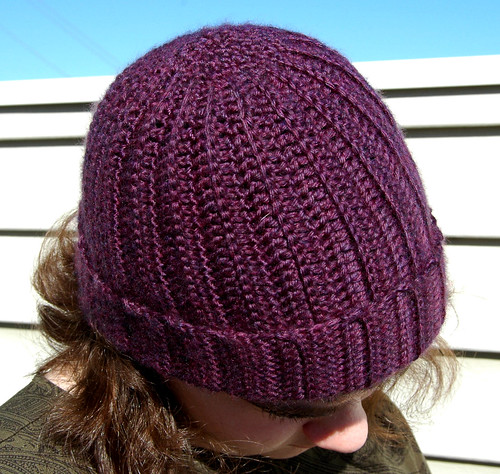
Blitz - Biker's "Beret"
For the next while, I'm shooting for crocheting at least one project a day as gifts. I picked up a bunch of pattern books a couple of days ago and did two on that first night. Here's the first one I did.
Biker's "Beret"
designed by Denise Black
Pattern from: 24 Hour Crochet Projects by Rita Weiss
Yarn recommended: worsted weight, Red Heart Super Saver
Yarn used: some easy care worsted weight acrylic in bulk sizes balls from Walmart in purple. The label disappeared after my younger daughter re-balled the yarn, but it might actually be Red Heart. I don't remember.
Hook: I (5.50mm)
Changes made: added an extra row of dc
This pattern is about as simple as they come - just rounds of dc. The original pattern called for 11 rounds of dc, followed by a round of sc. I tried it on before doing the sc round, and it seemed a touch too short, so I added one more round before finishing it off.
Quick to make up - about an hour - and comfortably snug. This cap will be perfect for cooler days, and with the machine wash and dry acrylic, there's no need to be fussy about it.
Labels:
blitz,
crochet,
crochet - hat
Friday, September 11, 2009
An item a day blitz
It's been a while since I've posted, but the time hasn't been wasted. I've slowed down on the last two projects I wrote about in favour of a rash of crocheting.
Since we're finally going out to visit our families over the Thanksgiving Weekend (for my readers outside of Canada, that's the second Monday of October), I've decided to make gifts for everyone. That translates into about 20 items. I've got one larger item - a blanket done in chunky yarn and a 9mm hook to work up quickly - about half way done.
For the rest, my goal is to finish a project a day. I've got a stack of pattern books for quick projects I picked up on Wednesday. That night, I worked up two hats. Last night, I made a choker with matching earrings. I'm hoping to get my kids to model them for photos later today so I can start posting them.
Because these are so quick, I won't be posting the step-by-step process in photos, but I will detail where I got the patterns from, any changes made, etc. with each photo.
I may not be able to post a photo every night, but I am shooting to get some up at least every 2 or three days.
Wish me luck! *L*
Subscribe to:
Posts (Atom)